← User guide

Step-by-step work manual with screenshots

Choose your role and task. Follow the screenshots for sign-up, translation, video visits, messages and management.

Manual updated · · v0.4.70

Find by role

All staff and doctors →
Sign in · My settings · Photo · Security · Screen lock
Referring hospital administrator →
Prepare patients, consent and records · Send a request · Ask for a session · Share results
Korean hospital administrator →
Answer referrals · Assign doctors · Translate · Confirm sessions · Manage the hospital and credits
Korean doctor →
Accept an assignment · Review records · Hold the session · Confirm opinions and summaries
Referring hospital doctor →
Check records · Join the session · Write memos · Send messages
Patients and guardians who enter through a consultation link →
Open the link you received · Join video and interpretation
Patients who sign up on their own →
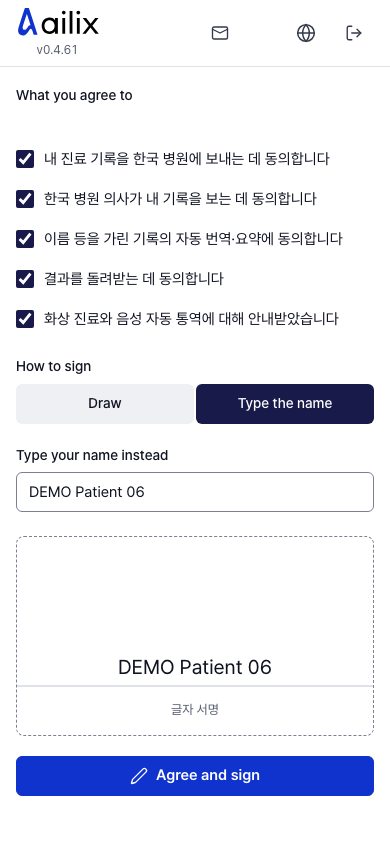
Your details and consent · Upload records · Choose a hospital · Results and messages
Service administrator →
Sign-up and profile review · Account support · Top-ups and prices · Operations checks

Read this first

  • Hospital staff and doctors sign in with their own accounts. Patients sign up on their own or enter through a consultation link from the hospital.
  • Before two hospitals can work together, the sign-up must be approved and the pair must be connected. To send a referral to several hospitals, you also use the hospital finder.
  • Get the patient's consent before you send any records. Korean hospitals should check their credits for translation and sessions.
  • For a video session, check your camera, microphone and internet. Join from a quiet place.

We took these screenshots of the real service with a made-up hospital and patient. The names and records in the photos and videos are examples.

1. Access and My settings

Referring hospital administrator · Korean hospital administrator

Apply to sign up your hospital

Home page → Sign up → Hospital
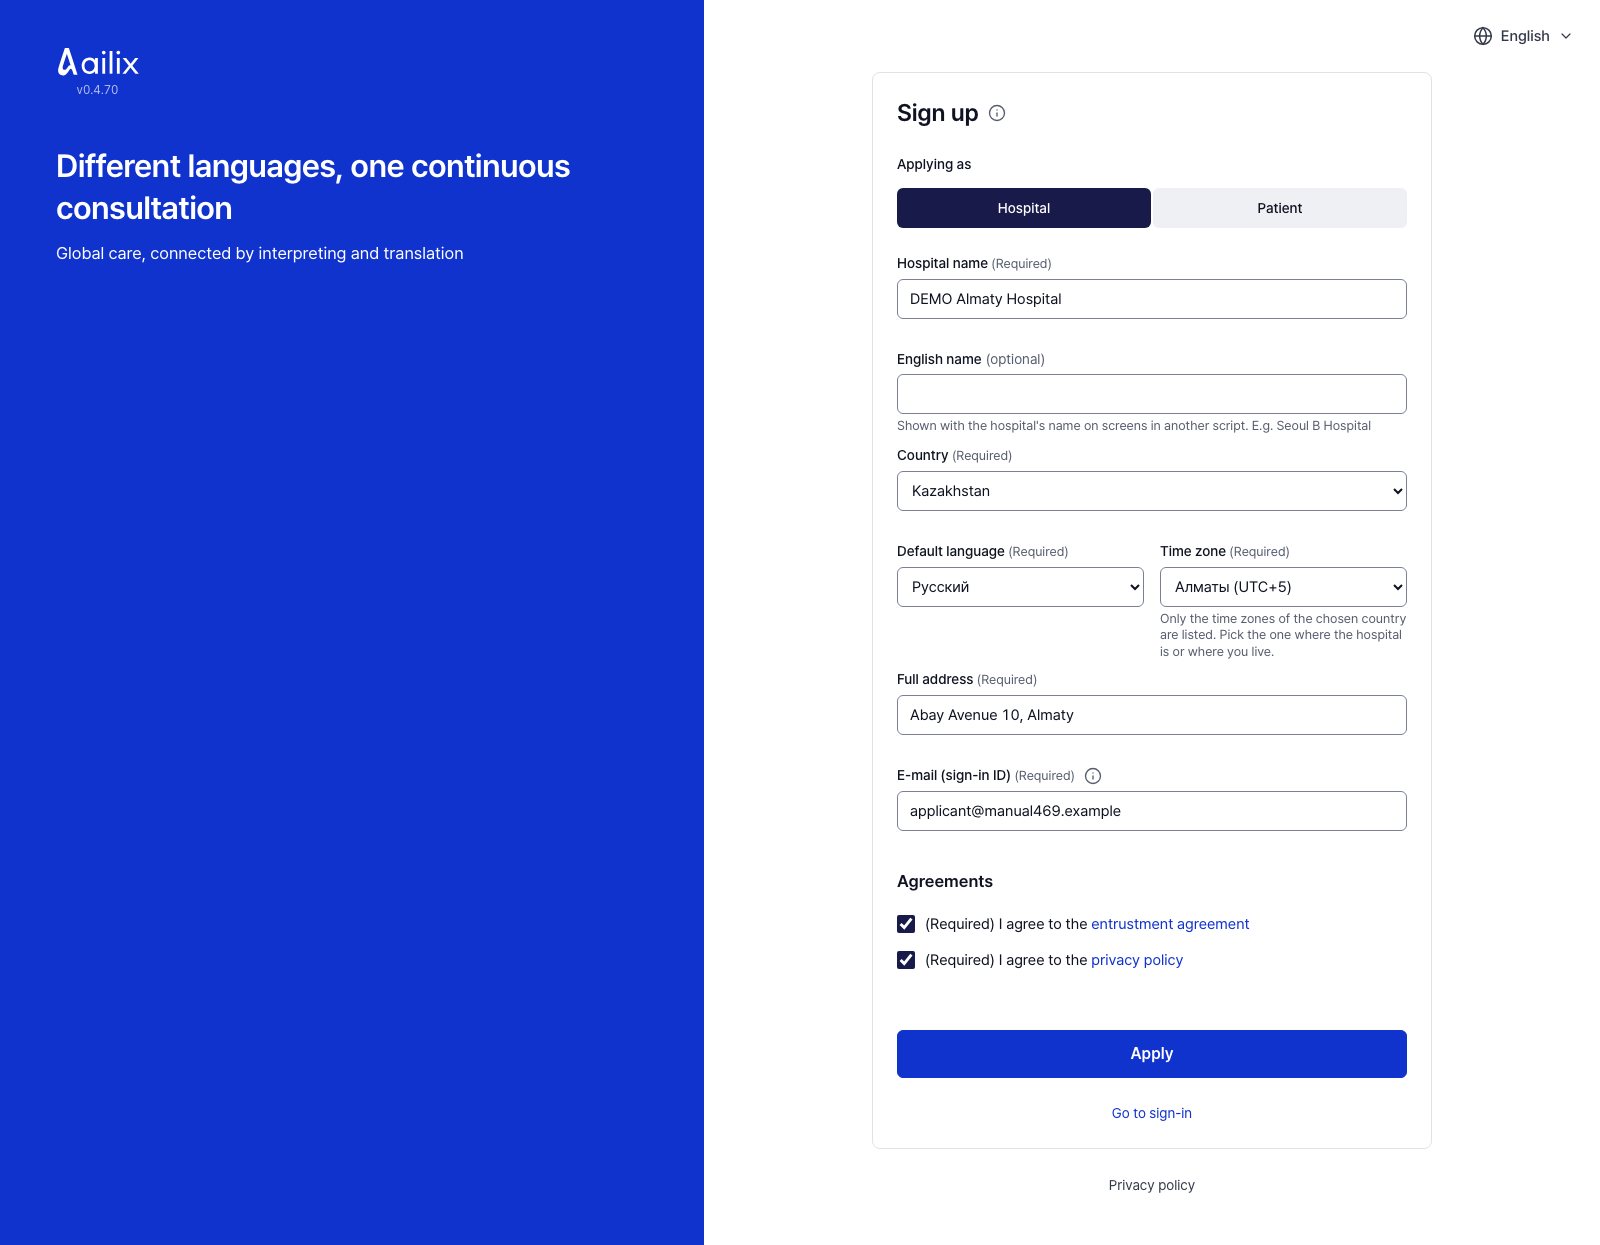
Referring hospital administrator · Apply to sign up your hospital
View larger
  1. Enter the hospital name, country and address, the default language and time zone, and the email you will use to sign in.
  2. Open and read the documents, agree, and apply. Open the link in the email and click Finish signing up.
  3. For a Korean hospital, open “Hospital verification” on the status page and submit the evidence. Referring hospitals wait for the review result.
  4. Check the result under Application status. When you are approved, sign in with the invitation email you receive.

Check before you finishYou cannot start hospital work before the review is done. While you wait, you can use Withdraw application.
Korean hospital administrator

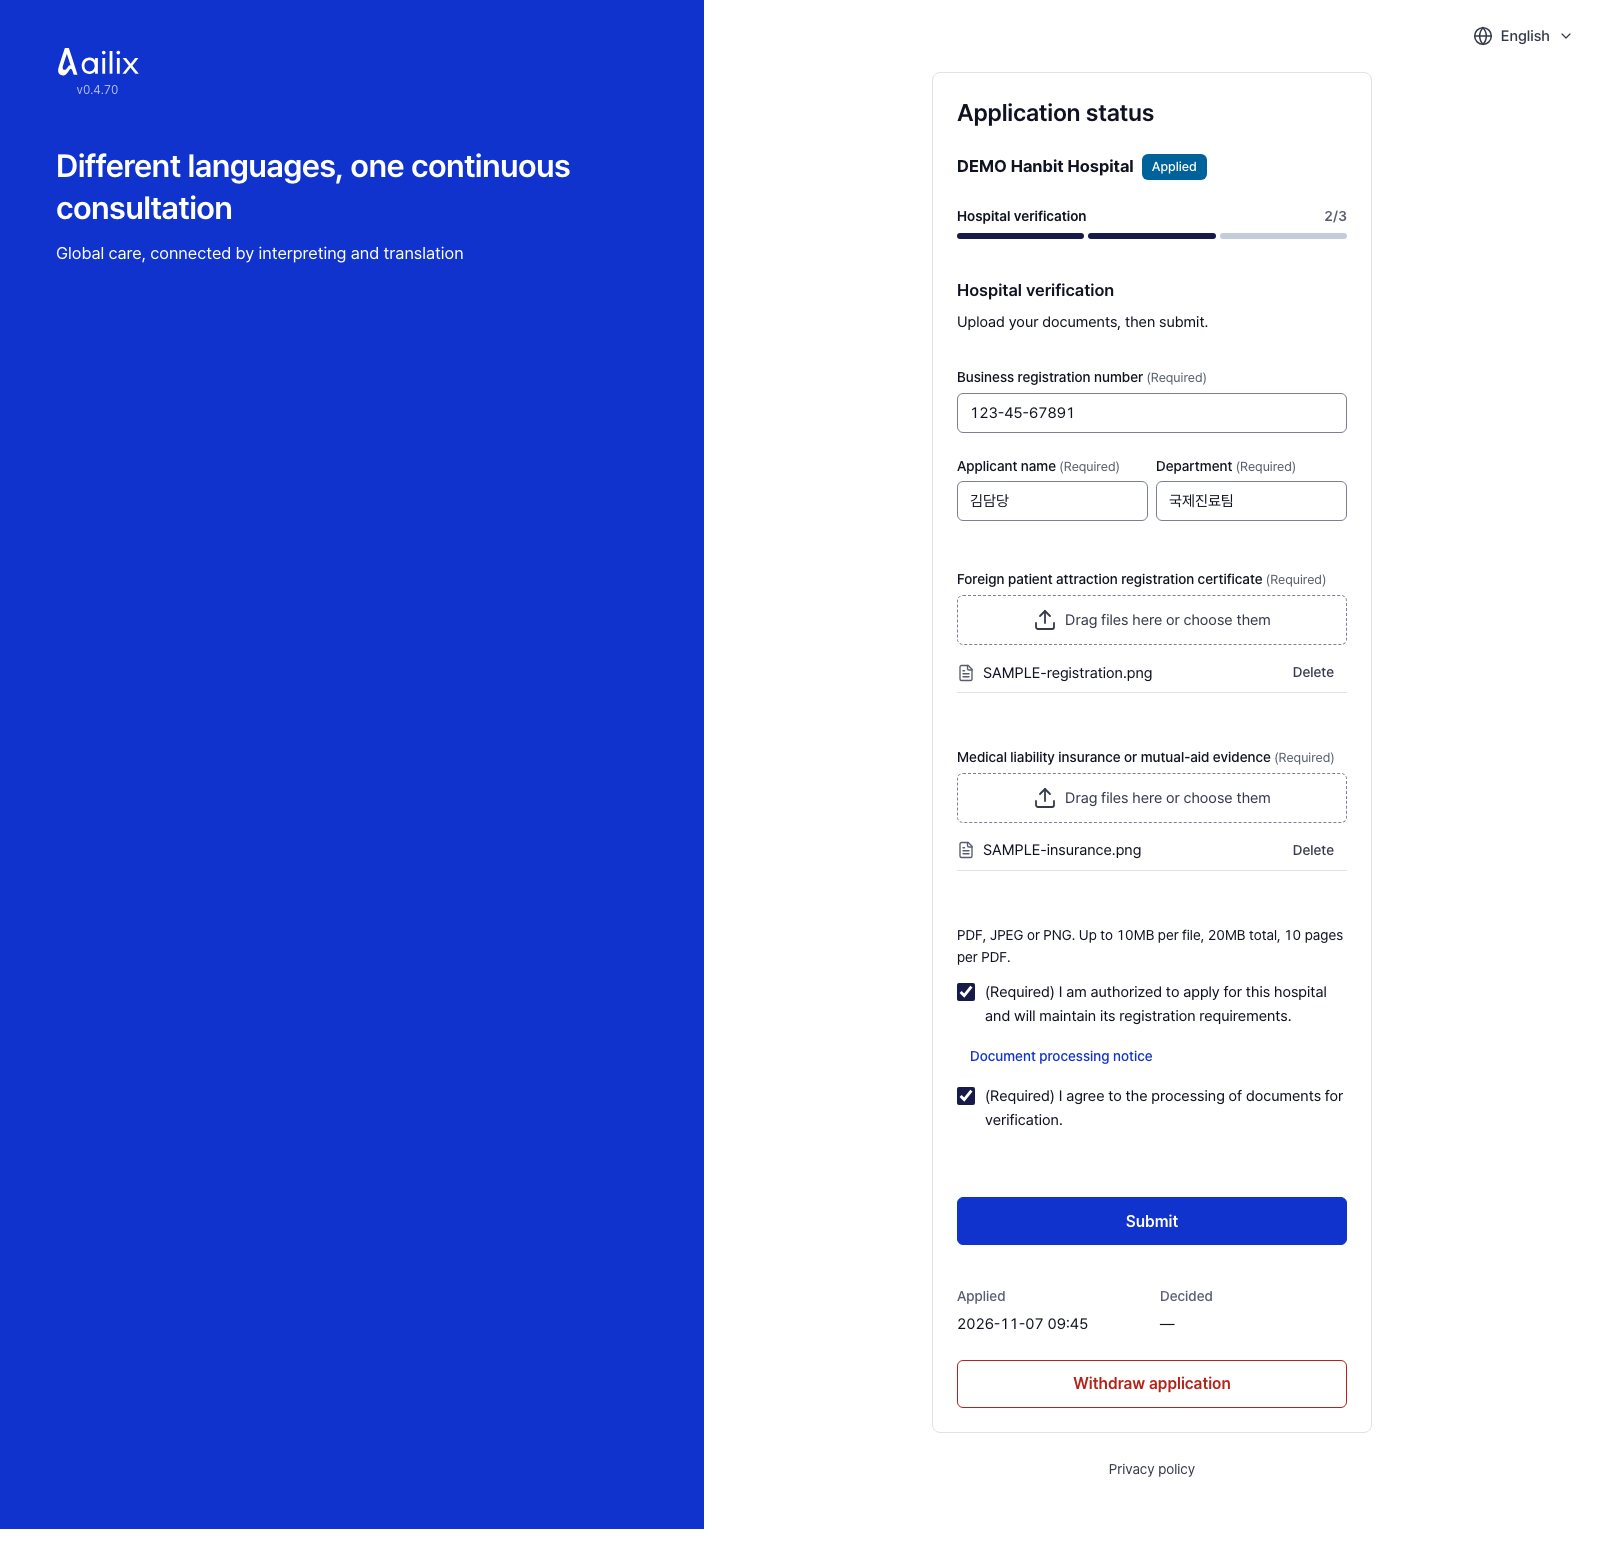
Submit registration and insurance evidence

Application status → Hospital verification

Korean hospital administrator · Submit registration and insurance evidence
View larger
  1. After confirming your email, open the application status. Enter the 10-digit business number, applicant name and department.
  2. Upload the foreign-patient attraction registration certificate and current medical liability insurance or mutual-aid evidence. Include policy endorsements.
  3. PDF, JPEG or PNG. Up to 10MB per file, 20MB total, 10 pages per PDF.
  4. Read and confirm your authority to apply and the document-processing consent, then select “Submit”.

Check before you finishThe policy must cover foreign patients. Check the annual aggregate limit: at least KRW 100 million for clinics and hospitals, or KRW 200 million for general hospitals. All required fields, consents and both evidence types are needed to submit.

Korean hospital administrator

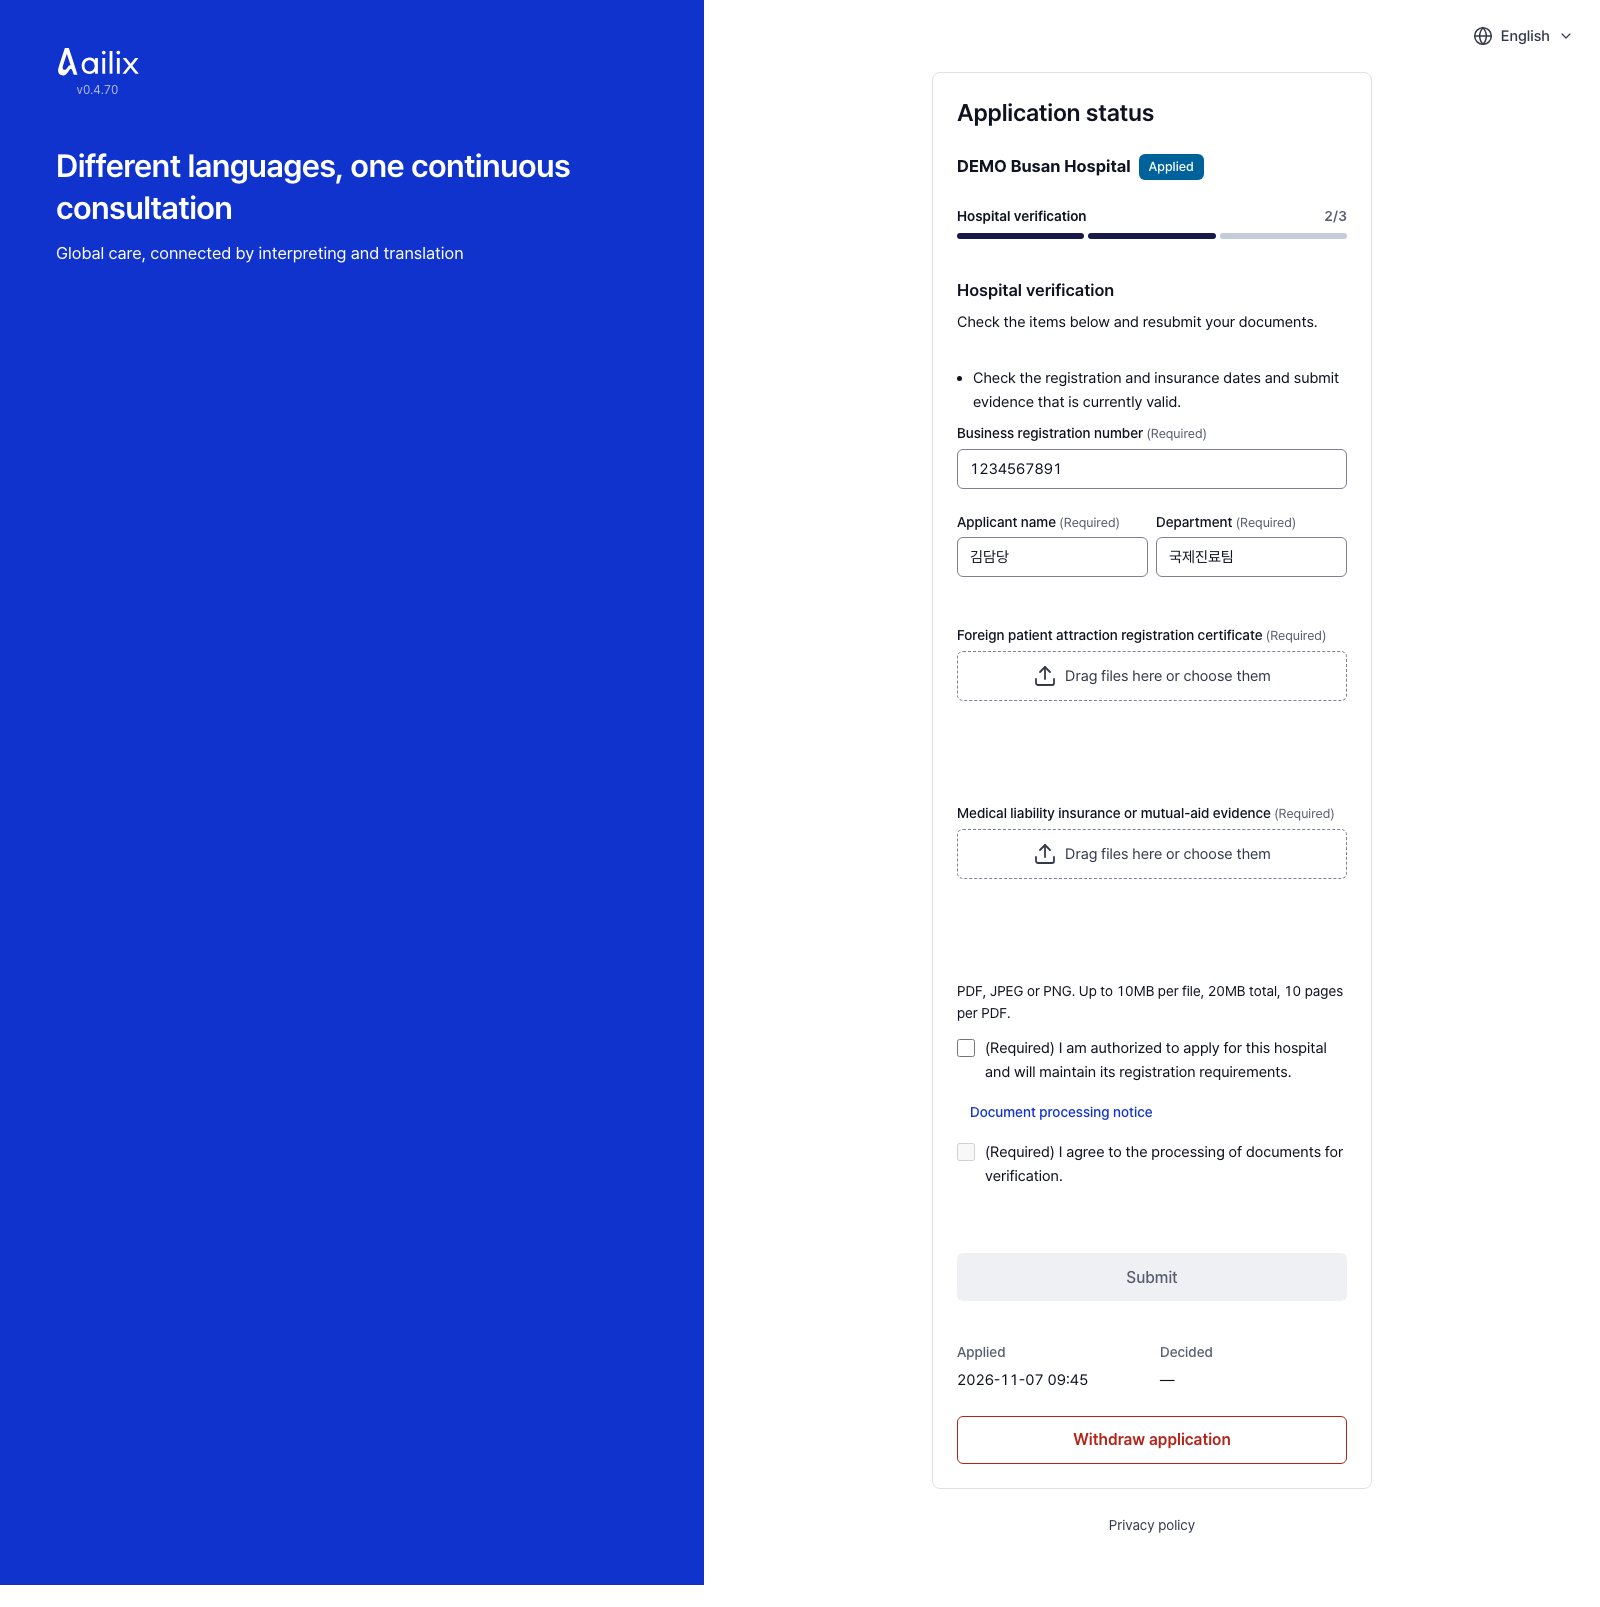
Check the result and correct documents

Application status → Hospital verification

Korean hospital administrator · Check the result and correct documents
View larger
  1. Keep the status link in your receipt email. Wait while verification is in progress.
  2. If corrections are requested, read the reasons and replace the documents. Confirm the consents and select “Submit” again.
  3. After approval, sign in using the invitation email. If the registry check rejects the application as ineligible, correct the official registration information before applying again.

Check before you finishResults appear on the page and by email. Lookup or reading failures are retried separately from confirmed ineligibility. You may withdraw before a decision.

All staff and doctors · Referring hospital administrator · Korean hospital administrator · Korean doctor · Referring hospital doctor · Service administrator · Patients who sign up on their own

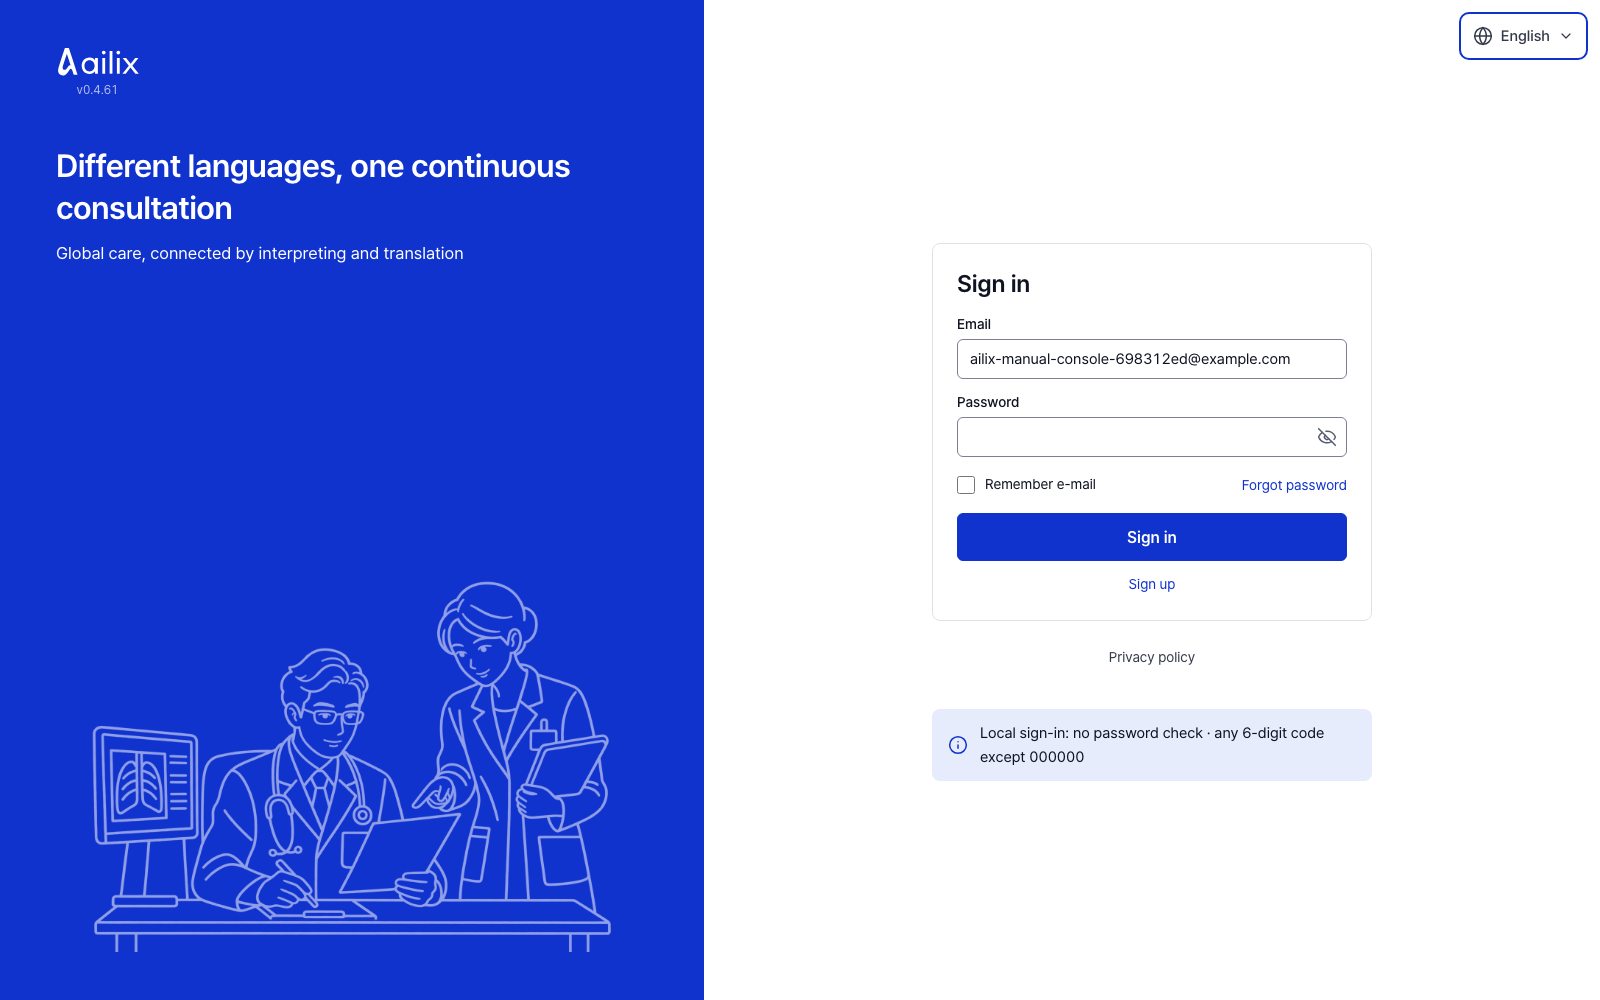
Sign in to your account

Home page → Sign in

All staff and doctors · Sign in to your account
View larger
  1. Enter your email and password. If this is your first time, sign in with the temporary password from the invitation email and set a new password.
  2. Enter the 6-digit number shown in your authenticator app. The first time, set up the authenticator app with the QR code or key on the screen.
  3. If you forgot your password, click Forgot password. Use the code in the email to set a new password.

Check before you finishCheck that your name, hospital and role are correct. You can use the temporary password for 7 days after you receive it.

Referring hospital administrator · Korean hospital administrator · Korean doctor · Referring hospital doctor

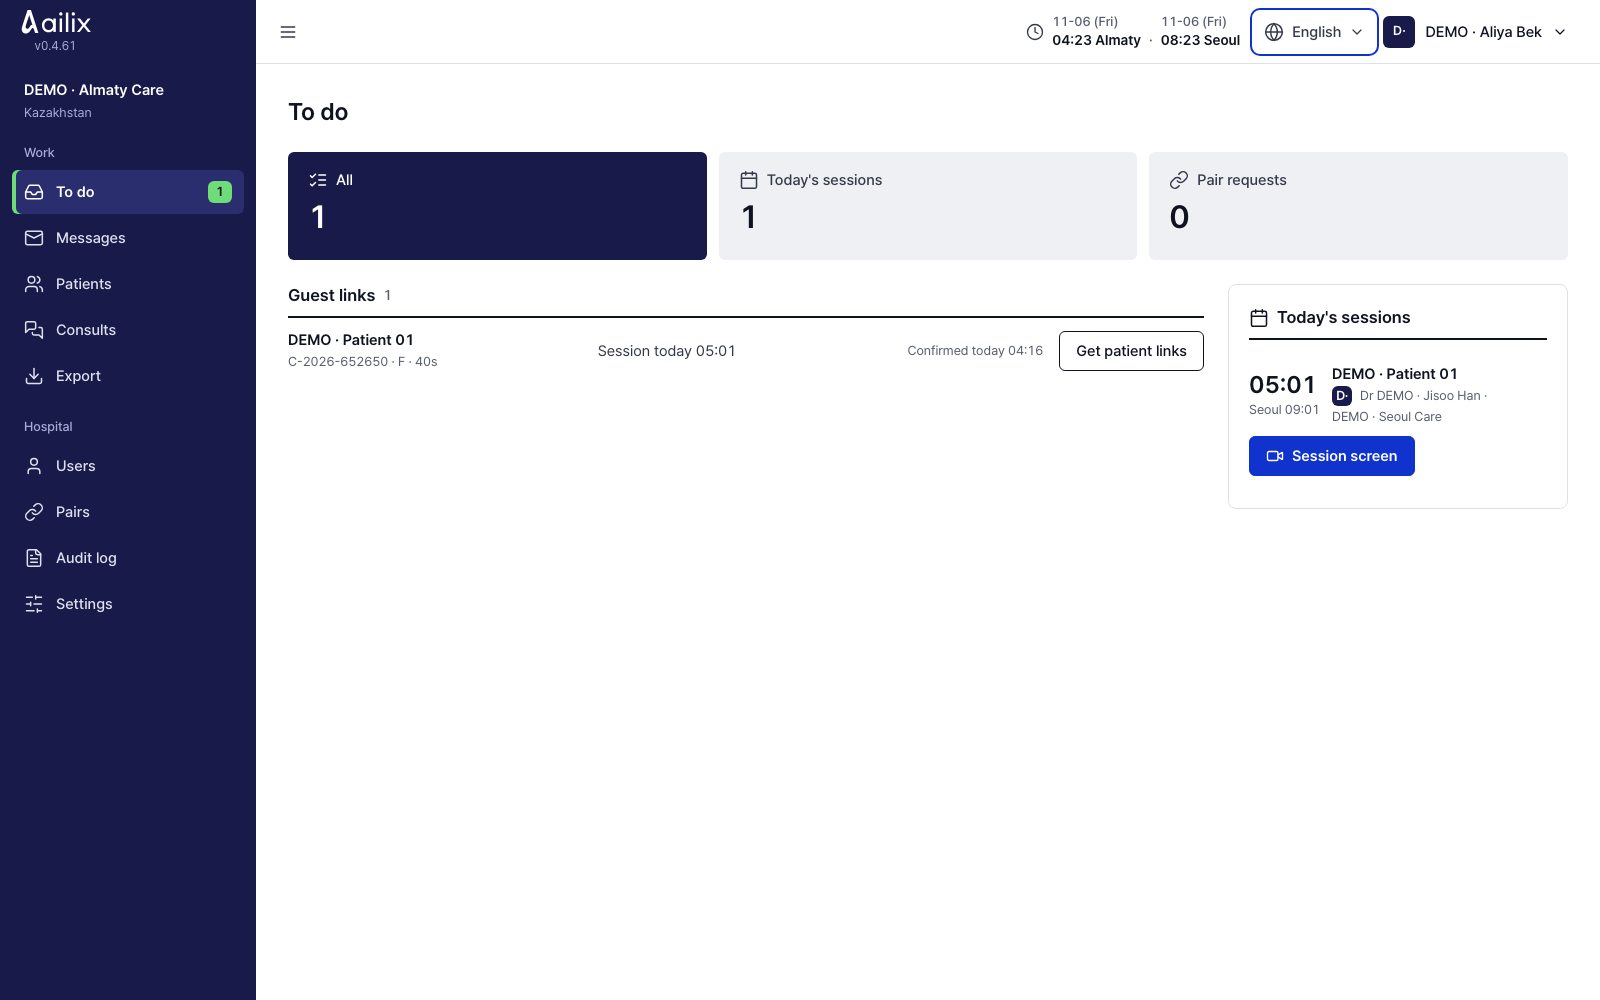
Find your turn under To do

Work → To do

Referring hospital administrator · Find your turn under To do
View larger
  1. Under To do, click an item to handle it. Things you can do now, such as new requests, assignments and answers, are collected here.
  2. The Waiting list below shows things where you wait for the other side to answer or pick a time. These are not counted in the to do number.

Check before you finishYour to do list differs for doctors and administrators, and for Korean and referring hospitals.

All staff and doctors · Referring hospital administrator · Korean hospital administrator · Korean doctor · Referring hospital doctor · Service administrator

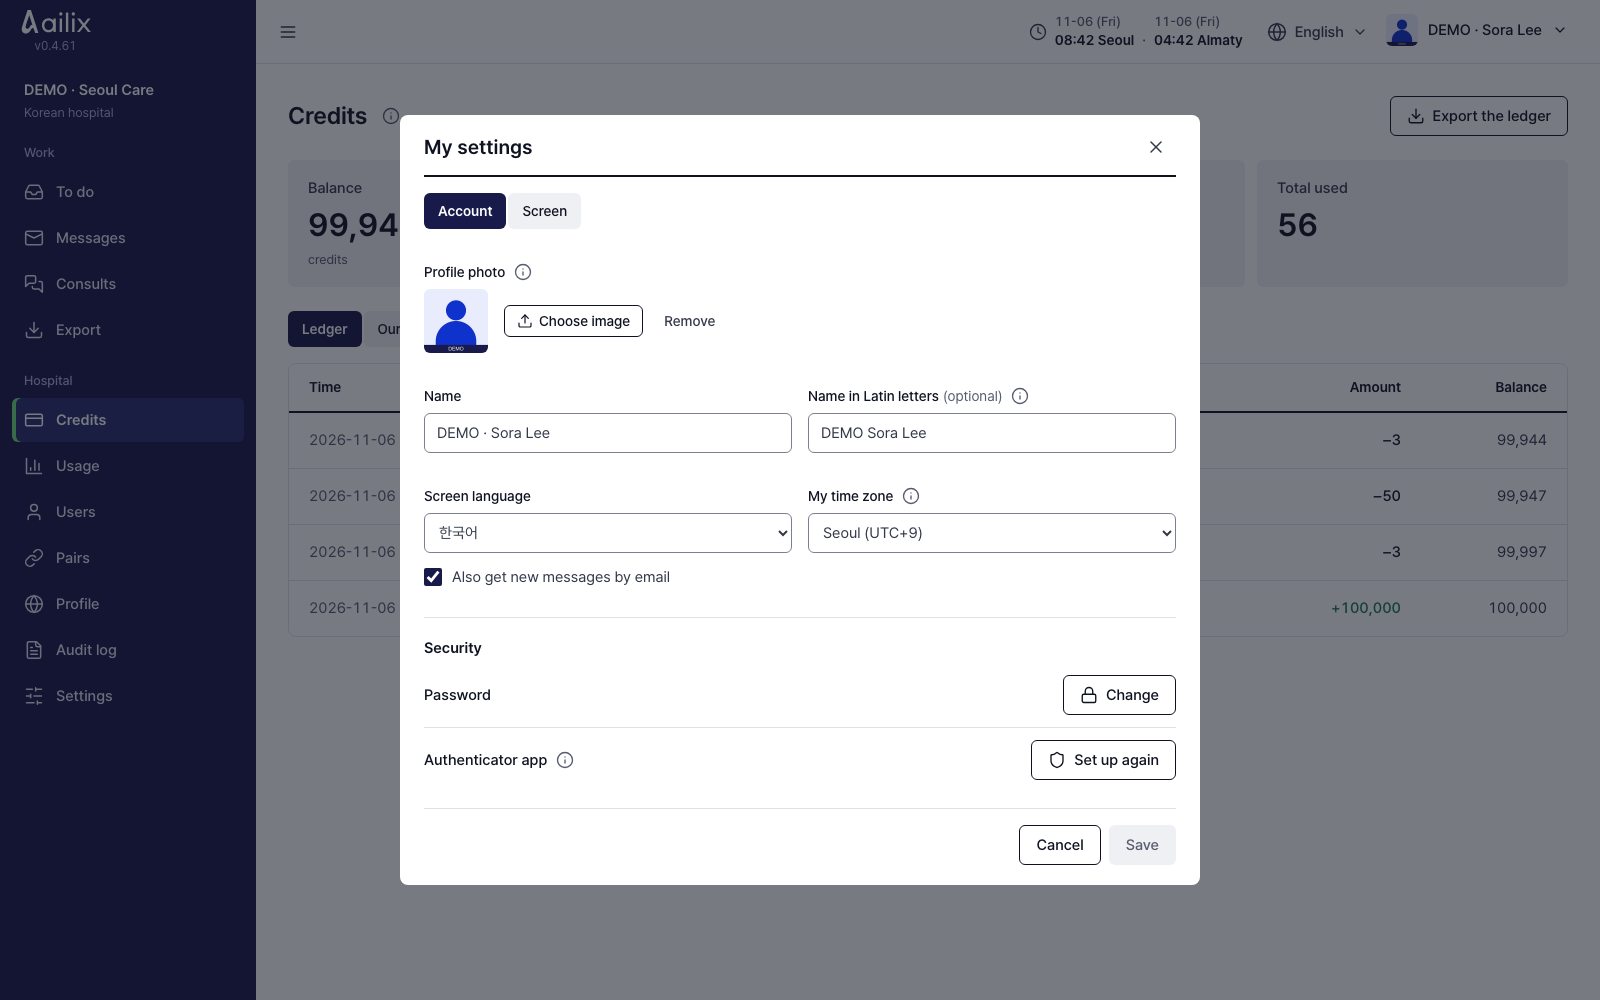
Set your name, language and time zone

Your name at the top right → My settings → Account

All staff and doctors · Set your name, language and time zone
View larger
  1. Enter your name and your English name if needed. Choose your Screen language and My time zone.
  2. Choose your setting for Also get new messages by email and click Save.

Check before you finishTimes appear in your own time zone. To change the default for the whole hospital, use Hospital settings.

All staff and doctors · Referring hospital administrator · Korean hospital administrator · Korean doctor · Referring hospital doctor · Service administrator

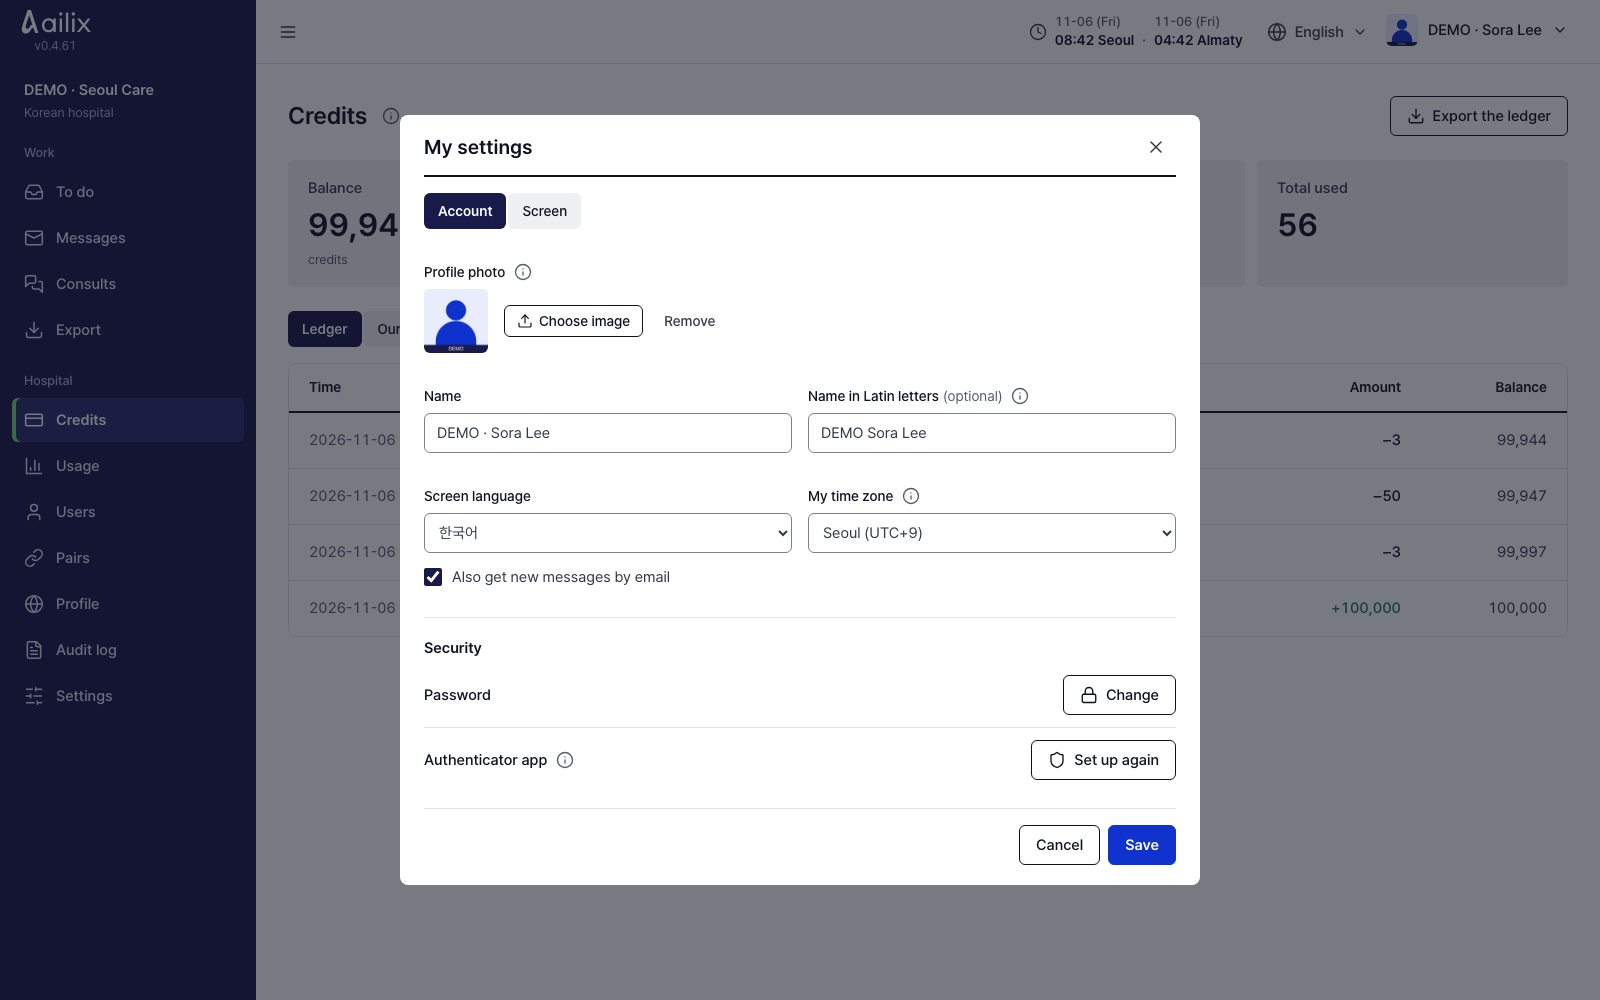
Add or remove your profile photo

My settings → Account → Profile photo

All staff and doctors · Add or remove your profile photo
View larger
  1. Click Choose image and choose a JPEG, PNG or WebP photo. Check how it looks cropped to a centered square.
  2. Click Save to keep it. To remove it, click Remove next to the photo, then click Save again.

Check before you finishYour photo appears next to your name and in your video tile when your camera is off. Patients who sign up on their own do not set a photo.

All staff and doctors · Referring hospital administrator · Korean hospital administrator · Korean doctor · Referring hospital doctor · Service administrator

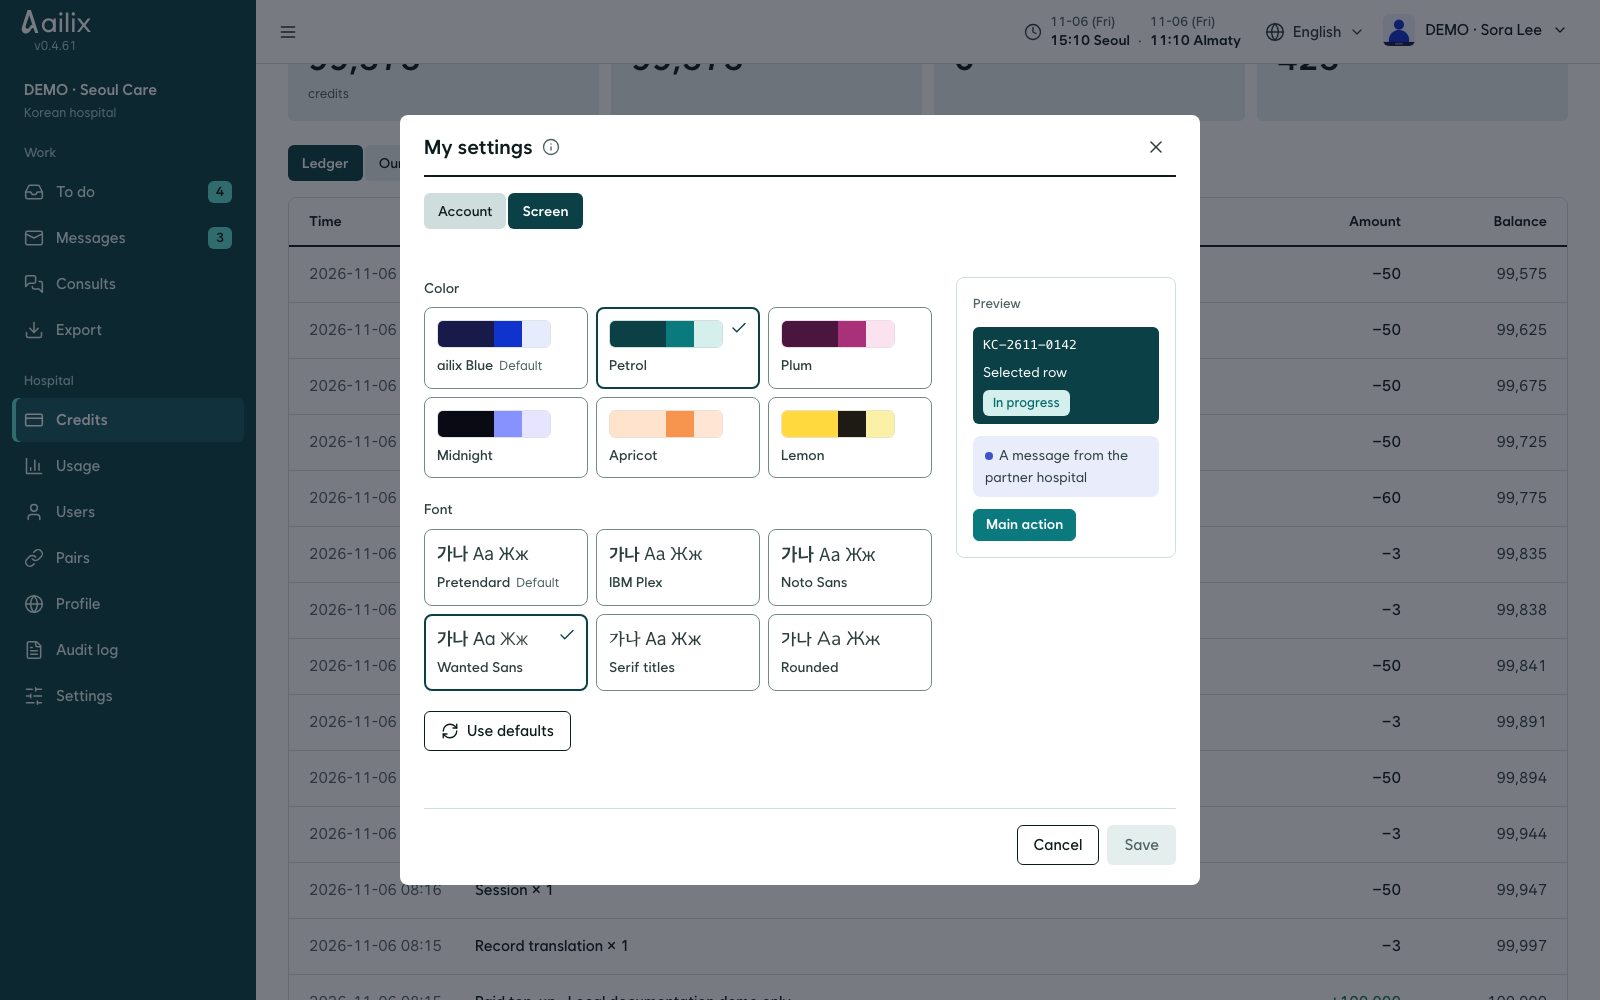
Change screen colors and fonts

My settings → Screen

All staff and doctors · Change screen colors and fonts
View larger
  1. Choose a color and a font separately. Watch how the whole screen changes.
  2. If you like it, click Save. If you cancel, the screen goes back to how it was. Use defaults picks the default color and font.

Check before you finishIt is saved to your account. You can choose the color and the font separately.

All staff and doctors · Referring hospital administrator · Korean hospital administrator · Korean doctor · Referring hospital doctor · Service administrator

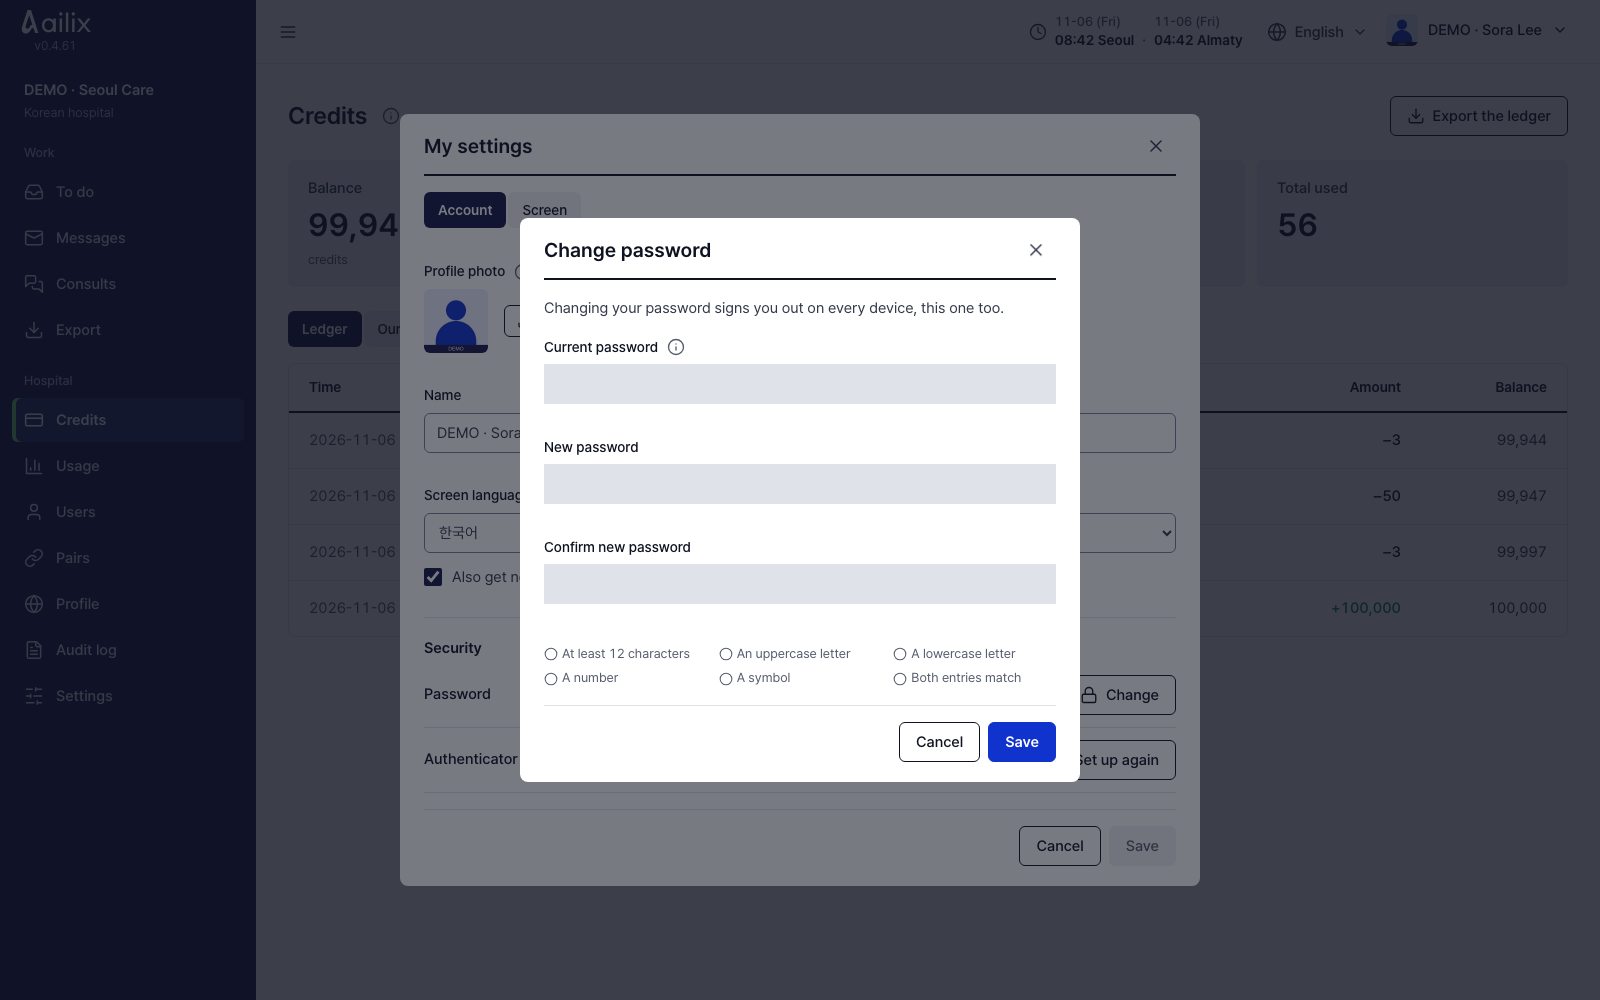
Change your password

My settings → Account → Security → Password → Change

All staff and doctors · Change your password
View larger
  1. Enter your current password and a new password. Use at least 12 characters, with uppercase and lowercase English letters, numbers and special characters.
  2. Enter the same value in the confirm box and click Save.

Check before you finishYou are signed out on all devices. Sign in again with the new password.

All staff and doctors · Referring hospital administrator · Korean hospital administrator · Korean doctor · Referring hospital doctor · Service administrator

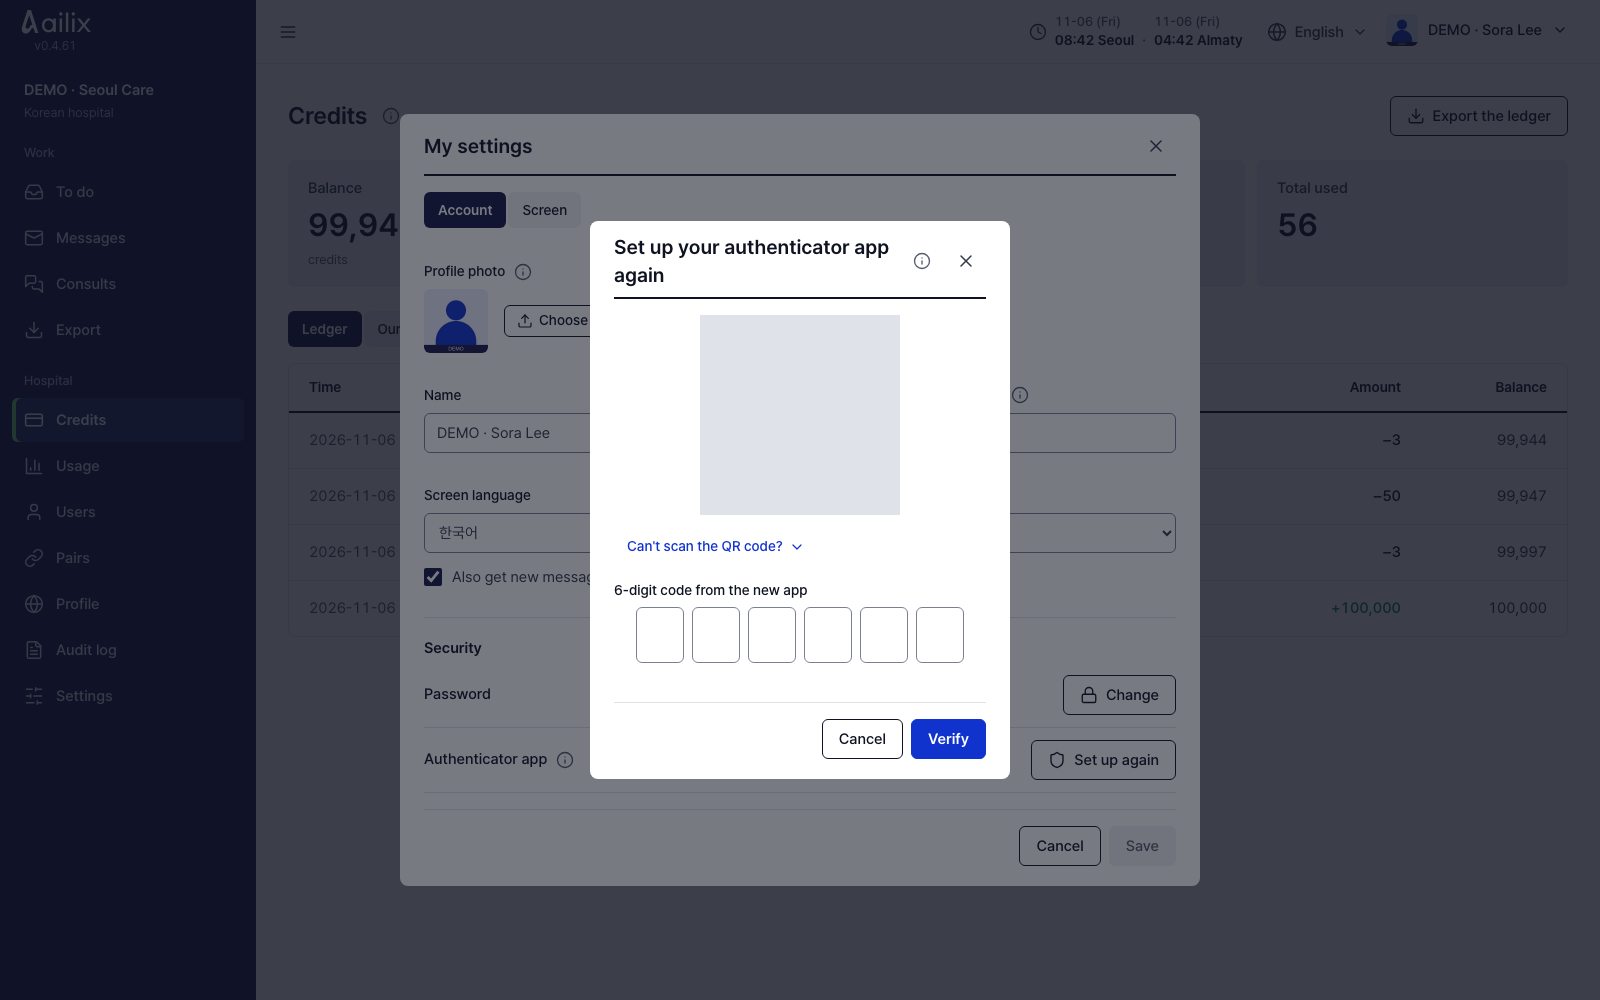
Set up the authenticator app on a new phone

My settings → Account → Security → Authenticator app → Set up again

All staff and doctors · Set up the authenticator app on a new phone
View larger
  1. While you are still signed in on your computer, click Set up again. Scan the QR code with the authenticator app on your new phone, or enter the key.
  2. Enter the 6-digit number shown in the app and click Verify.

Check before you finishIf you cannot sign in, ask your hospital administrator for Reset authenticator app. A lead administrator should ask the service administrator.

All staff and doctors · Referring hospital administrator · Korean hospital administrator · Korean doctor · Referring hospital doctor · Service administrator · Patients who sign up on their own

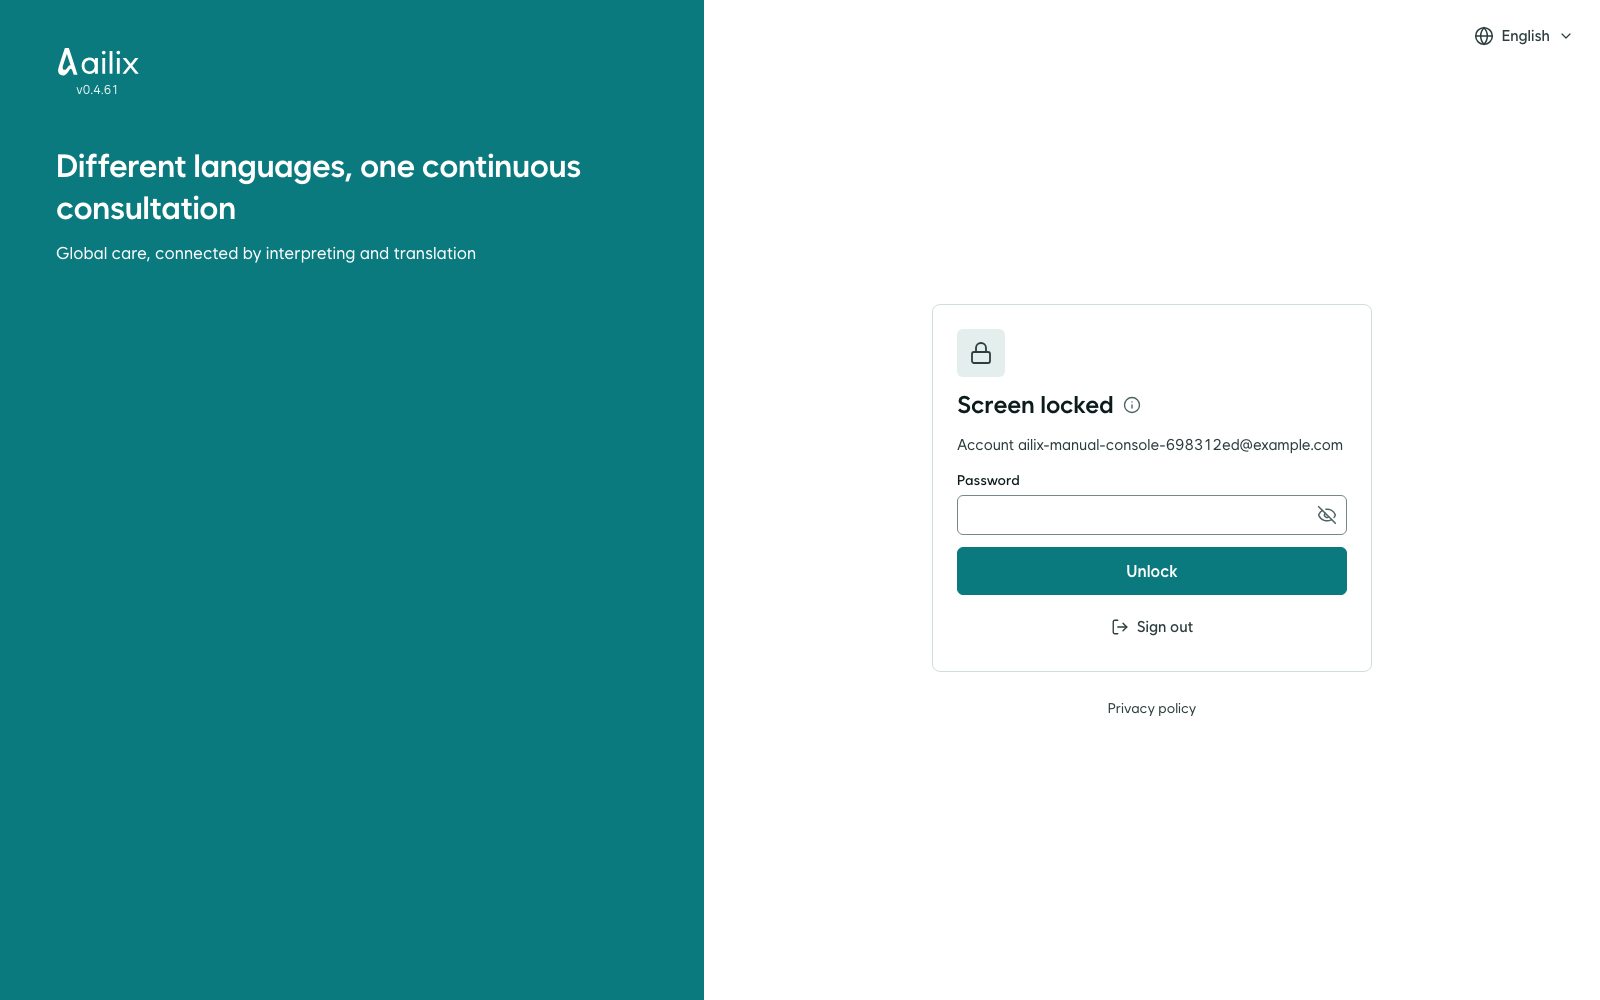
Screen locking and unlocking

Staff, doctors and administrators: your name at the top right (profile picture on phones) → Lock screen · Patient accounts: automatic lock after 30 minutes without activity

All staff and doctors · Screen locking and unlocking
View larger
  1. Staff, doctors and service administrators: open your name at the top right (your profile picture on phones), then click Lock screen below My settings. During a consultation, mute your microphone first. The work screen is covered and cannot be used.
  2. The screen also locks automatically after 30 minutes without activity, including patient account screens. Automatic locking is paused during an active consultation.
  3. On Screen locked, check that the account shown is yours and enter your password.
  4. Click Unlock. If asked, enter the 6-digit code from your authenticator app. An incorrect password or code will not unlock the screen.
  5. When the work screen returns, check what you were writing and continue.
  6. If someone else will use the computer, click Sign out on the lock screen. The next person must sign in with their own account.

Check before you finishLocking alone keeps what you were writing, so you can resume after unlocking with the same account. Reloading does not remove the lock. Locking the screen does not save your work or disconnect video or audio calls.

2. Hospital and account management

Korean hospital administrator · Referring hospital administrator

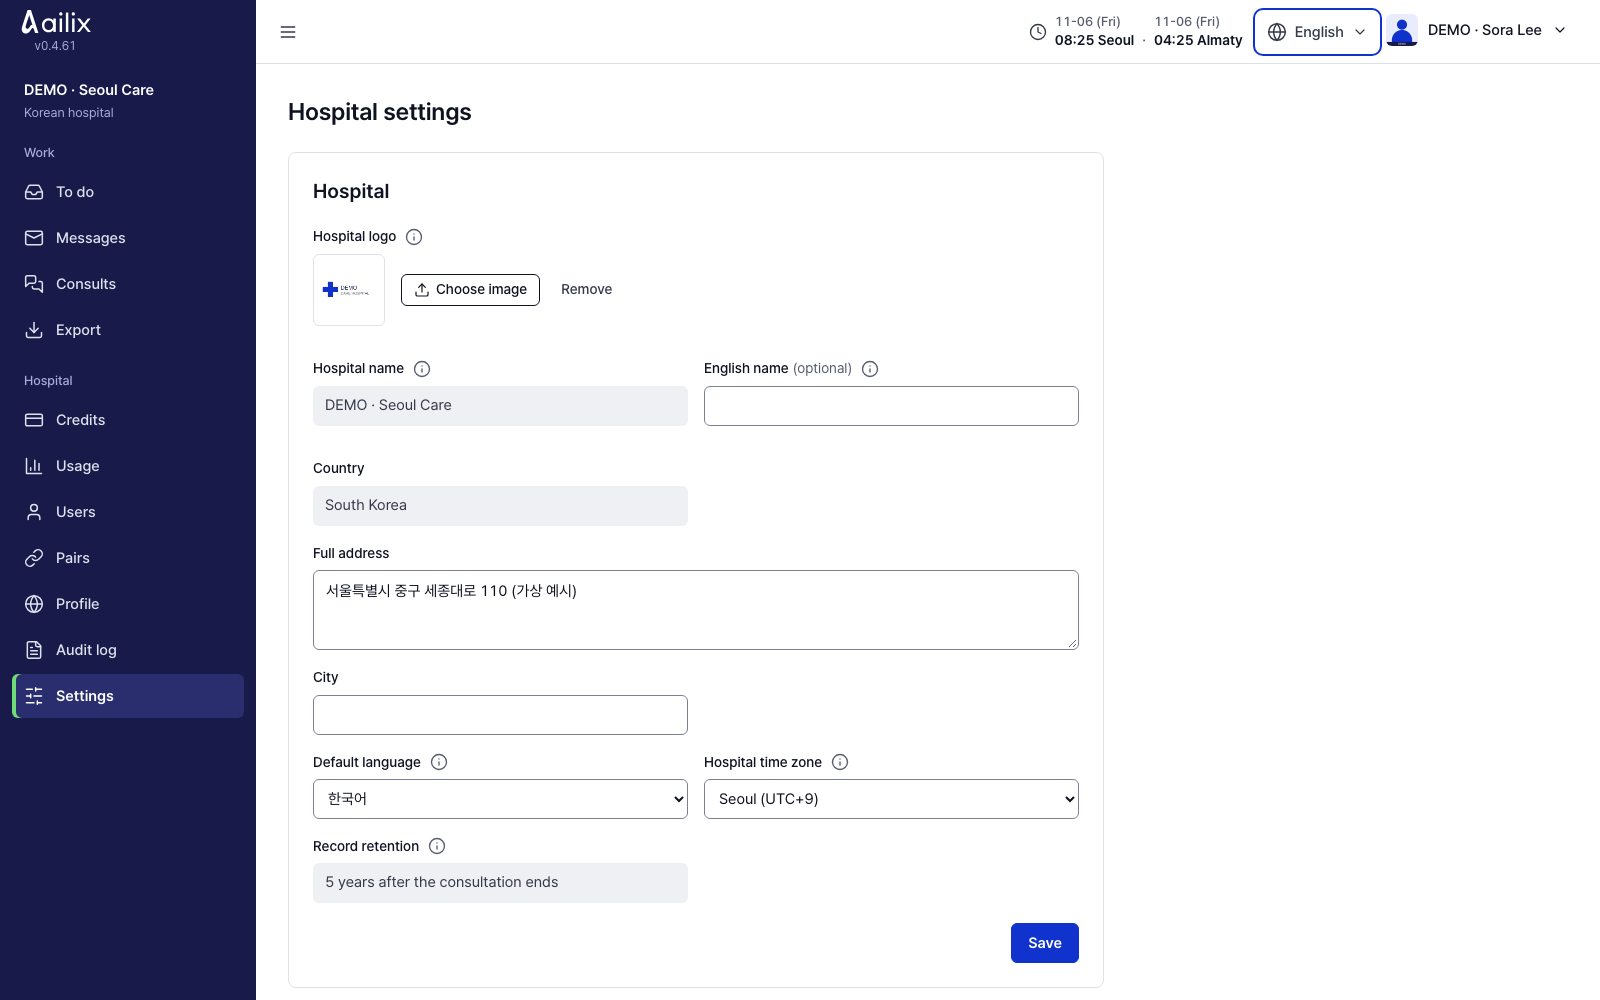
Change the hospital address, language and time zone

Hospital → Settings

Korean hospital administrator · Change the hospital address, language and time zone
View larger
  1. Under Hospital settings, fix the address, city and English name.
  2. Choose the default language and the hospital time zone, then click Save.

Check before you finishYou cannot change the hospital name, country or record retention period on this screen. If you need a change, contact the service administrator.

Korean hospital administrator

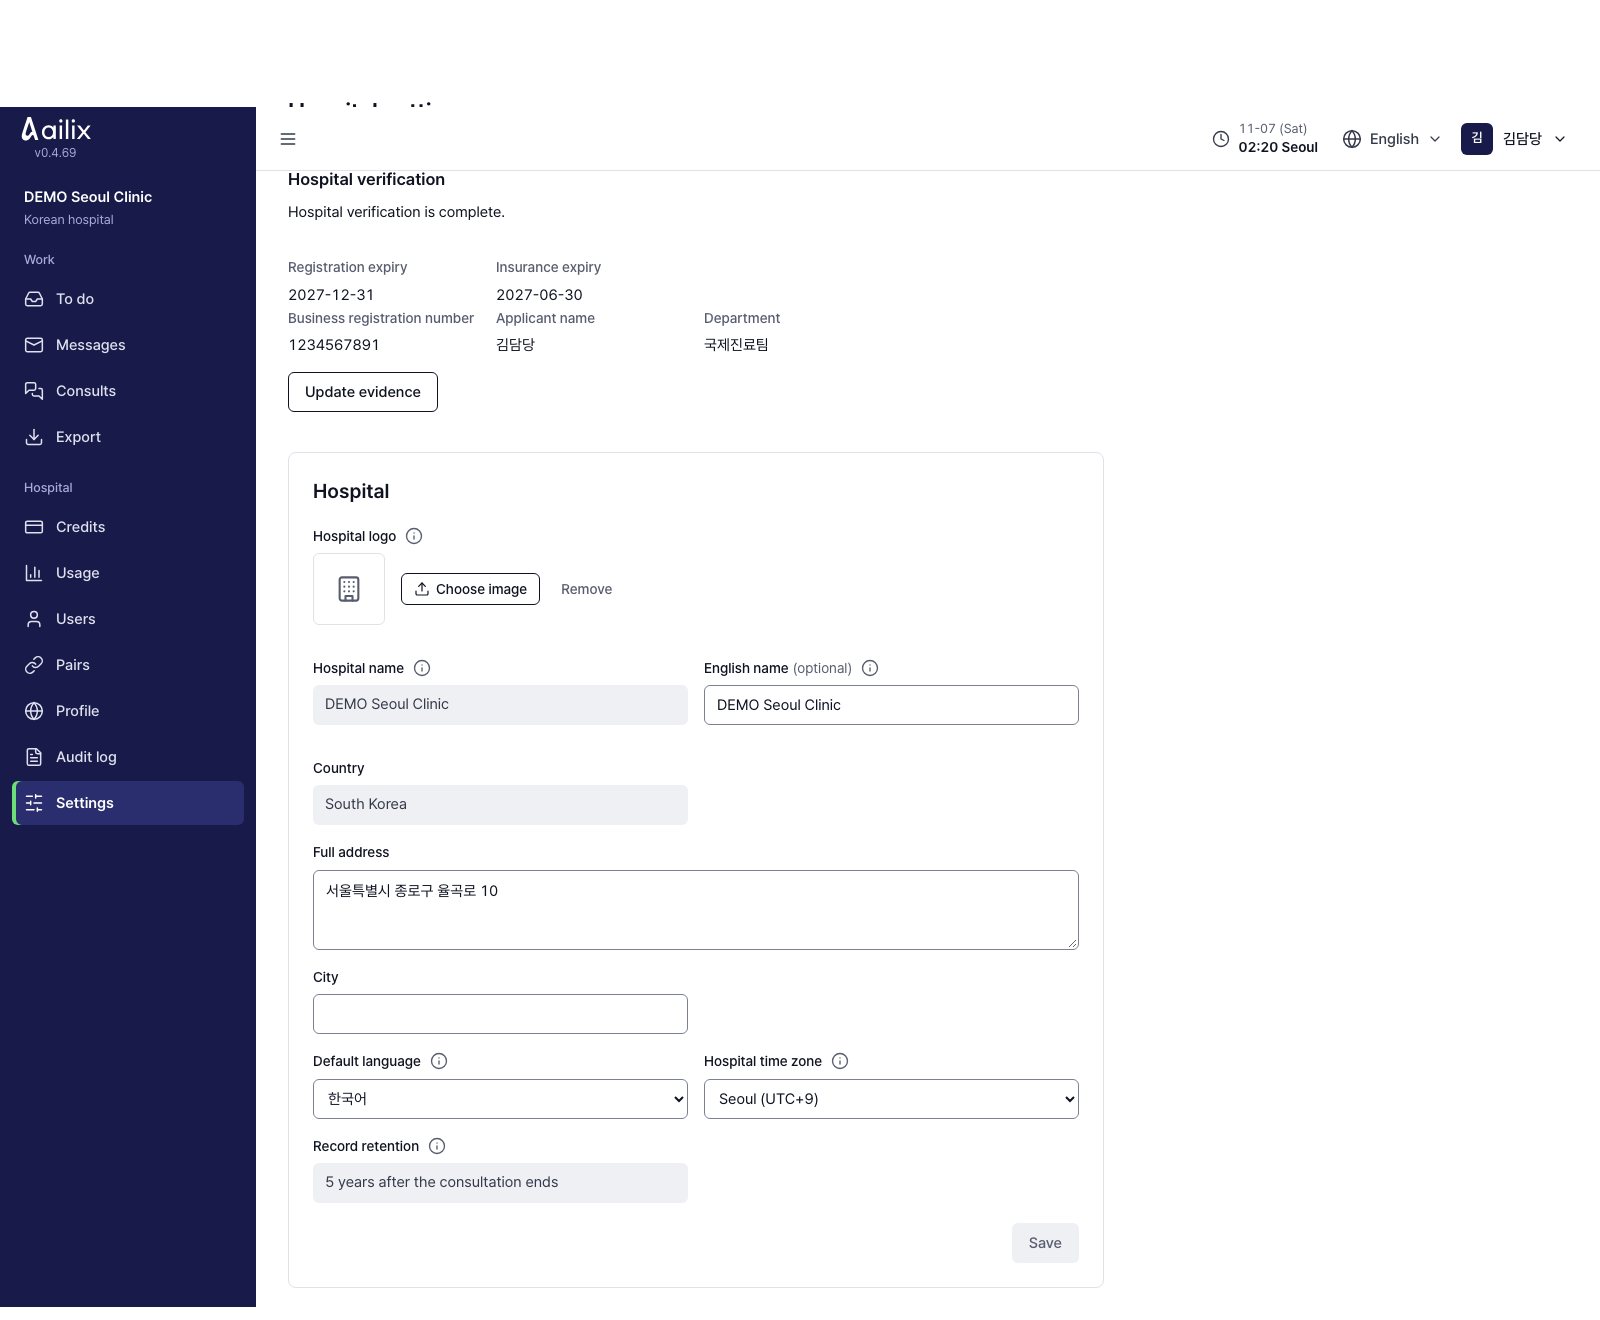
Renew evidence before it expires

Hospital → Settings → Hospital verification → Update evidence

Korean hospital administrator · Renew evidence before it expires
View larger
  1. In hospital settings, check “Hospital verification” for registration and insurance expiry dates and intake status.
  2. Select “Update evidence”, upload renewed evidence, confirm the consents and submit.
  3. Return to settings to check the new dates and result. An already-approved business number cannot be changed.

Check before you finishThis task is for Korean hospitals admitted through automatic verification. Intake continues during renewal while the previous verification remains valid. Expiry, ineligible registration or a prolonged verification outage can restrict new referrals. Existing records and ongoing consultations remain available.

Korean hospital administrator · Referring hospital administrator

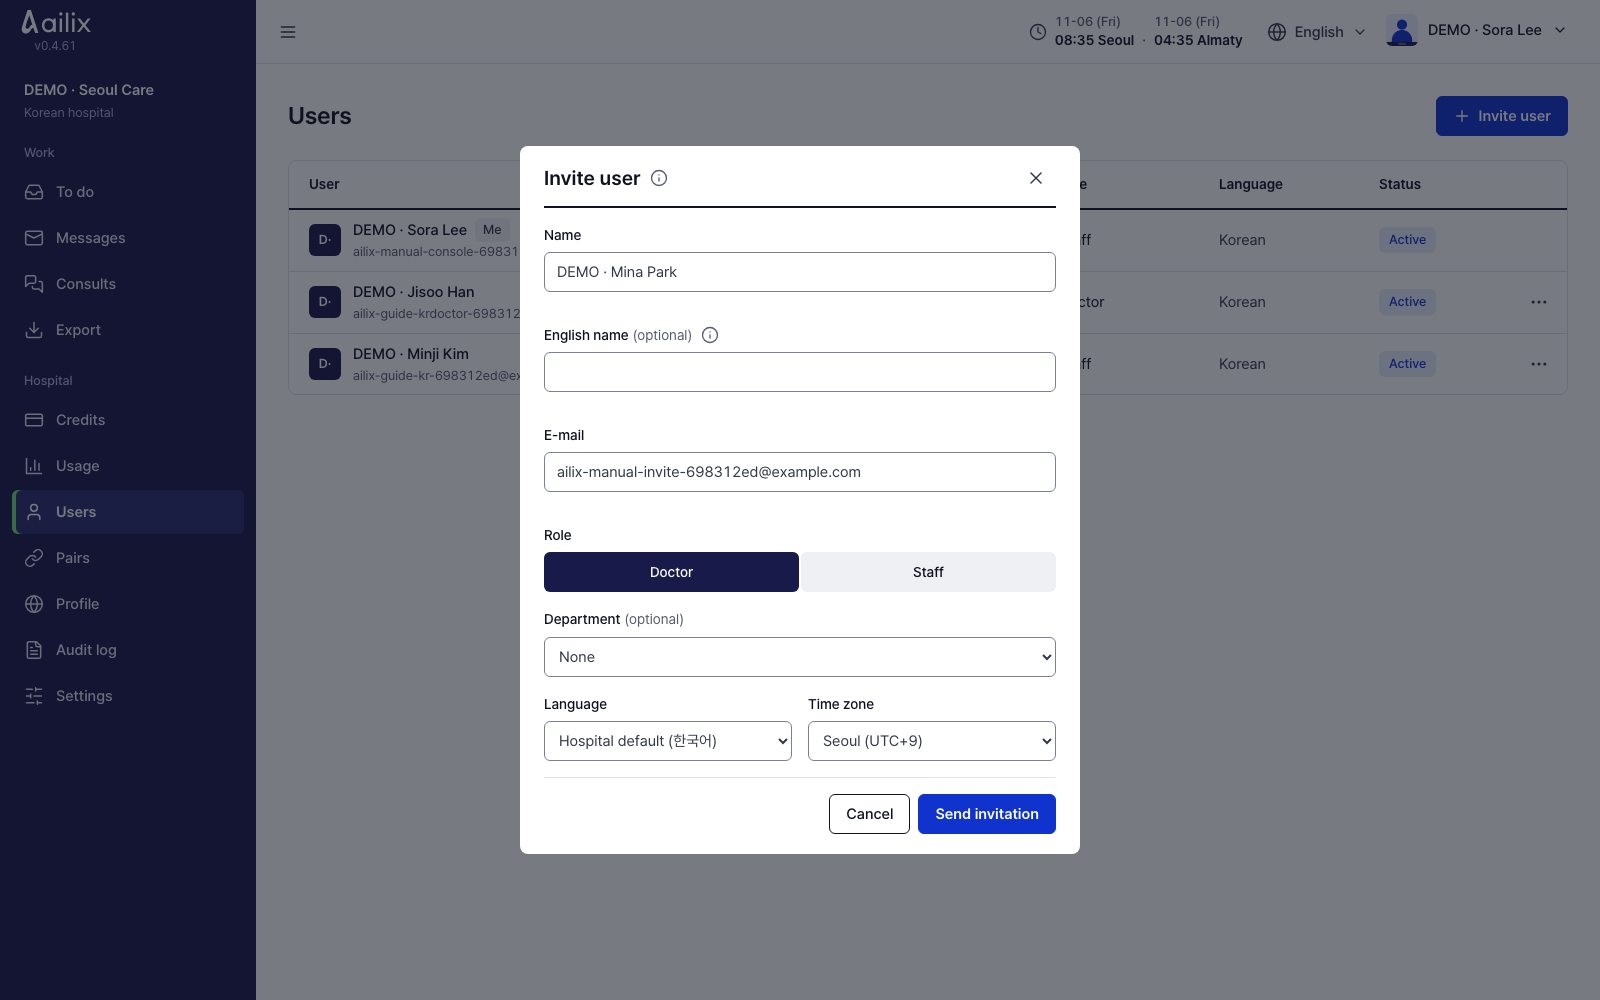
Invite staff and doctors

Hospital → Users → Invite user

Korean hospital administrator · Invite staff and doctors
View larger
  1. Enter the name and email, and choose administrator or doctor. For a doctor, also choose the department.
  2. Check the language and time zone, then click Send invitation.

Check before you finishThe list shows Invited. The invited person finishes their first sign-in by email.

Korean hospital administrator · Referring hospital administrator

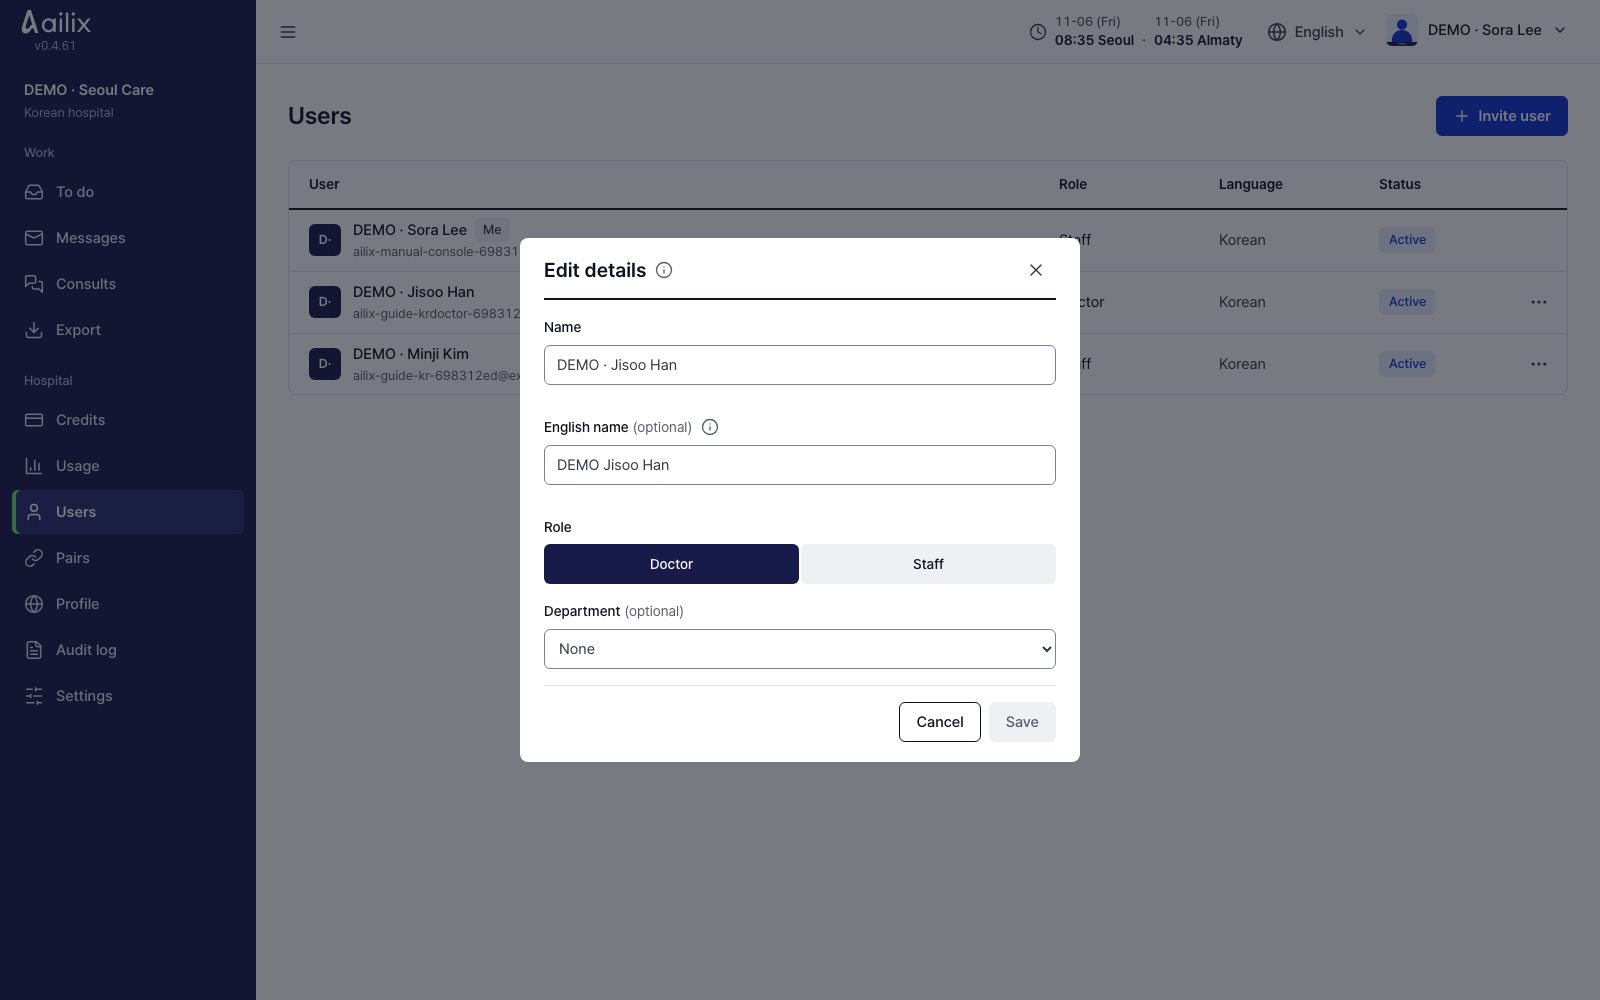
Manage user details and access

Hospital → Users → ⋯ next to the name

Korean hospital administrator · Manage user details and access
View larger
  1. Use Edit details to change the role or department. If someone did not get the email, choose Send invitation again. If you invited the wrong person, choose Cancel invitation.
  2. If someone lost their phone and cannot sign in, choose Reset authenticator app and write the reason.
  3. For someone who left, click Disable. To let them use the account again, click Enable. Remove an inappropriate photo with Remove photo.

Check before you finishIf you disable a user, they are signed out on all devices. Before you disable the last active administrator, prepare another administrator first.

Referring hospital administrator · Korean hospital administrator

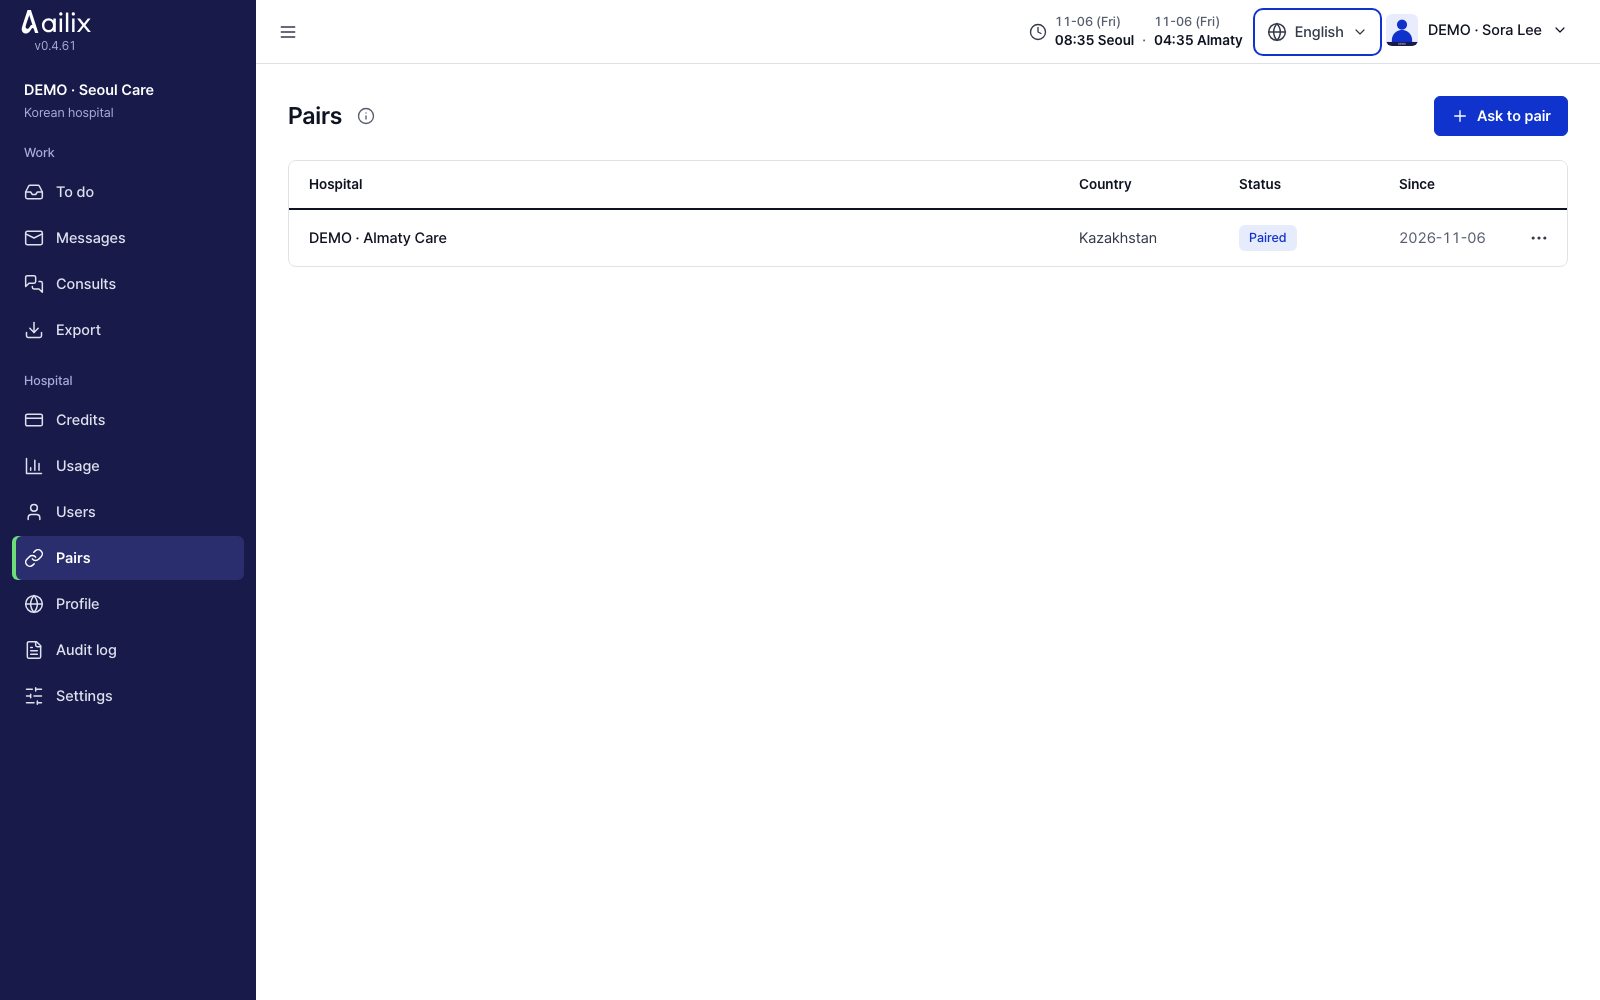
Pair with the other hospital

Hospital → Pairs

Referring hospital administrator · Pair with the other hospital
View larger
  1. Under Ask to pair, choose the other hospital and send the request. The hospital that receives it should check the details and click Accept.
  2. Check that the status is Paired. Before an answer comes, you can take a request back with ⋯ → Withdraw.
  3. To end the relationship, choose terminate in ⋯ and write the reason. Consults that are already in progress continue.

Check before you finishA pair is a link between two hospitals that lets them work on consults together.

Korean hospital administrator

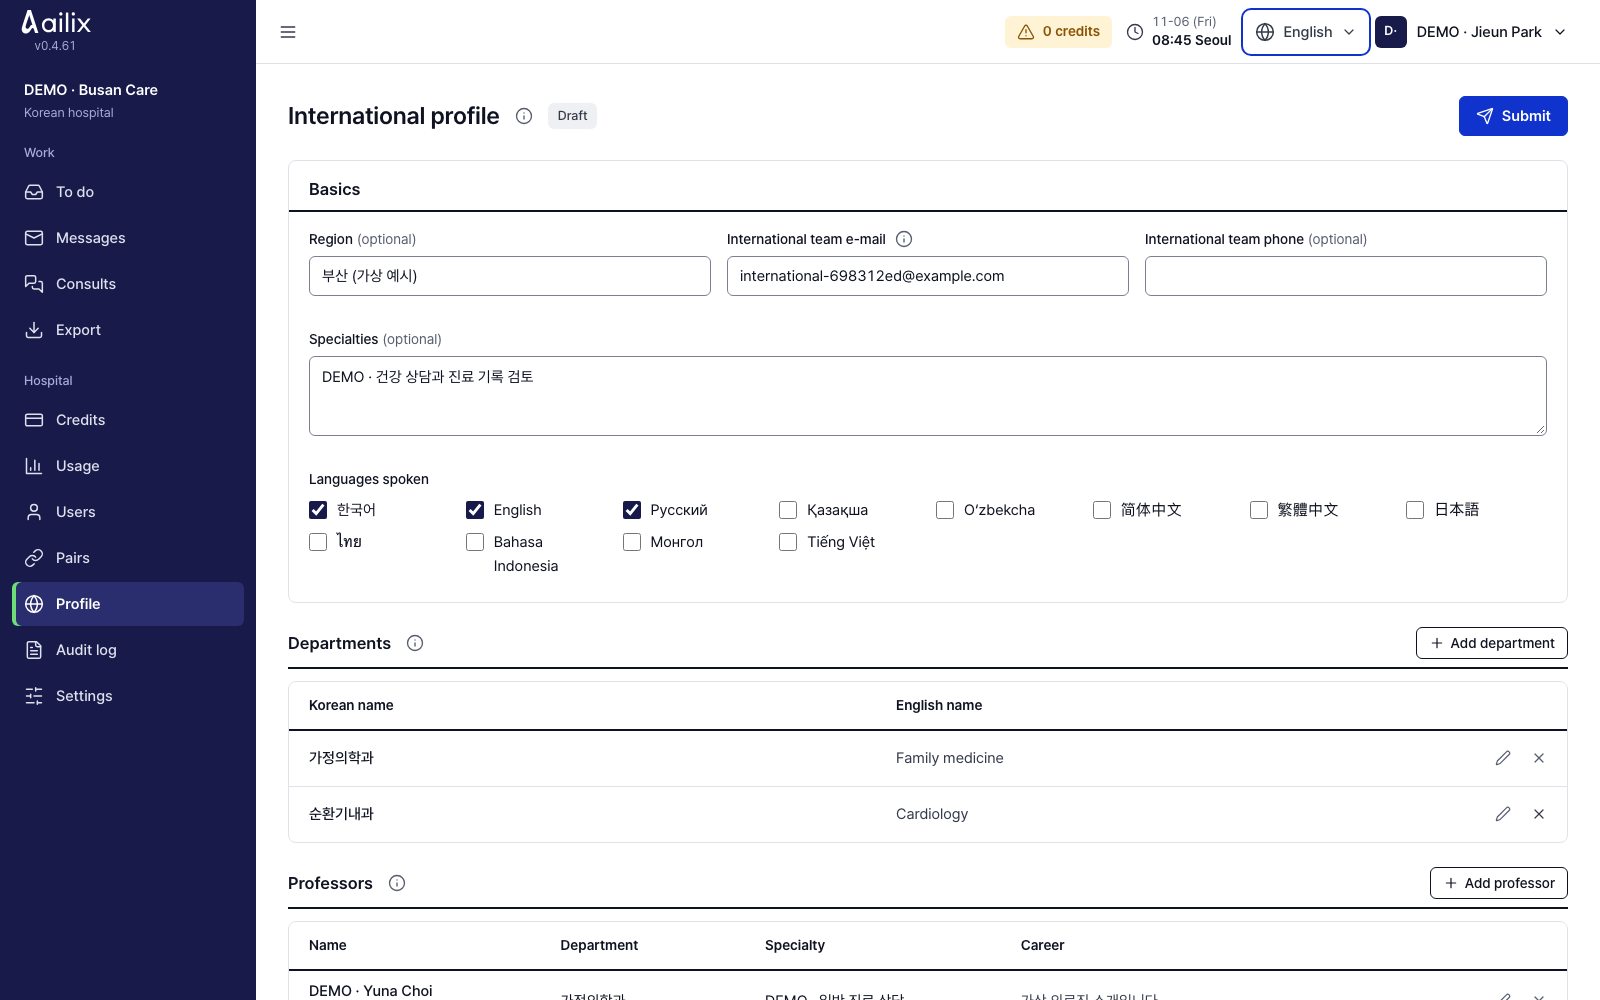
Upload the profile that shows in the hospital finder

Hospital → Profile

Korean hospital administrator · Upload the profile that shows in the hospital finder
View larger
  1. Enter the region, specialties, languages, and the contact for the international care team. Also fill in the departments and the professor introductions.
  2. Click Save, then Submit. To change content that was already approved, use Save and submit to send it for review again.
  3. To change it during review, click Withdraw submission. To stop showing it, click Remove from the hospital finder.

Check before you finishCheck Listed. Adding a professor introduction does not create a sign-in account for that doctor.

Korean hospital administrator

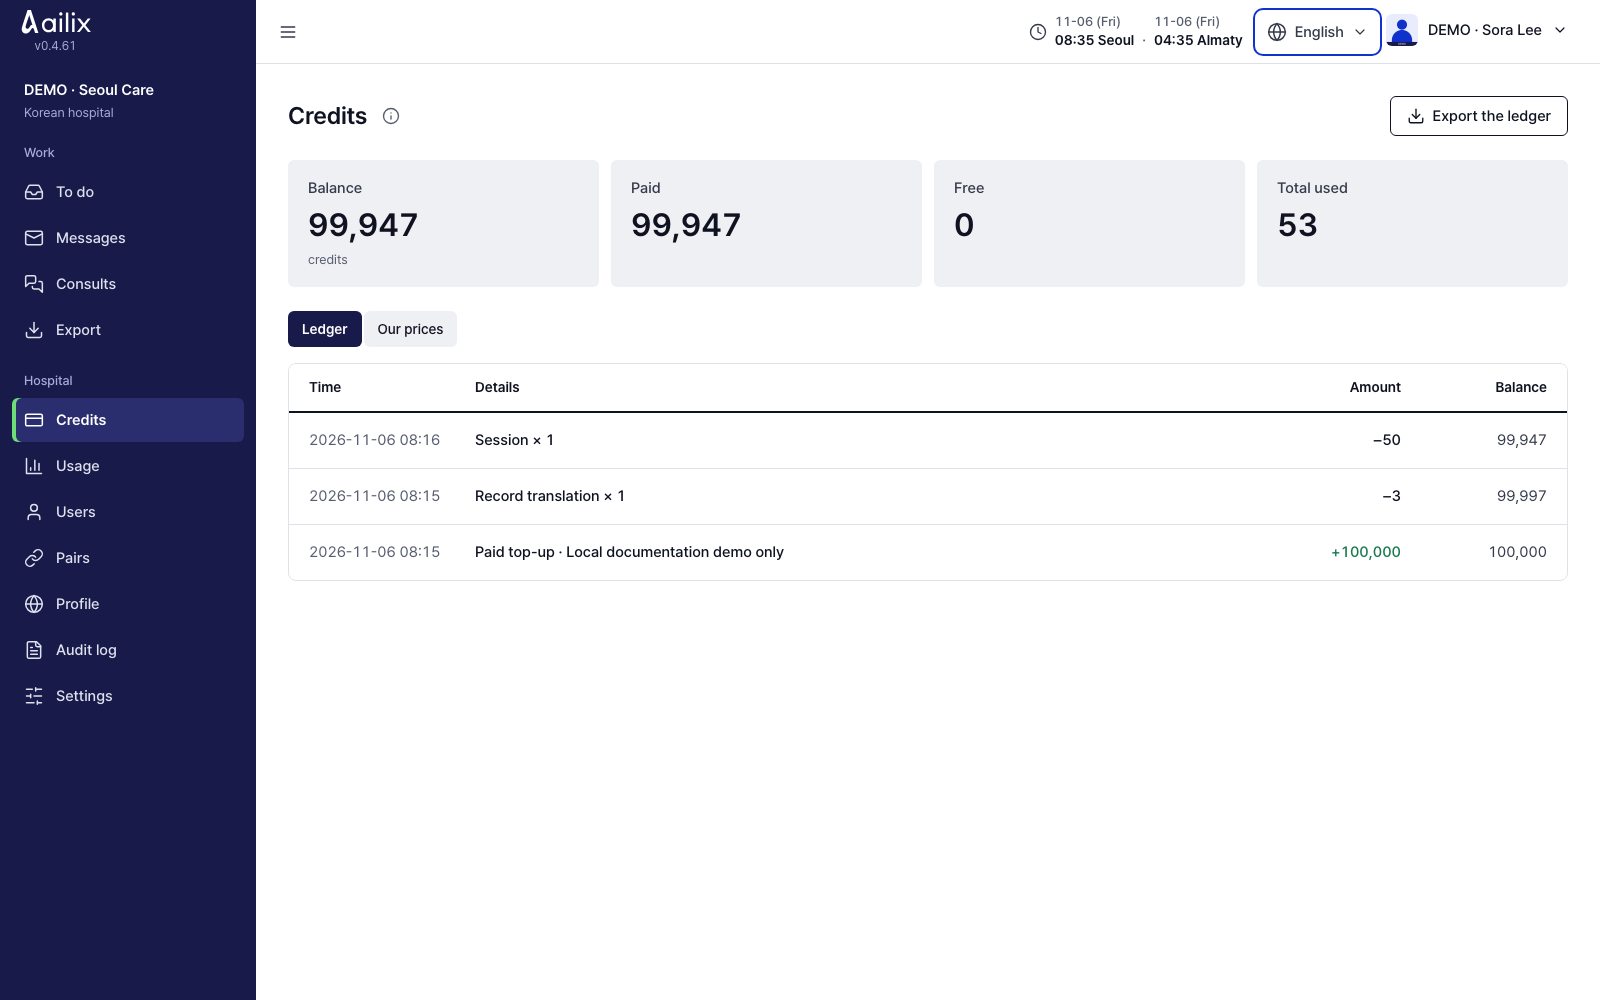
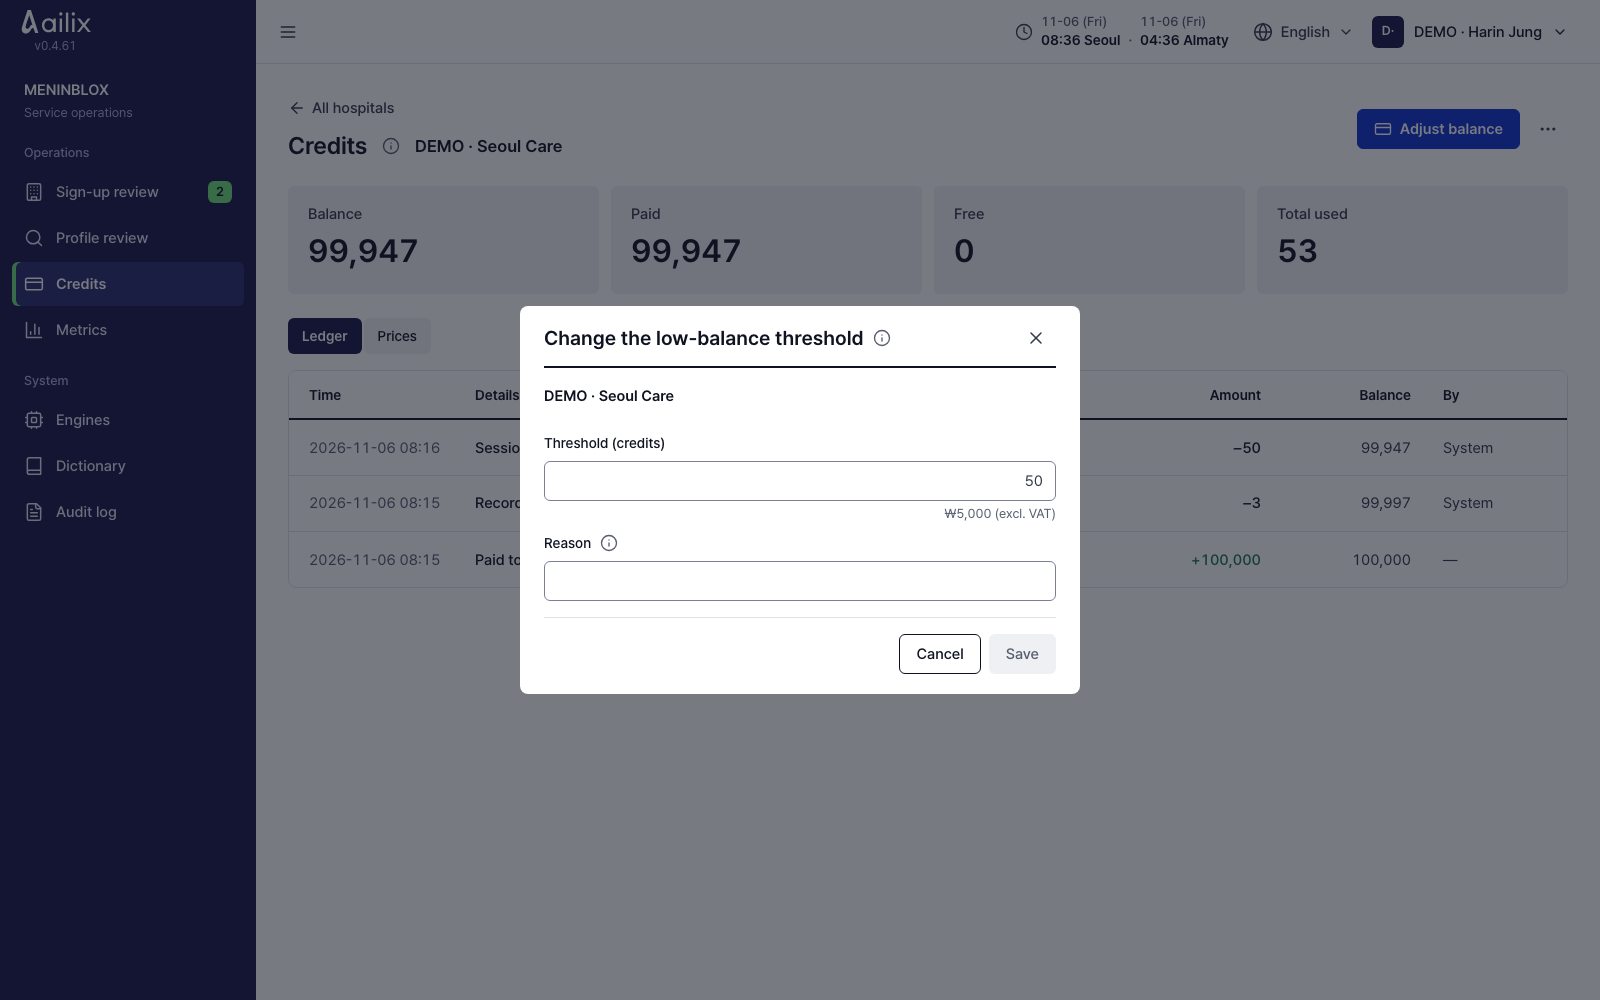
Check your balance and ask for a top-up

Hospital → Credits

Korean hospital administrator · Check your balance and ask for a top-up
View larger
  1. See your paid and free balances and total use. Under Ledger, check the lines for deductions, refunds and top-ups.
  2. Tell the service administrator how many credits you want to add. The administrator adds them after confirming your payment.
  3. Under Prices, see your hospital's prices and any upcoming changes. Download the ledger if you need it.

Check before you finishFor Korean hospitals, the base account fee is deducted next month for each account that was used. After a top-up, check your balance and the real cost on the request screen.

Korean hospital administrator

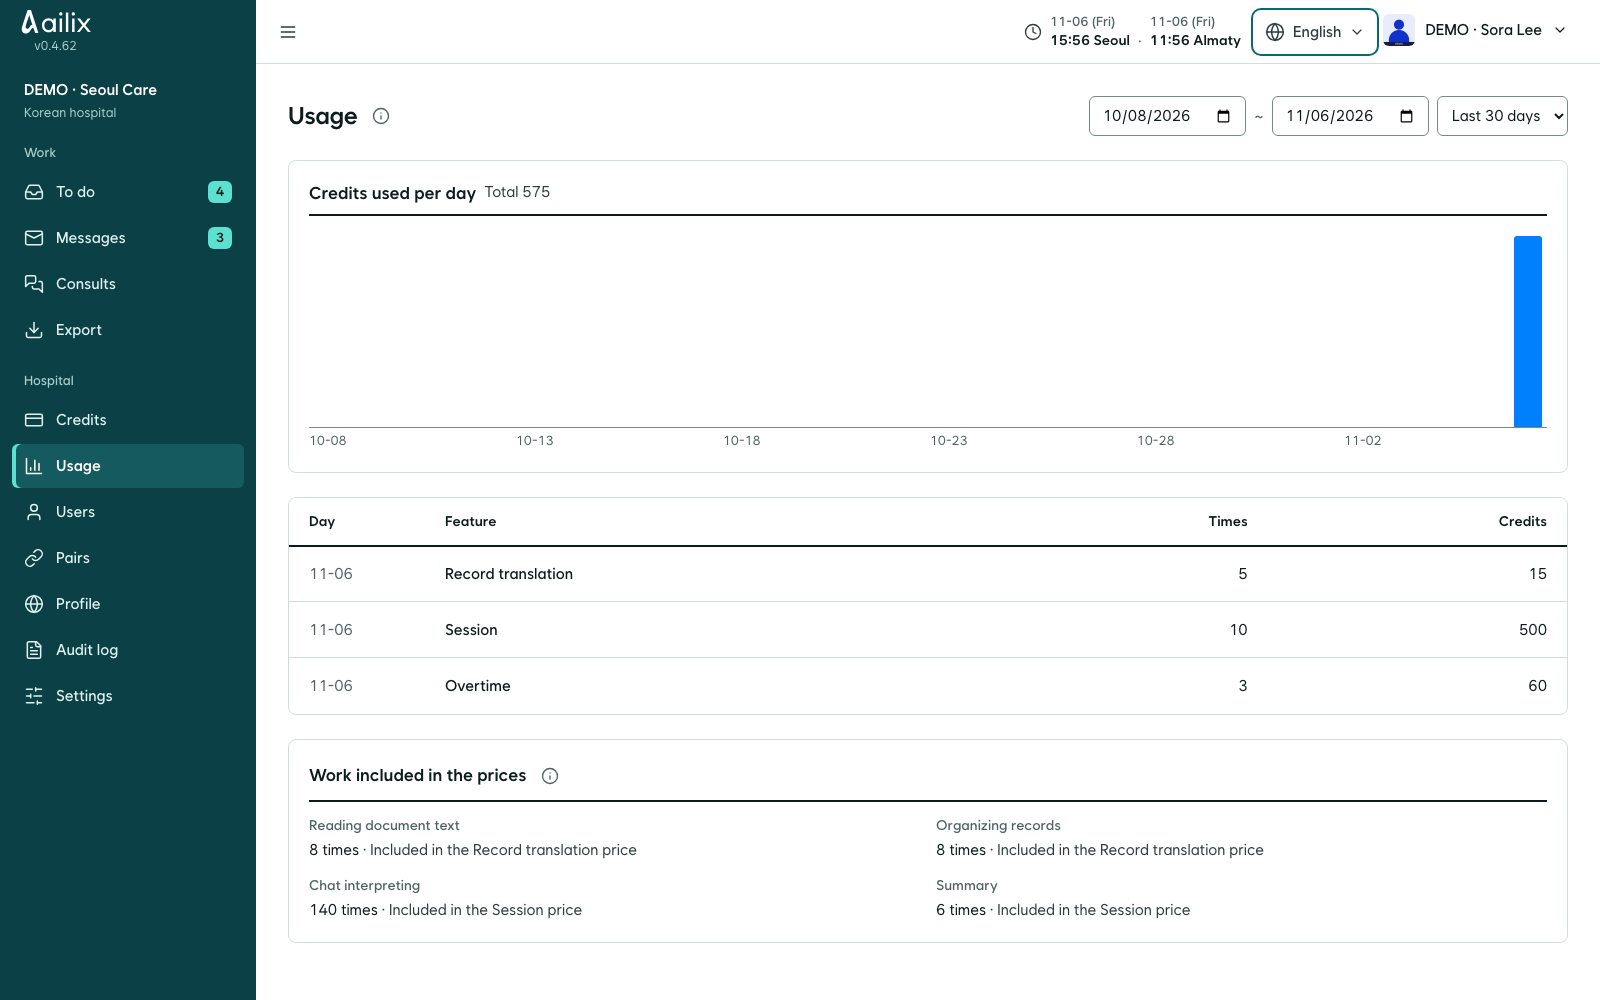
Check what you used and when

Hospital → Usage

Korean hospital administrator · Check what you used and when
View larger
  1. Choose a start date and end date, or a common period.
  2. Compare credits by date and counts by feature. Tasks marked Included are covered in the price of another item.

Check before you finishUsage is grouped by Seoul date. The numbers shown exclude refunds and reversals.

Korean hospital administrator · Referring hospital administrator

Find your hospital's work records

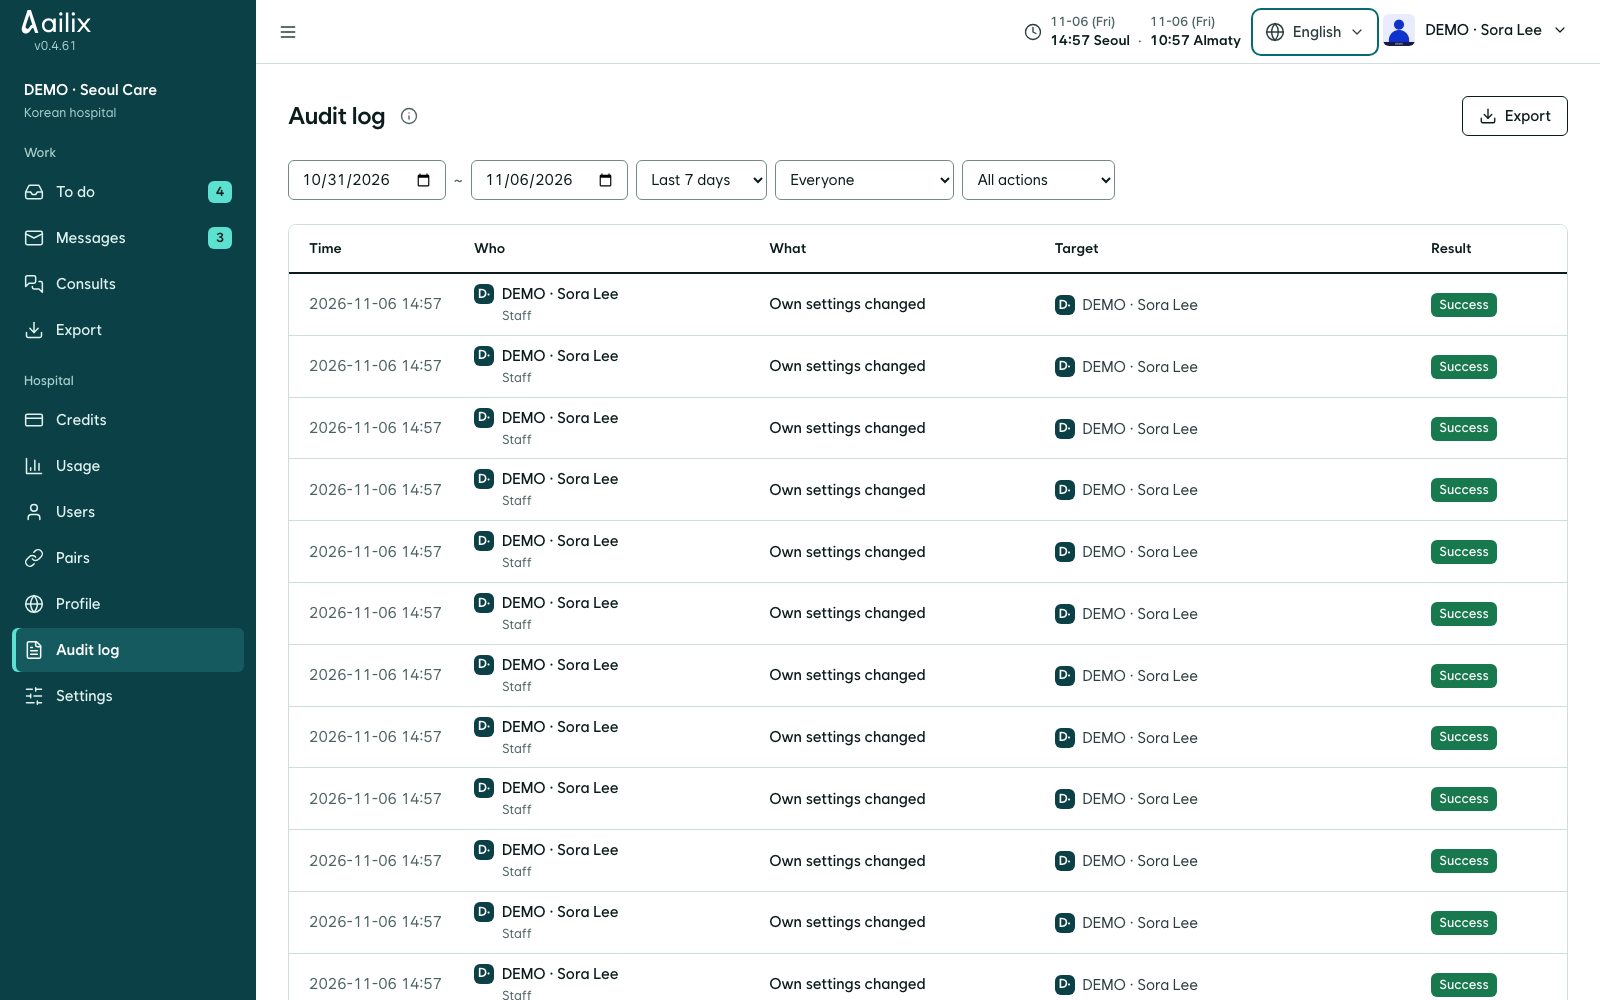
Hospital → Audit log

Korean hospital administrator · Find your hospital's work records
View larger
  1. Narrow the range by period, user and type of action. Look at the time, who, what they did, the target and the result.
  2. Click a line for details. If it has a consult link, it opens that task. Export to CSV if you need to.

Check before you finishYou cannot see records from other hospitals. When you report an error, also include the request number.

Korean hospital administrator · Referring hospital administrator

Bundle your hospital's data and download it

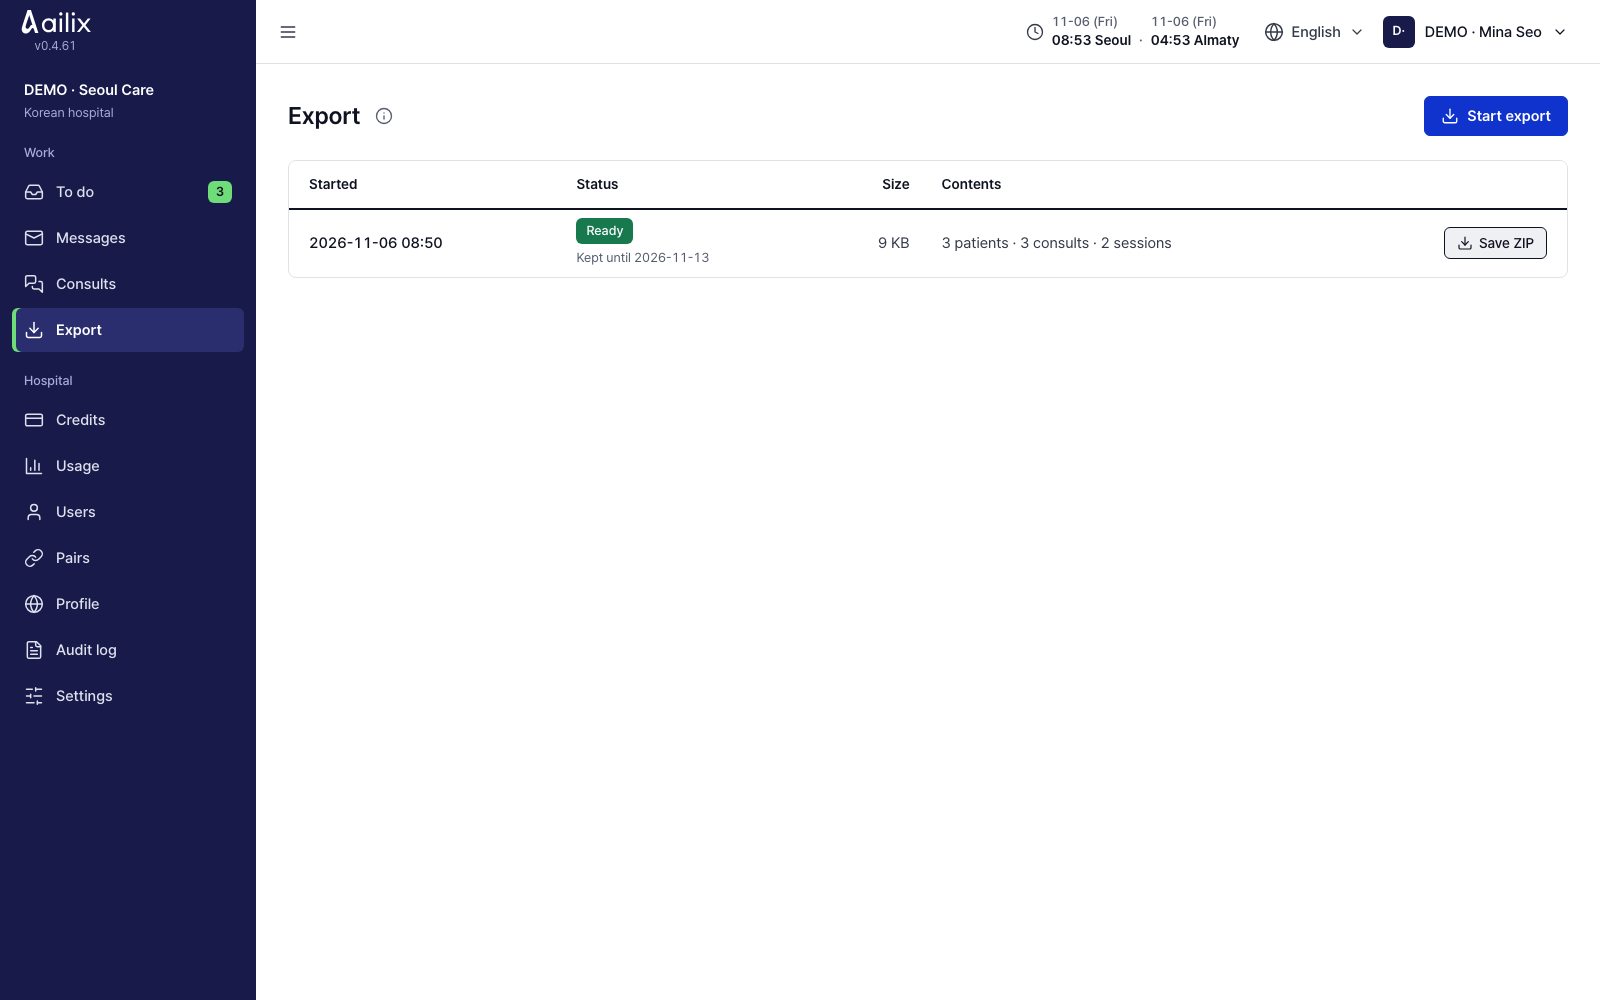
Work → Export

Korean hospital administrator · Bundle your hospital's data and download it
View larger
  1. Click Start export and wait until it is ready.
  2. Check the file size, what it contains and how long it is kept, then click Download and Save ZIP.

Check before you finishThe file is kept for 7 days. Store the downloaded file in a safe place, following your hospital's retention process.

3. Prepare patients and records

Referring hospital administrator

Register a patient

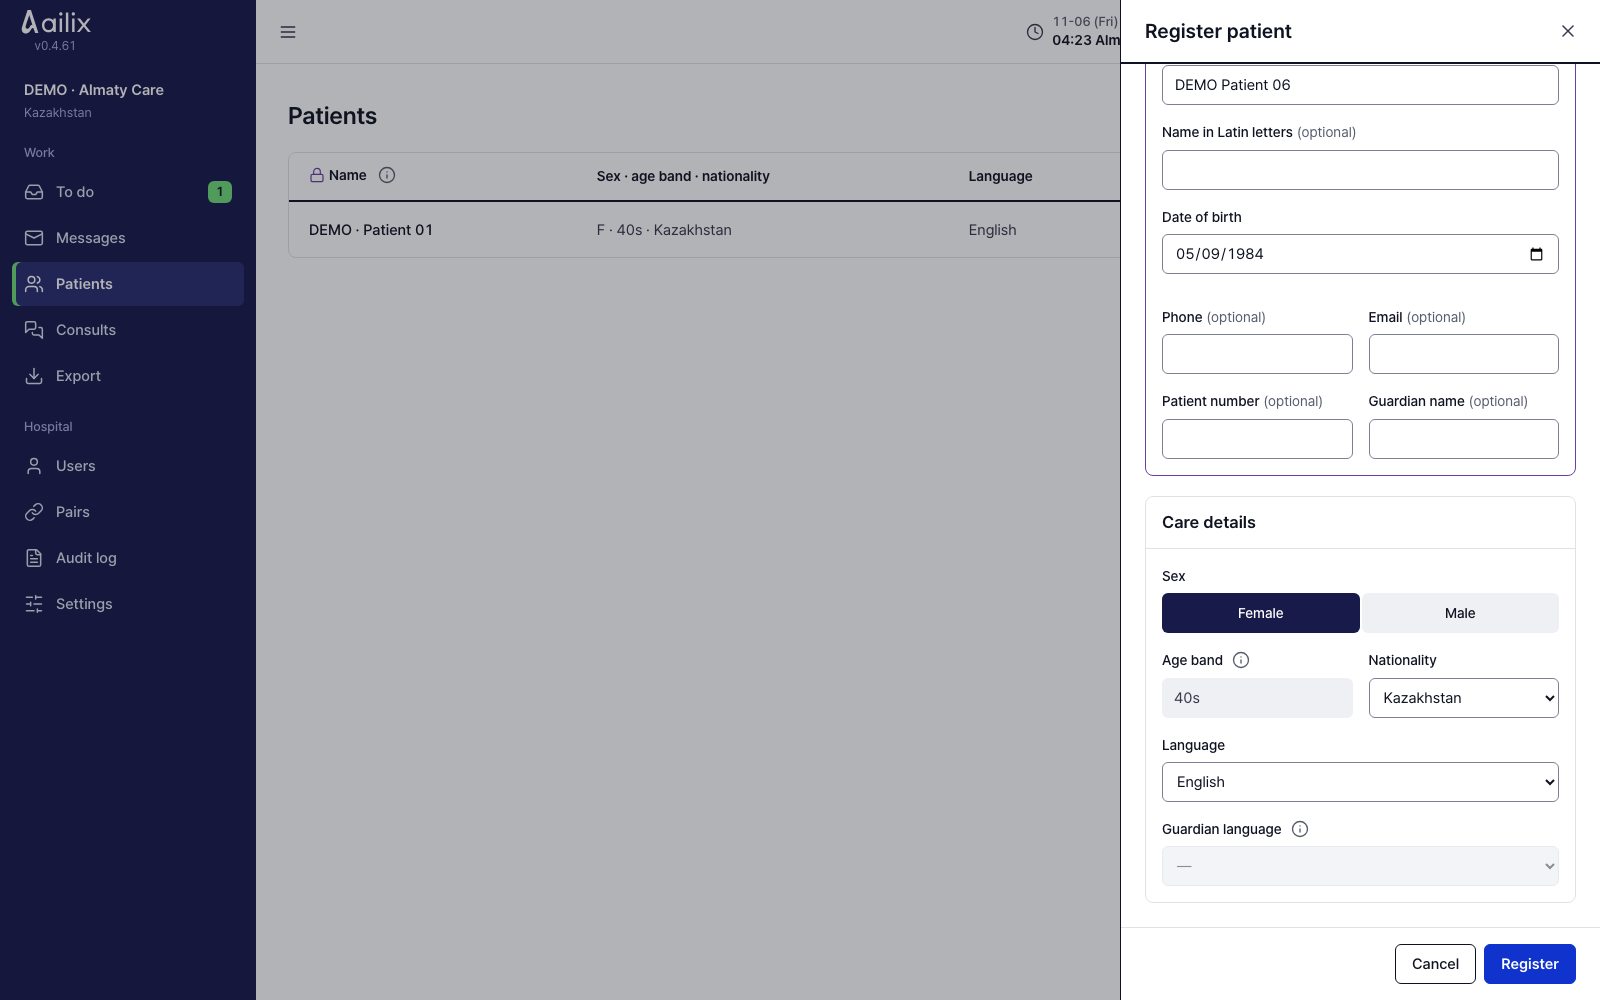
Patients → Register patient

Referring hospital administrator · Register a patient
View larger
  1. Enter the name, date of birth, sex and nationality, and the language the patient will use.
  2. If a guardian will join, enter their name and language, then click Register.

Check before you finishOn the patient details screen, check again that the name, date of birth and language are right.

Referring hospital administrator

Choose the document type and upload records

Patient details → Medical records

Referring hospital administrator · Choose the document type and upload records
View larger
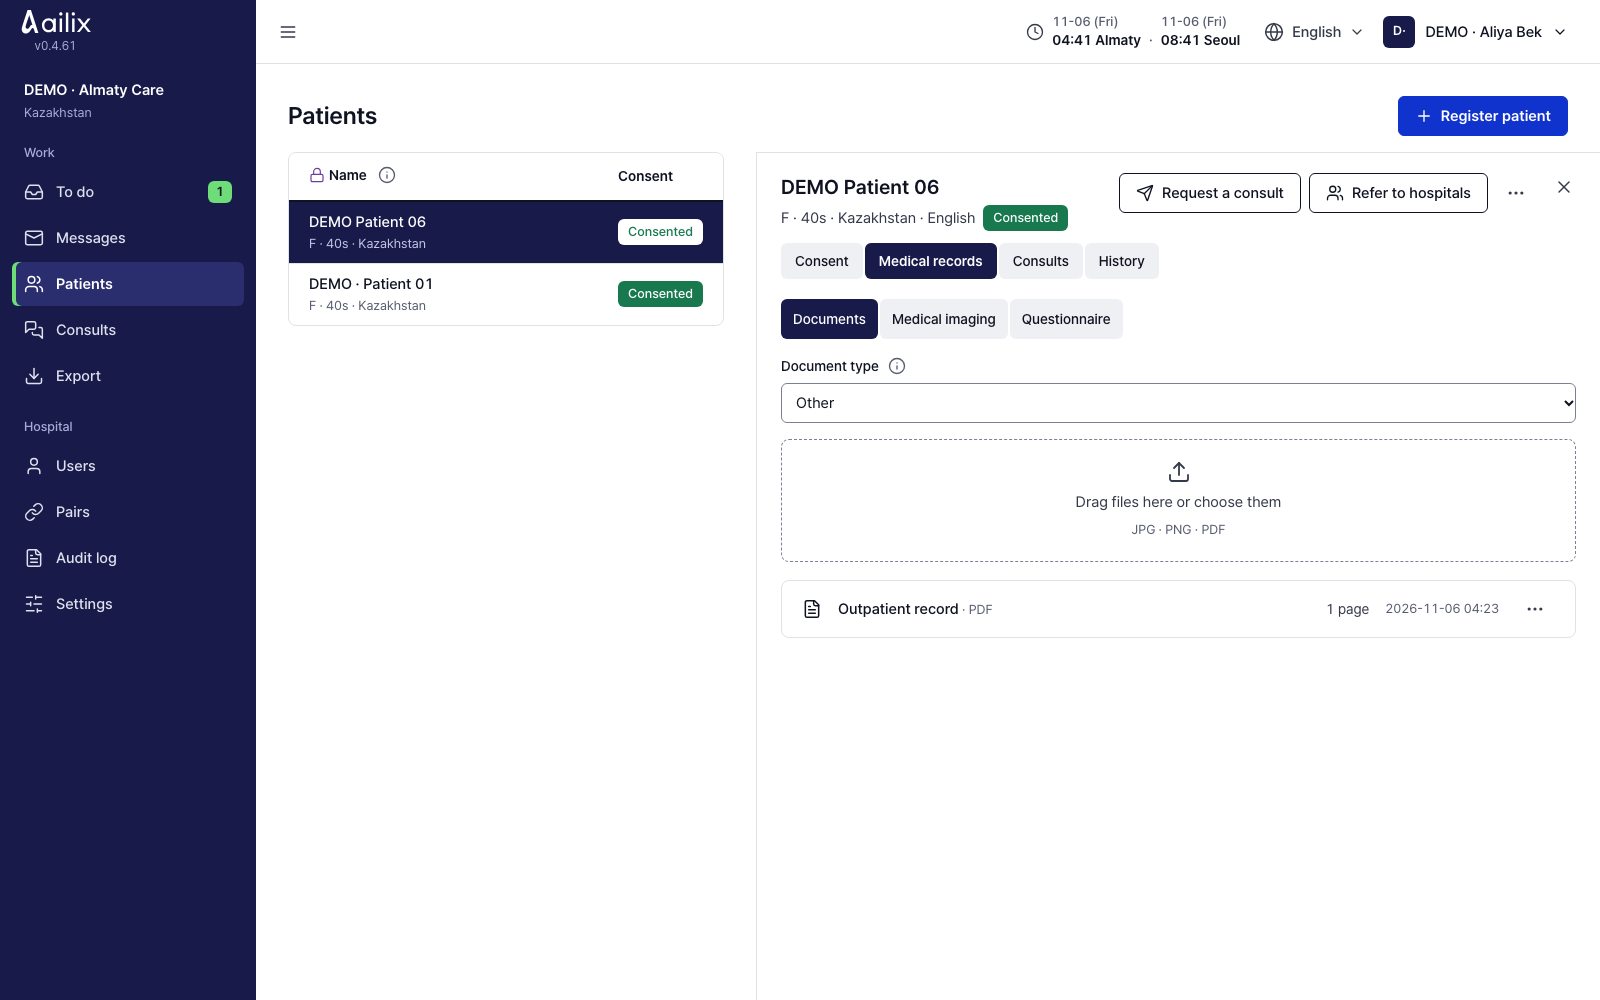
  1. Choose Documents and Document type, then upload a JPG, PNG or PDF. Use files where the text is easy to read.
  2. For a questionnaire, choose Questionnaire, enter the text and click Upload questionnaire.

Check before you finishCheck that the records belong to the right patient. You can send them only after scanning and page splitting are done.

Referring hospital administrator

Check the records to send

Patient details → Medical records

Referring hospital administrator · Check the records to send
View larger
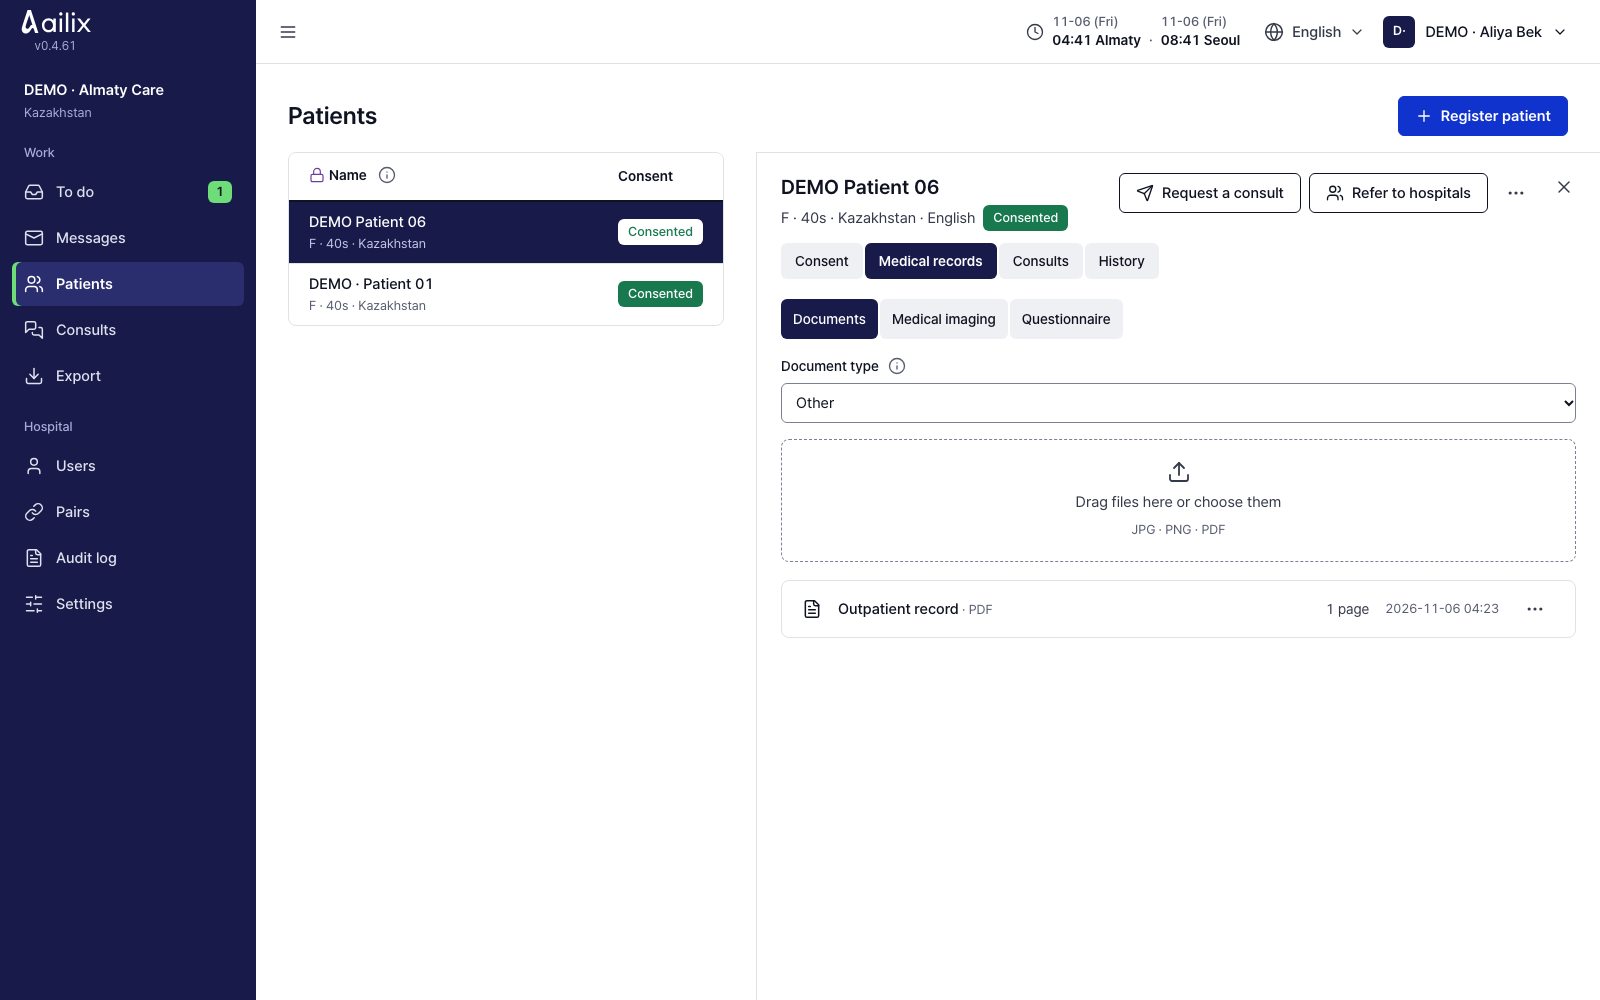
  1. Check the type and page count of each record. If it says Uploading, Scanning or Processing, wait.
  2. If it says Refused, upload a new file as the message tells you. If the type is wrong, click ⋯ → Change document type.

Check before you finishDo not send an ID document with a consult. Choose only medical records that are ready.

Referring hospital administrator

Upload CT, MRI and videos

Patient details → Medical records → Medical imaging

Referring hospital administrator · Upload CT, MRI and videos
View larger
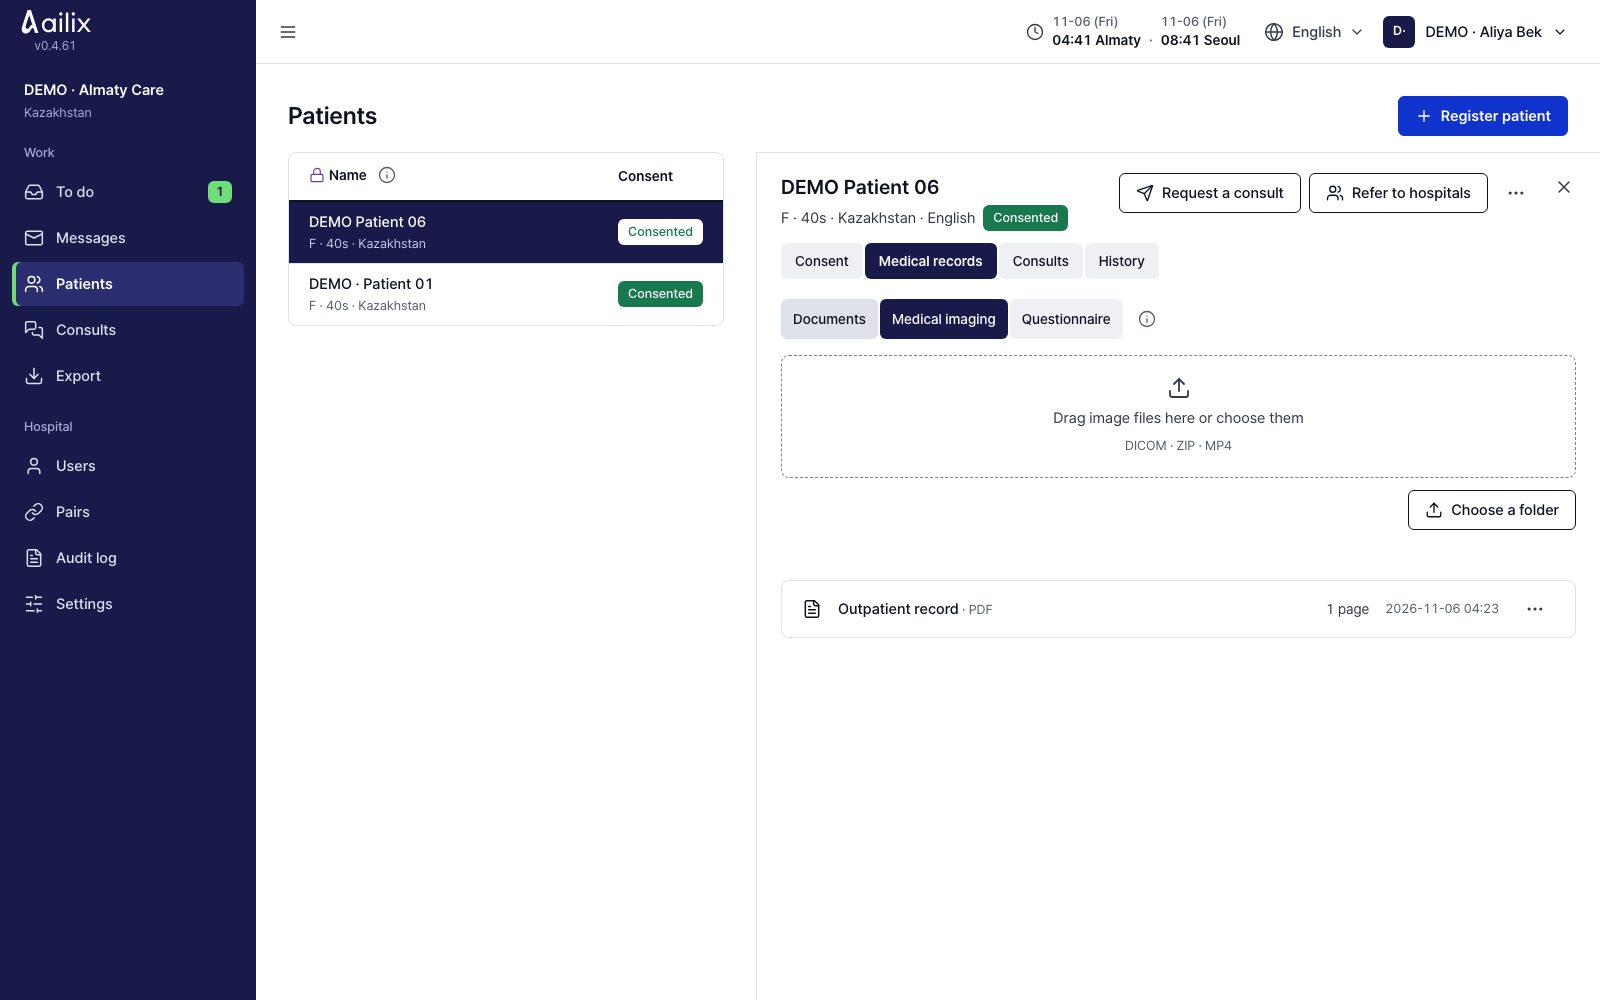
  1. Choose DICOM files, a folder or a ZIP, or an MP4. DICOM can be up to 2 GB, and MP4 up to 500 MB.
  2. If you need to, use Pause and then Resume. Check the processing result and the number of files.
  3. If a patient's name is printed on an image, check that separately. Text inside the picture is not erased automatically.

Check before you finishMedical imaging is different from document translation. The receiving hospital downloads the image files to check them.

4. Consult requests and choosing a hospital

Referring hospital administrator

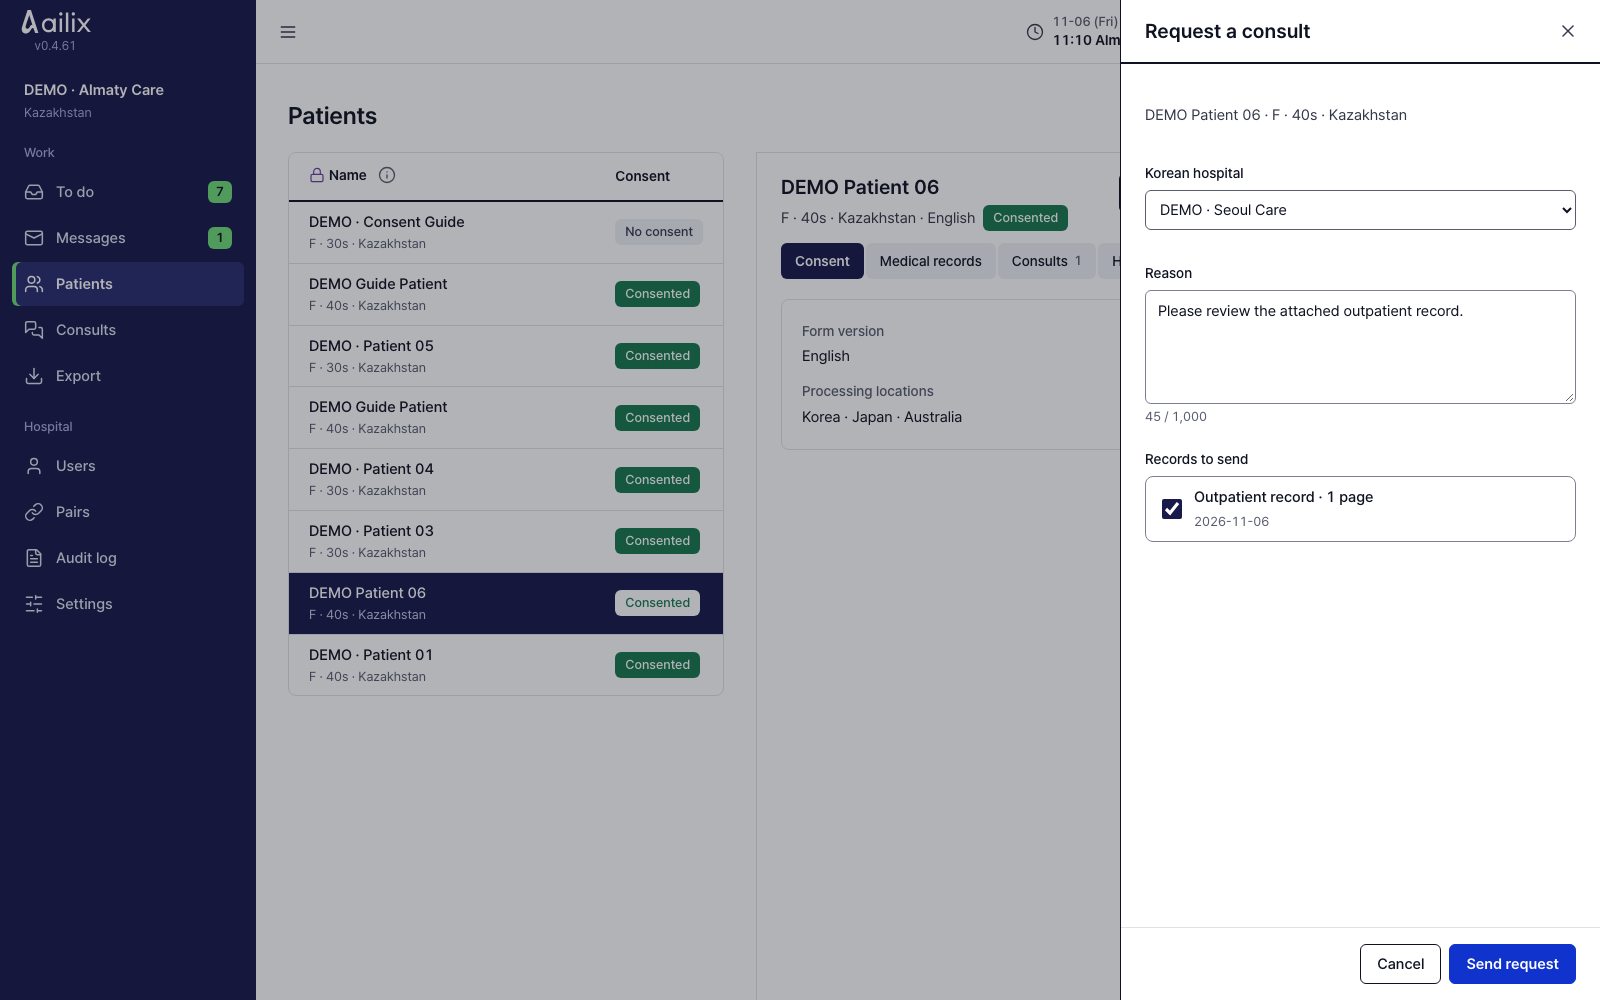
Ask a paired hospital for a consult

Patient details → Request a consult

Referring hospital administrator · Ask a paired hospital for a consult
View larger
  1. Choose a Korean hospital you are paired with and write the reason for the request.
  2. Check Records to send and uncheck any files you do not want to send. Click Send request.

Check before you finishCheck that the status is Requested. The Korean hospital will now review it.

Referring hospital administrator

Get answers from several hospitals

Patient details → Refer to hospitals

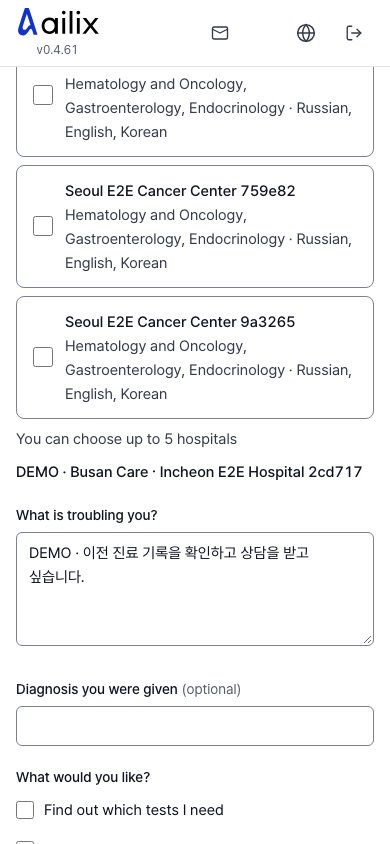
Referring hospital administrator · Get answers from several hospitals
View larger
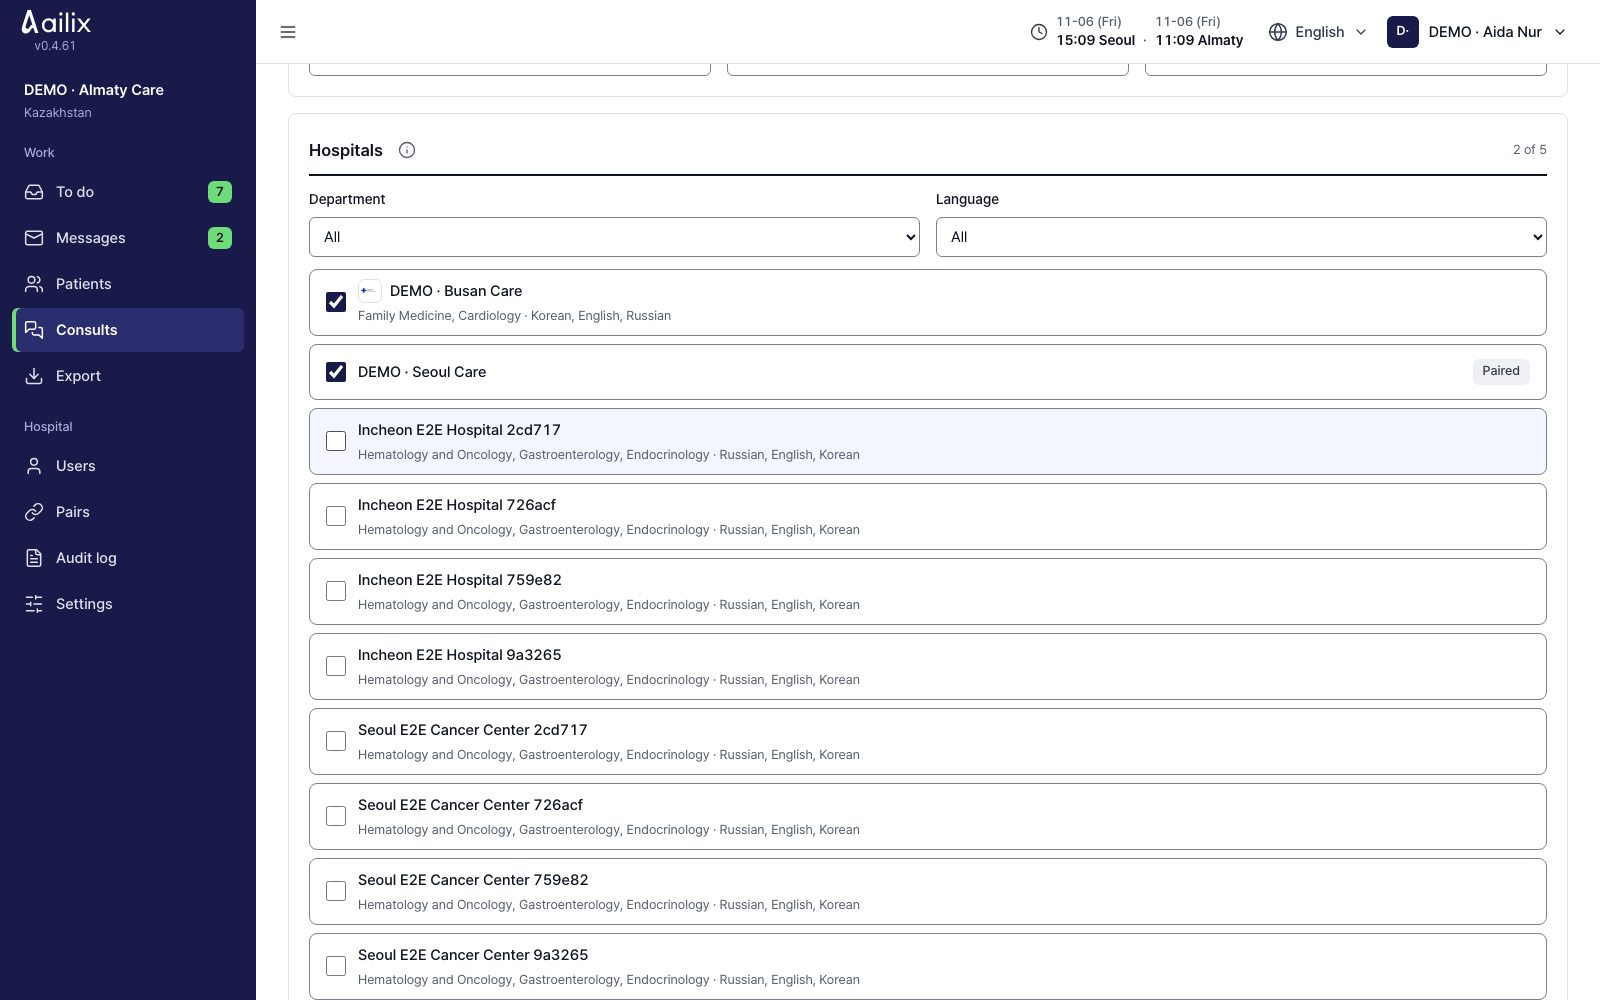
  1. Write the symptoms, any diagnosis received, the care you want and how urgent it is. Check the text that was split up automatically.
  2. Find hospitals by department and available language, and choose up to 5. Check the records to send, then send the referral.

Check before you finishEach hospital sees the masked records and answers. You have not yet chosen a hospital for care.

Korean hospital administrator

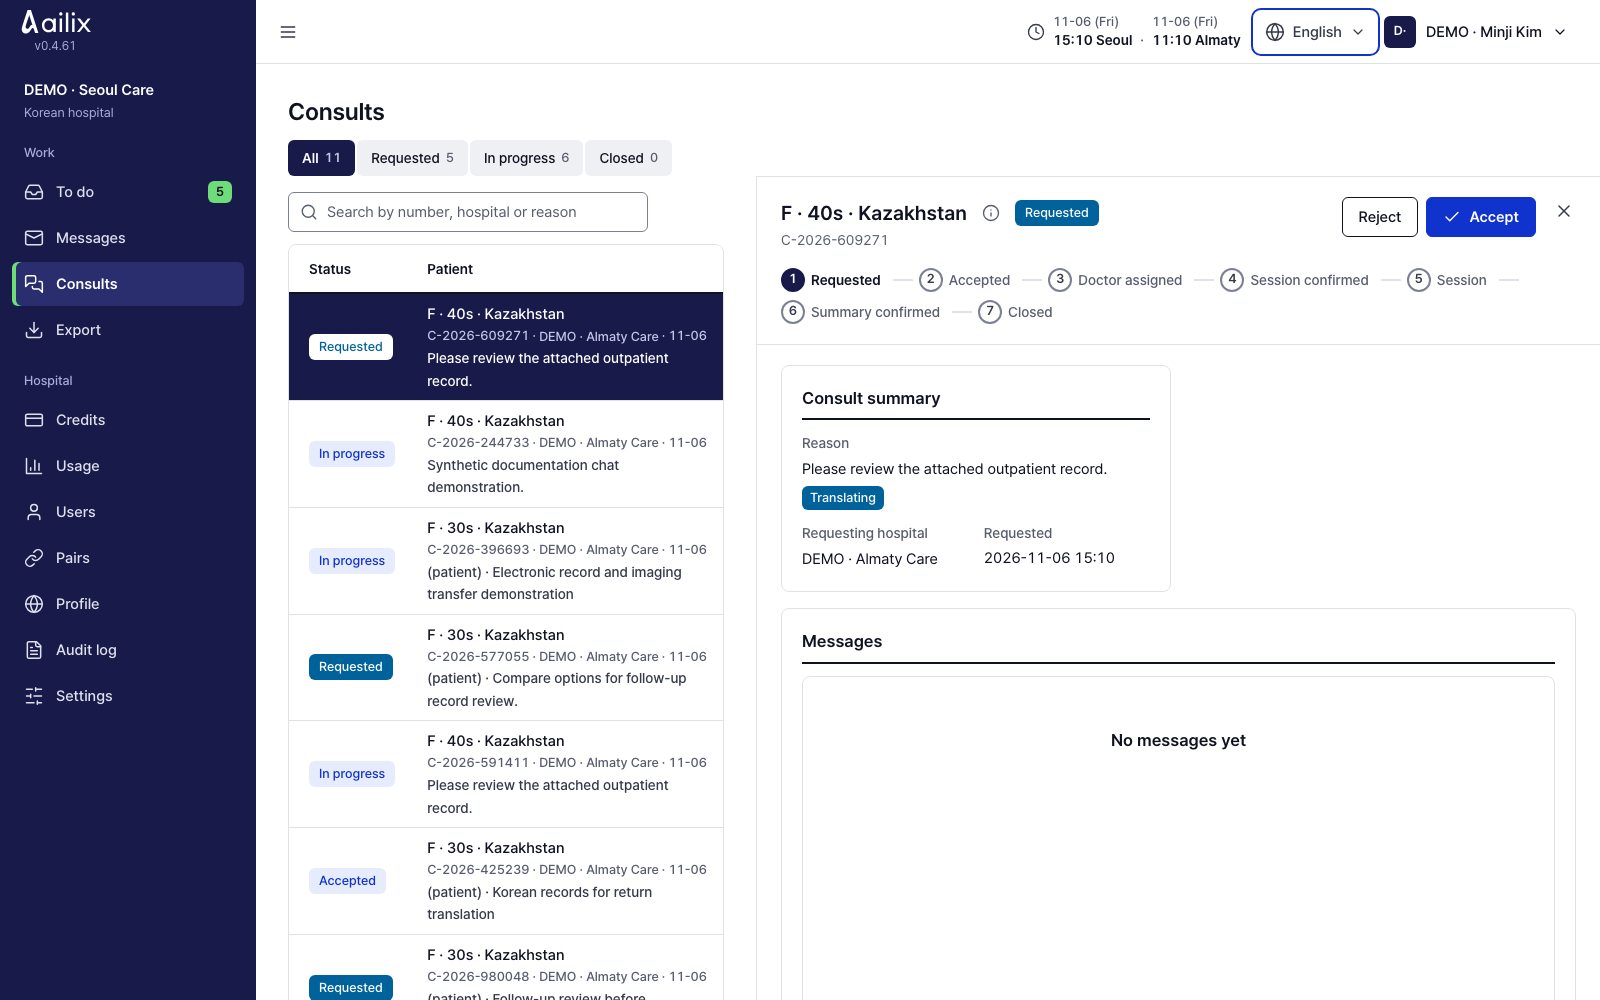
Check the consult requests you received

To do or Consults → New requests

Korean hospital administrator · Check the consult requests you received
View larger
  1. Check the sending hospital, the reason for the request, and the patient information and records.
  2. For a consult sent directly to you, click Accept. If you cannot take it, click Reject and leave a reason.

Check before you finishFor referrals sent to several hospitals, you go on to answer with expected tests, costs and so on.

Korean hospital administrator

Answer with expected tests, costs and the doctor in charge

Received referral → Accept → Accept and answer

Korean hospital administrator · Answer with expected tests, costs and the doctor in charge
View larger
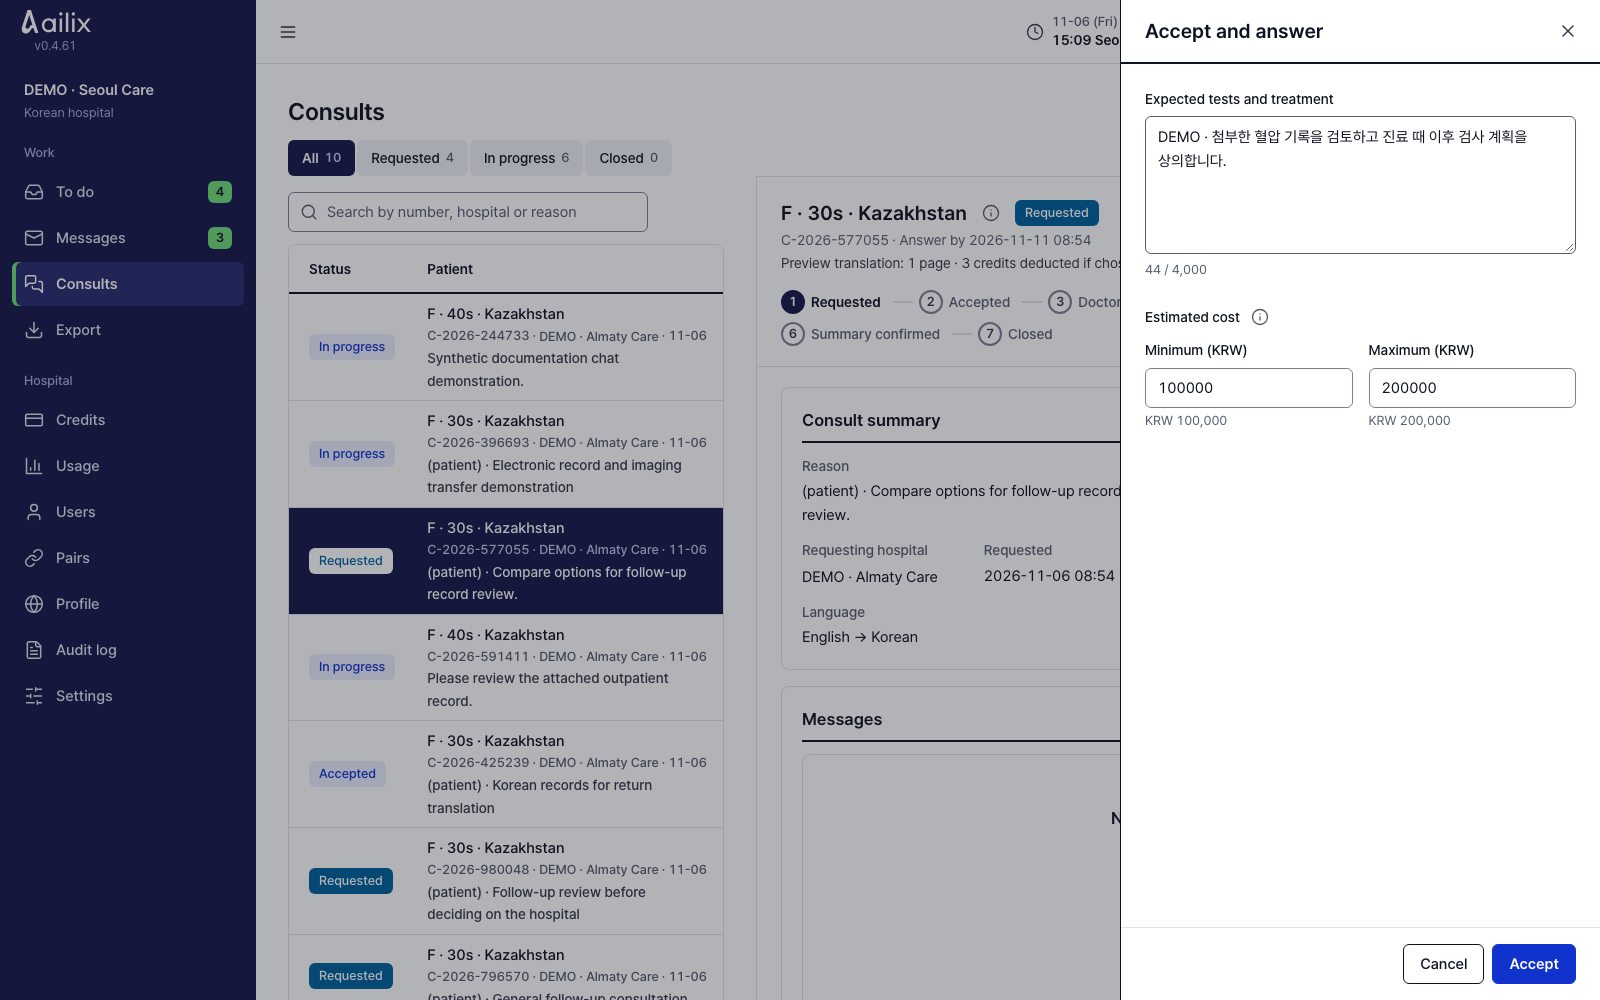
  1. Check the answer deadline and read the masked referral and records. If needed, check the preview translation.
  2. Enter Expected tests and treatment, the minimum and maximum cost and the doctor in charge, then click Accept.

Check before you finishThe cost is an expected range in Korean won. Until the other side chooses your hospital, the care is not confirmed.

Referring hospital administrator

Talk with the patient and choose one hospital

To do → Answers to compare → Compare answers

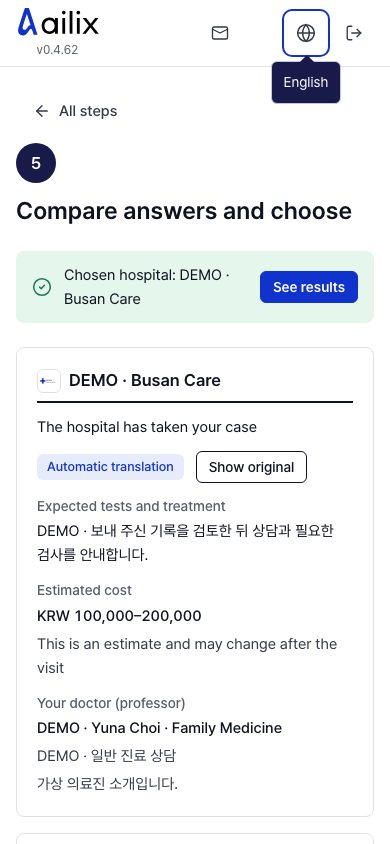
Referring hospital administrator · Talk with the patient and choose one hospital
View larger
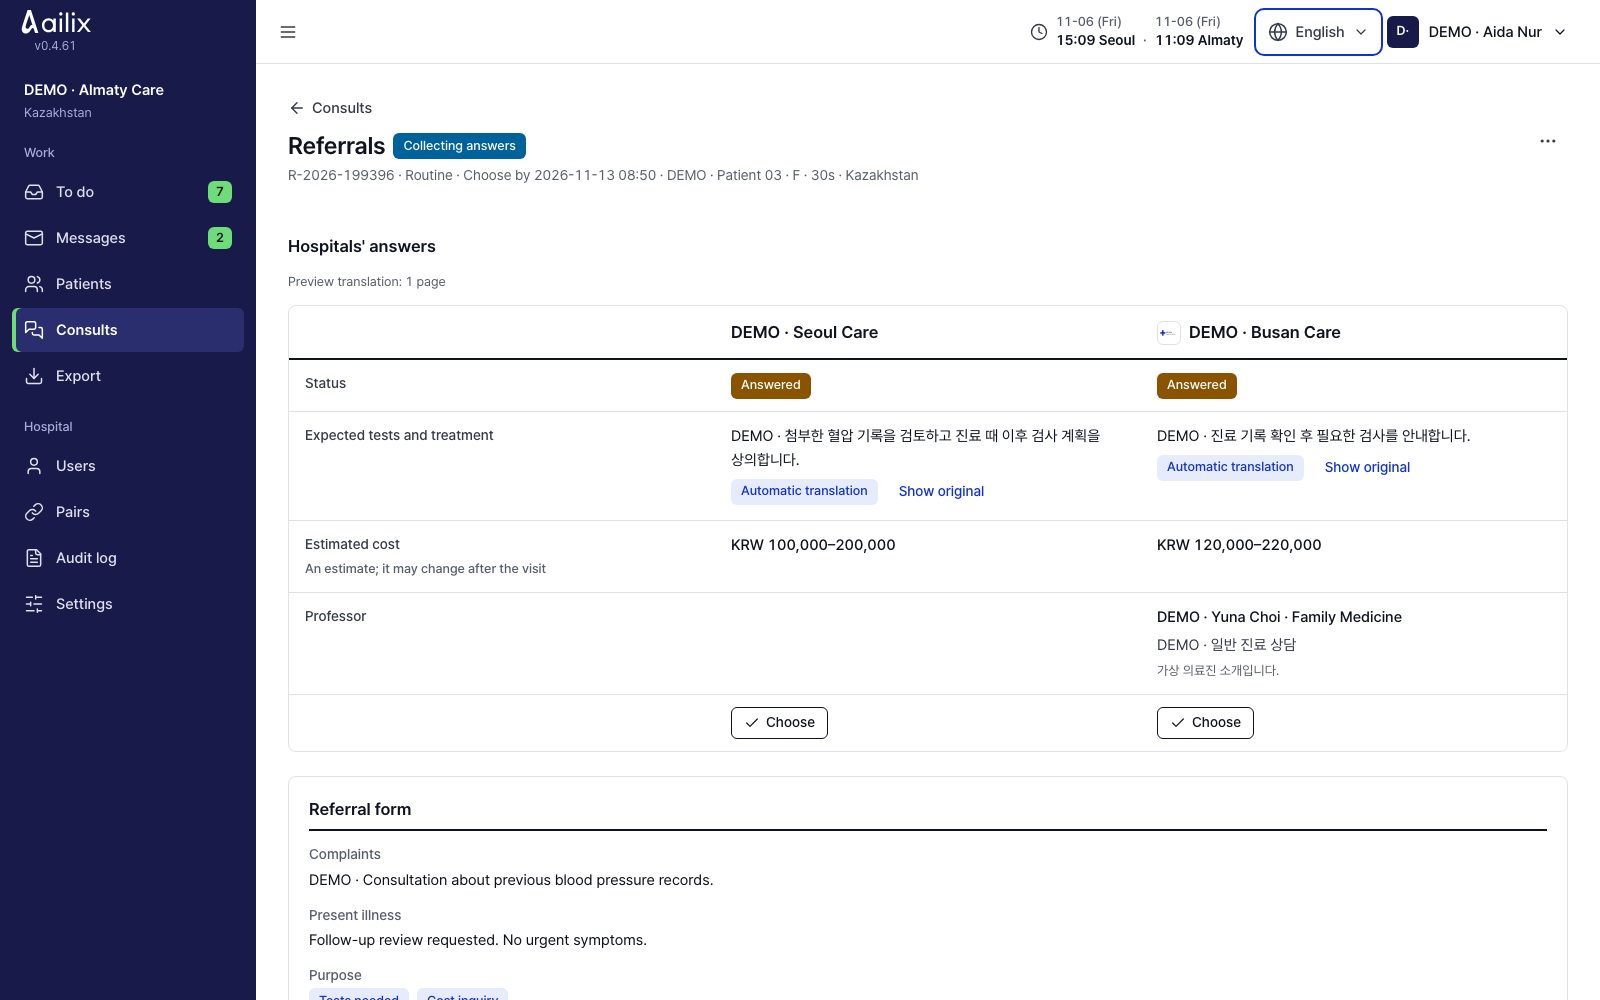
  1. Compare each hospital's test and treatment plan, expected cost and doctor in charge. Open Show original if you need to.
  2. After you talk with the patient, click Choose for one hospital within the deadline and confirm.

Check before you finishYou cannot undo your choice. The other hospitals can no longer see the records for this referral.

Korean hospital administrator

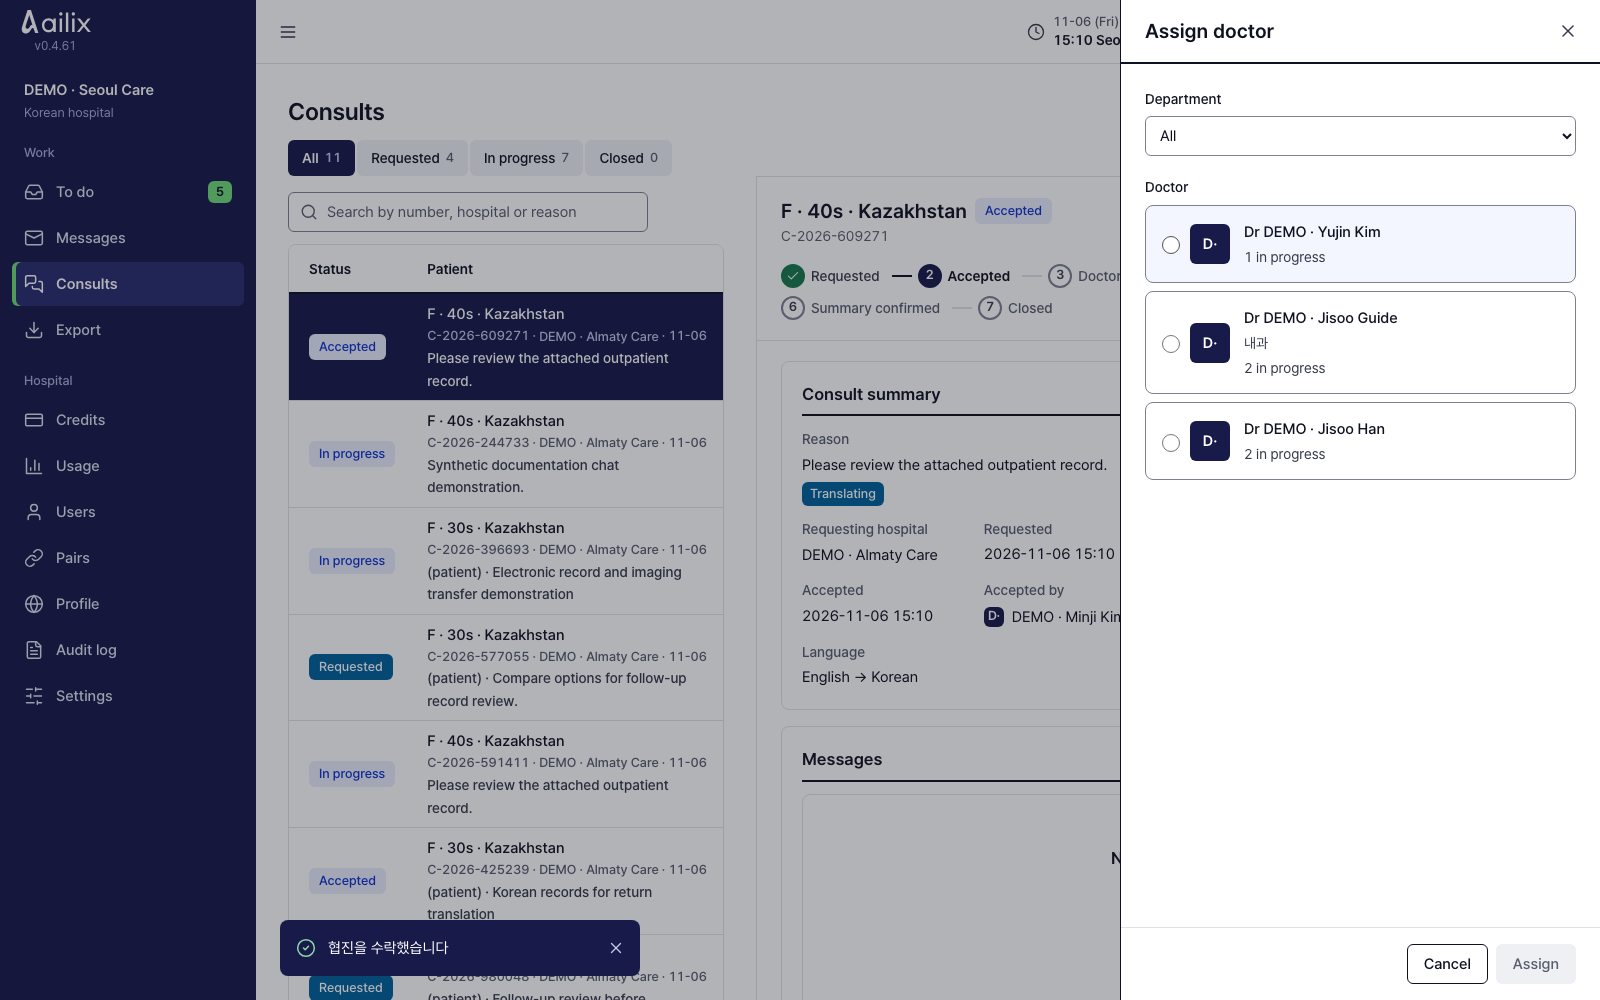
Assign a doctor in charge

Consult details → Assign doctor

Korean hospital administrator · Assign a doctor in charge
View larger
  1. Choose the department and the doctor, then finish the assignment.
  2. Tell the assigned doctor to accept the assignment from their own To do list.

Check before you finishCheck the doctor's name and whether they accepted. If they cannot take it, reassign with Change doctor.

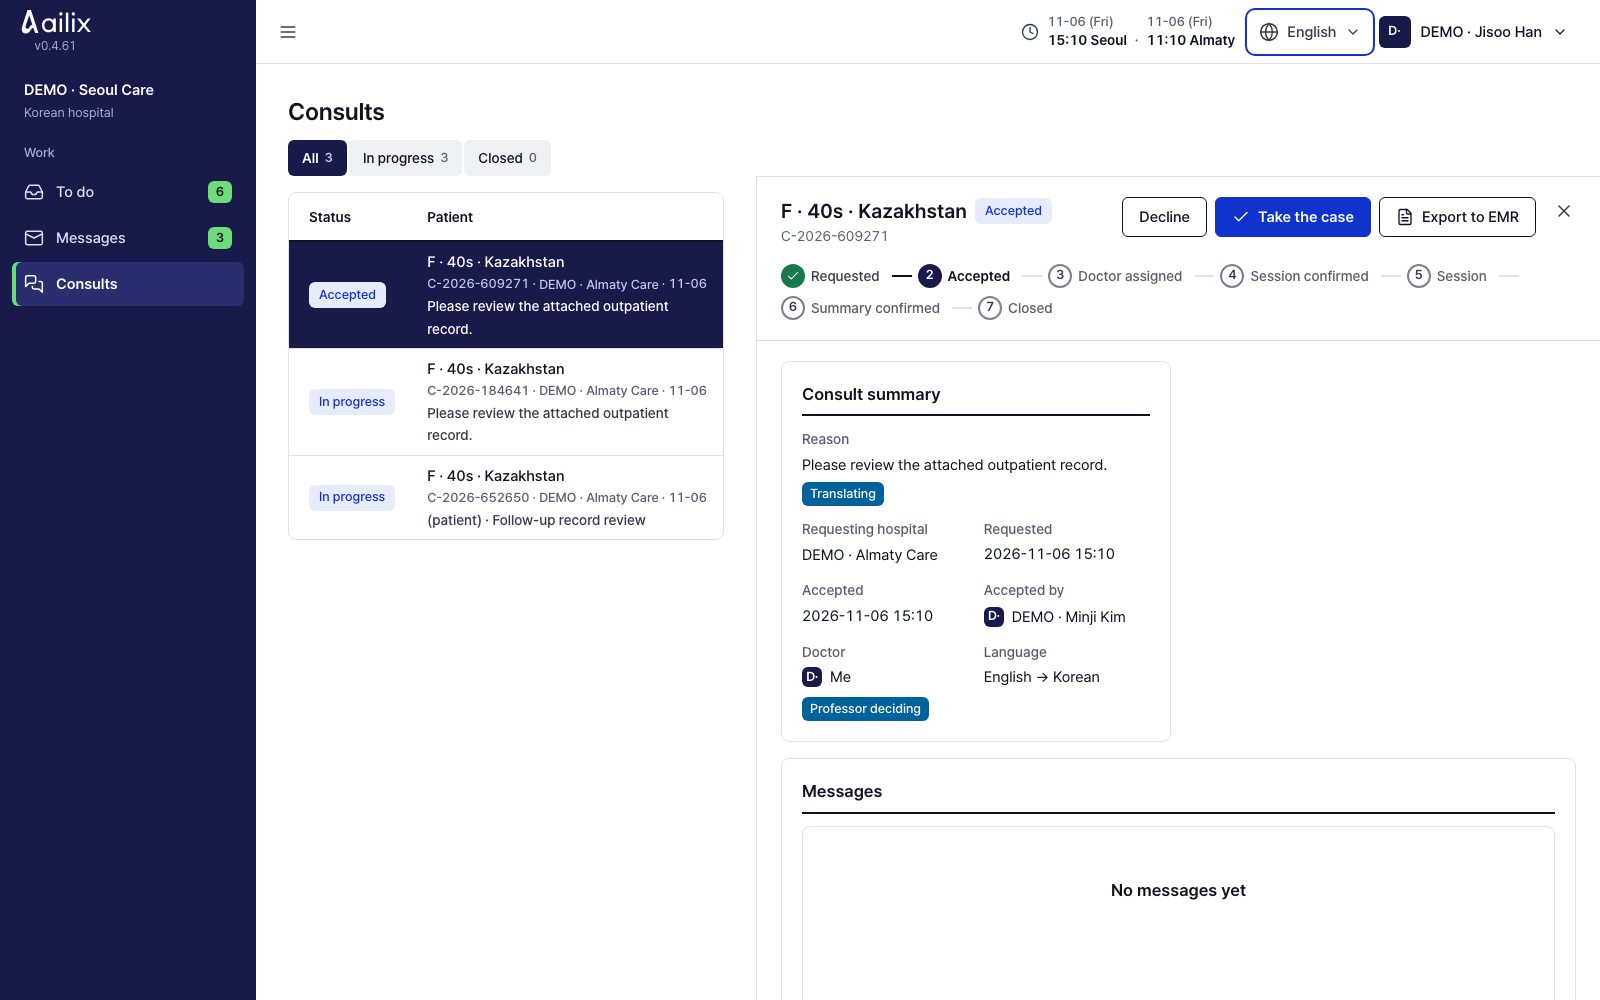
Korean doctor

Accept your own assignment as a doctor

To do or Consults → Assigned consults

Korean doctor · Accept your own assignment as a doctor
View larger
  1. Read the reason for the request and the records, then click Take the case.
  2. If you cannot take it, click Decline and leave a reason. The hospital administrator will choose another doctor.

Check before you finishAfter you accept the assignment, you can go on to ask for a session.

Korean hospital administrator · Referring hospital administrator

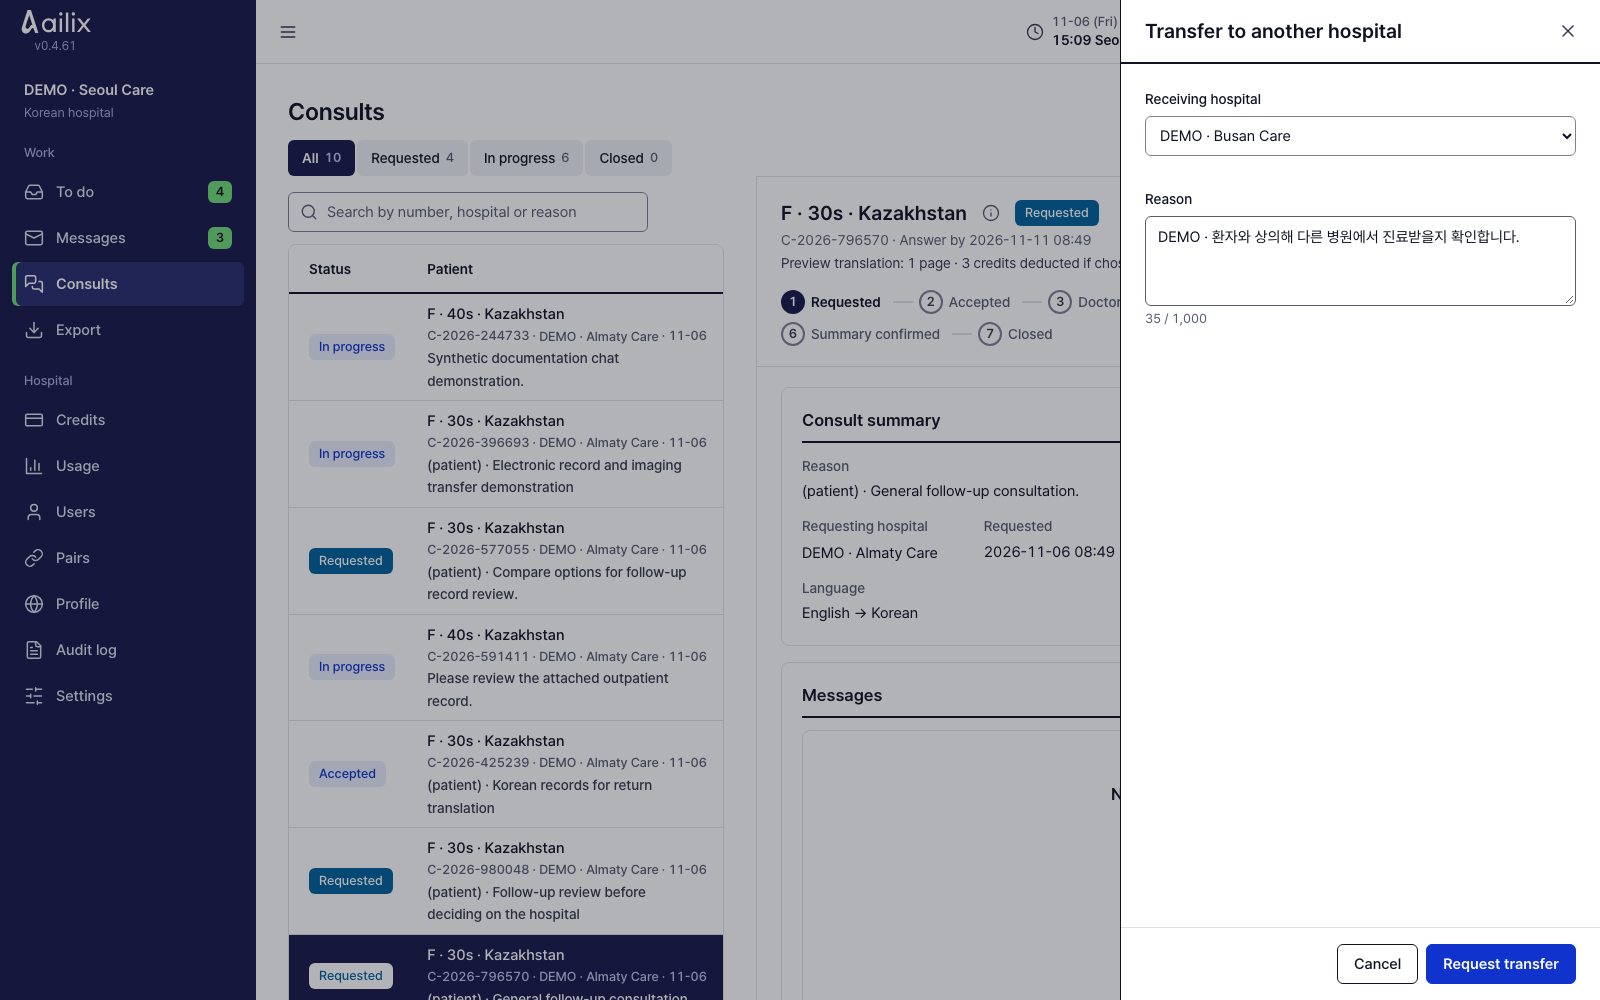
Get consent before you transfer to another hospital

Consult details → ⋯ → Transfer to another hospital

Korean hospital administrator · Get consent before you transfer to another hospital
View larger
  1. Enter the receiving hospital and the reason, then click Request transfer.
  2. The referring hospital should look at the target hospital and the reason, then click Approve or Decline. A patient who signed up on their own decides on their own answers screen.
  3. If no decision has been made yet, the hospital that asked can take it back with ⋯ → Withdraw transfer request.

Check before you finishA request alone does not transfer the case. Check the status after the other side decides.

Referring hospital administrator · Korean hospital administrator

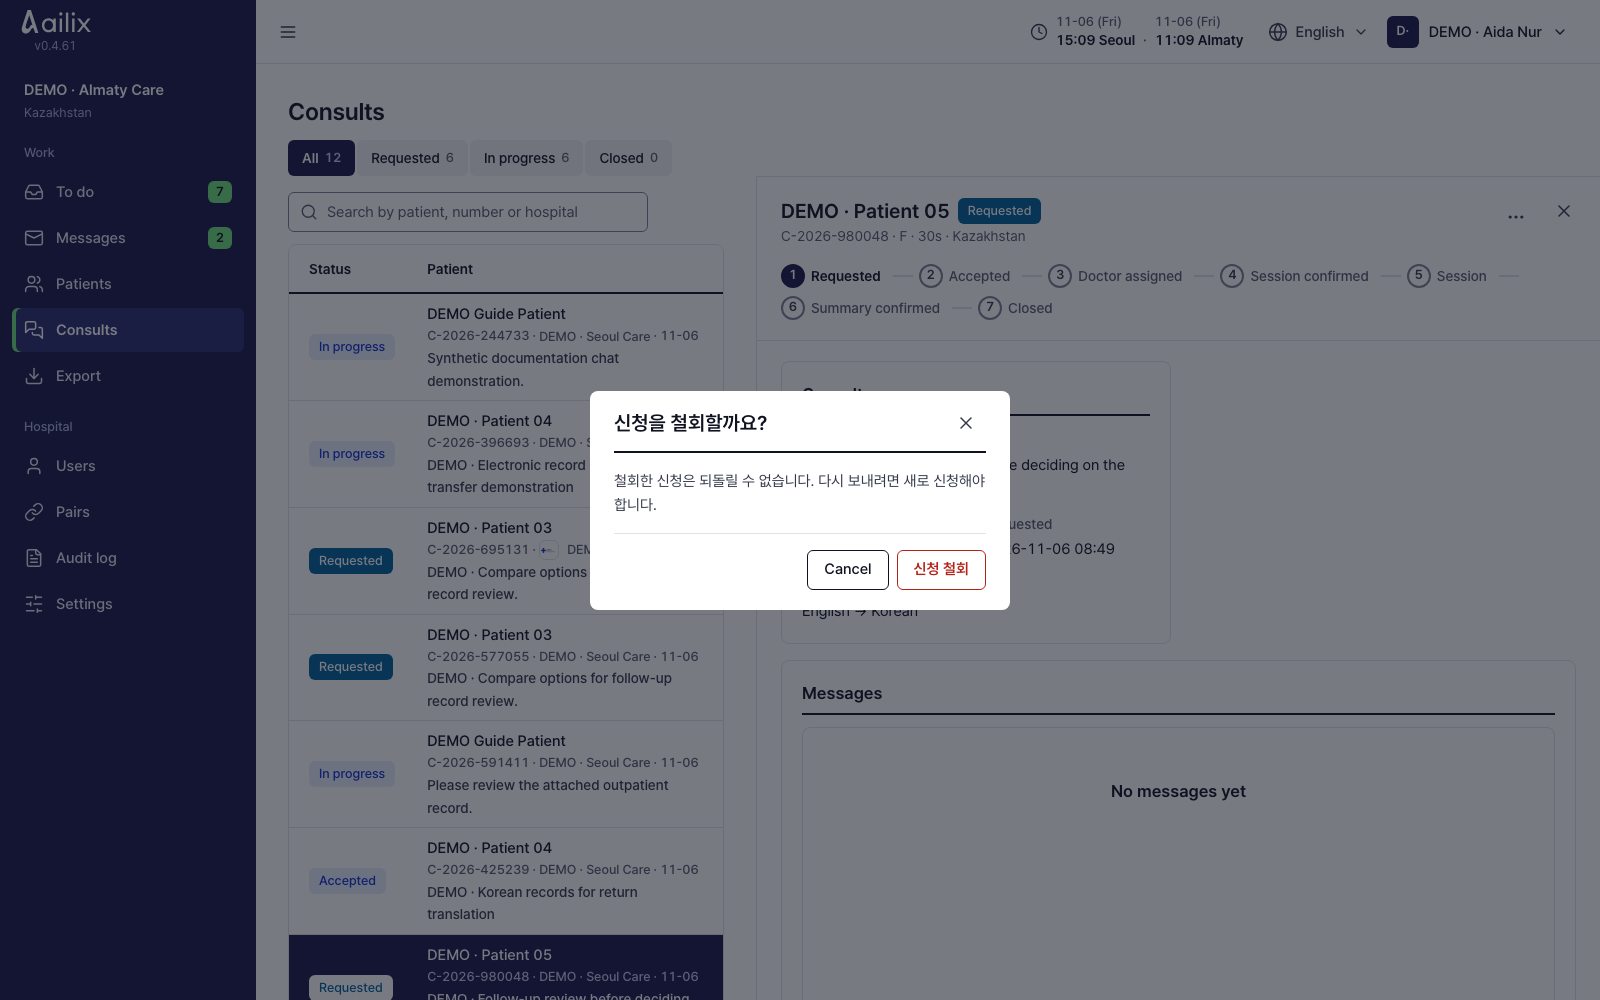
Withdraw a request or close a consult

Consult details → ⋯

Referring hospital administrator · Withdraw a request or close a consult
View larger
  1. To take back a request before an answer, click Withdraw request and confirm.
  2. To end the work, choose Close consult. If a session is already scheduled, first check its status and the cancellation terms.

Check before you finishYou cannot undo withdrawing or closing. Do not confuse them with End session, which ends only one session.

5. Medical record translation and hospital systems

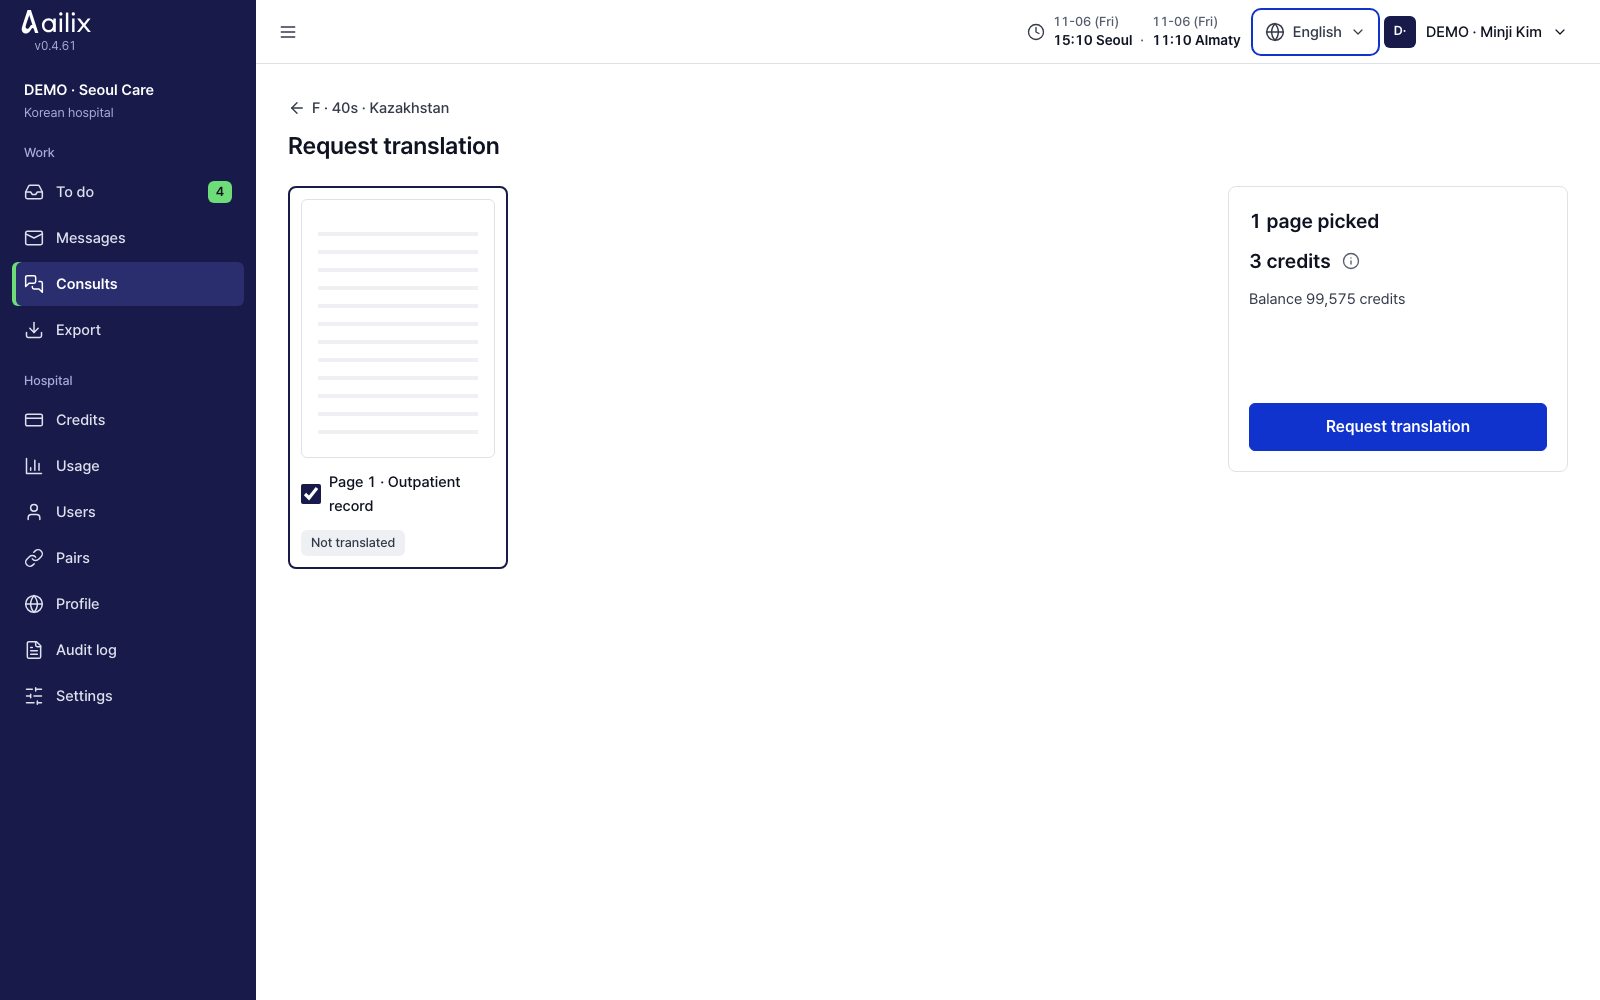
Korean hospital administrator

Check the pages to translate and the cost

Consult details → Medical records → Request translation

Korean hospital administrator · Check the pages to translate and the cost
View larger
  1. Choose the pages to translate. Check the page count, the credits to be deducted and your balance.
  2. Click Request translation. You can do other work and come back with Open result in the completion notice.

Check before you finishCheck the translation status of each page. For a page that failed, check the error and ask again.

Korean doctor

Look at the original, the translation and the risk marks

Consult details → Translated page

Korean doctor · Look at the original, the translation and the risk marks
View larger
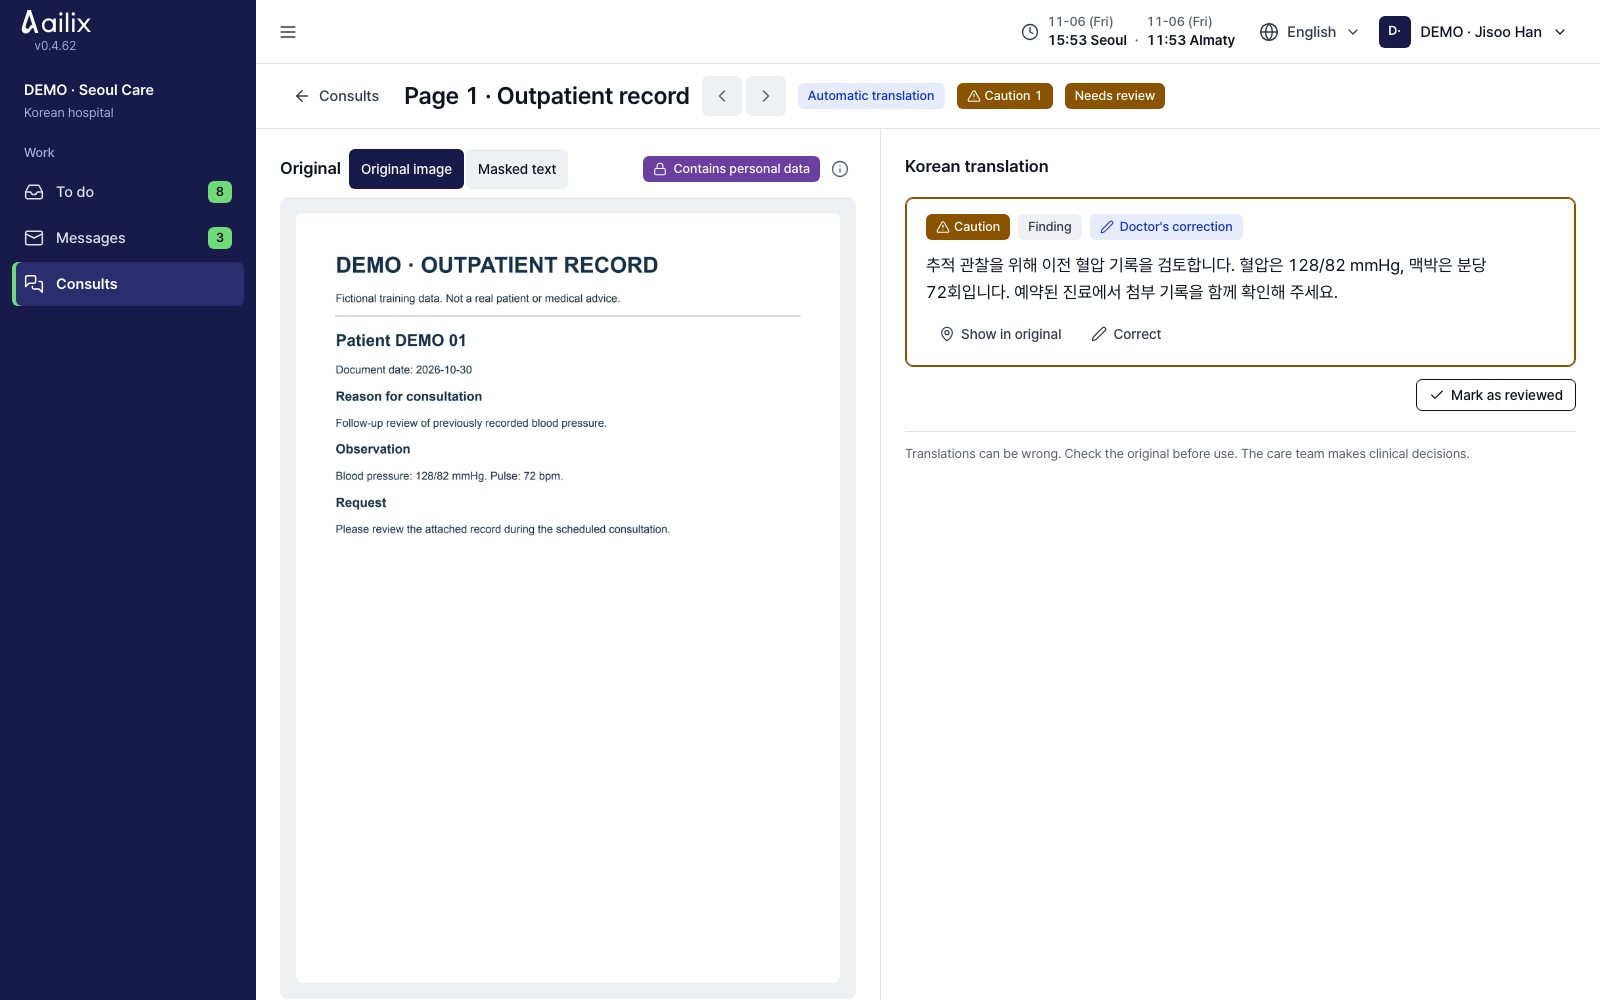
  1. Open the original and the Korean translation side by side. Click a table cell to see where it is in the original.
  2. First check drug names, doses, numbers, units, allergies and None. If you do not know the original text, do not guess. Ask for language support.
  3. For anything to fix, click Correct and then save. When you finish checking a page, click Mark as reviewed.

Check before you finishDoctor-reviewed means the doctor in charge checked it. If you translate again, the review mark goes away.

Korean hospital administrator · Korean doctor

Move translated records into the hospital EMR

Consult details → Export to EMR

Korean hospital administrator · Move translated records into the hospital EMR
View larger
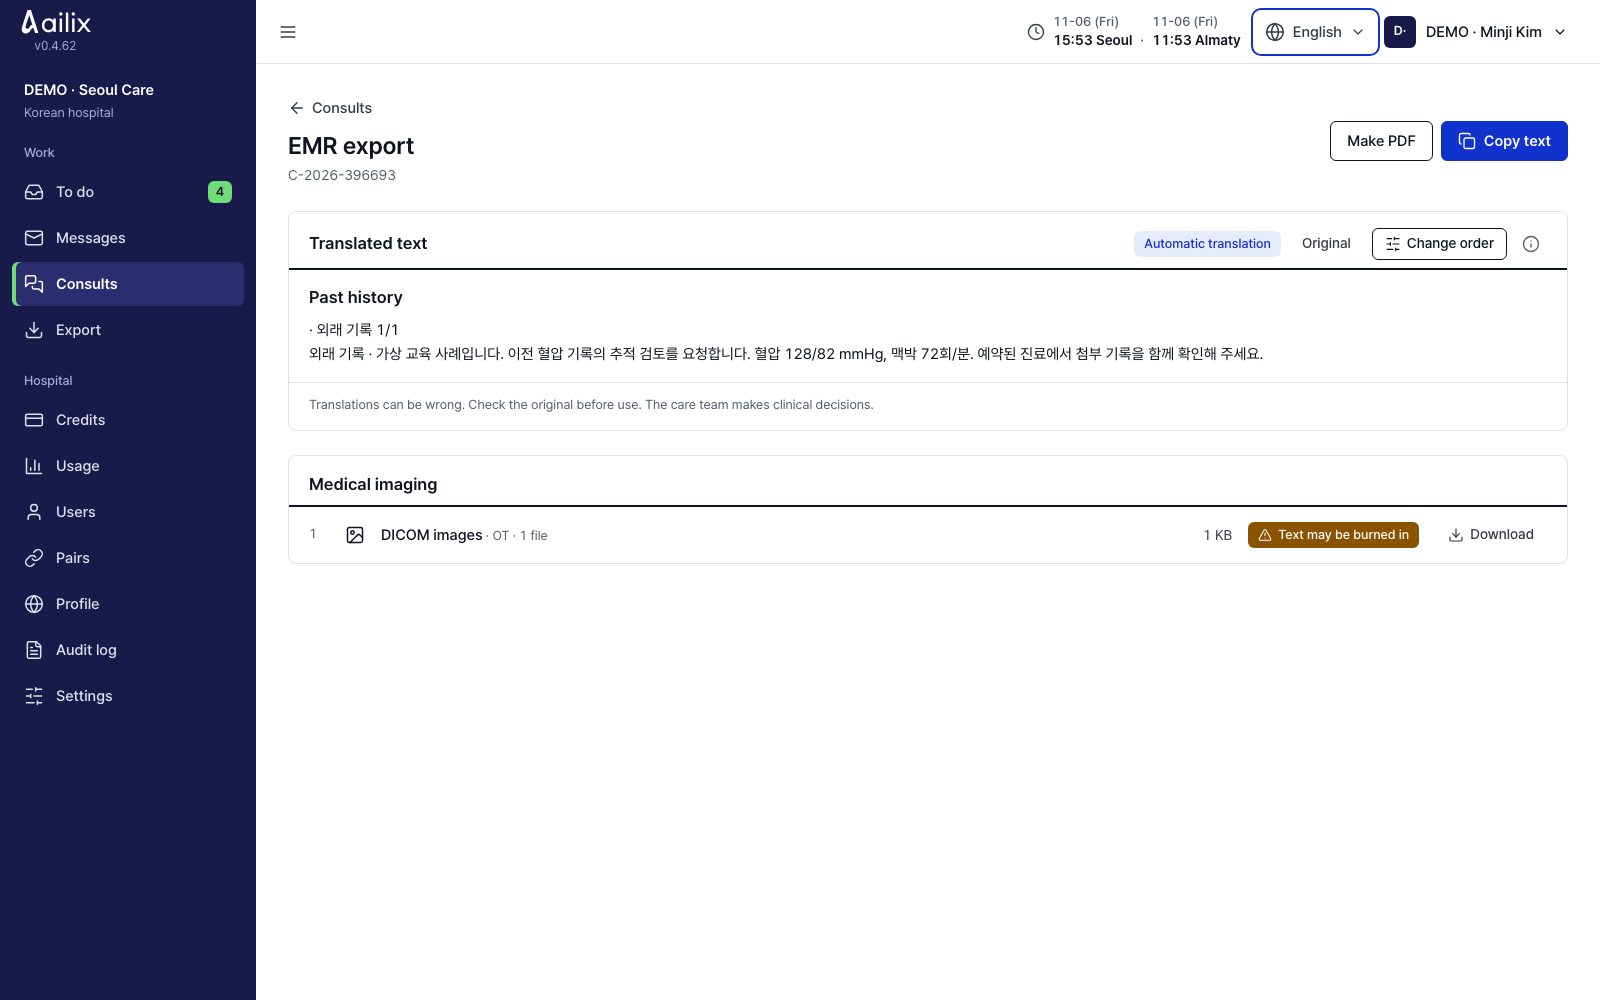
  1. Check the patient and consult numbers and the untranslated pages. Ask for any missing translations first.
  2. Paste into the electronic medical record with Copy text, or save and print with Make PDF.
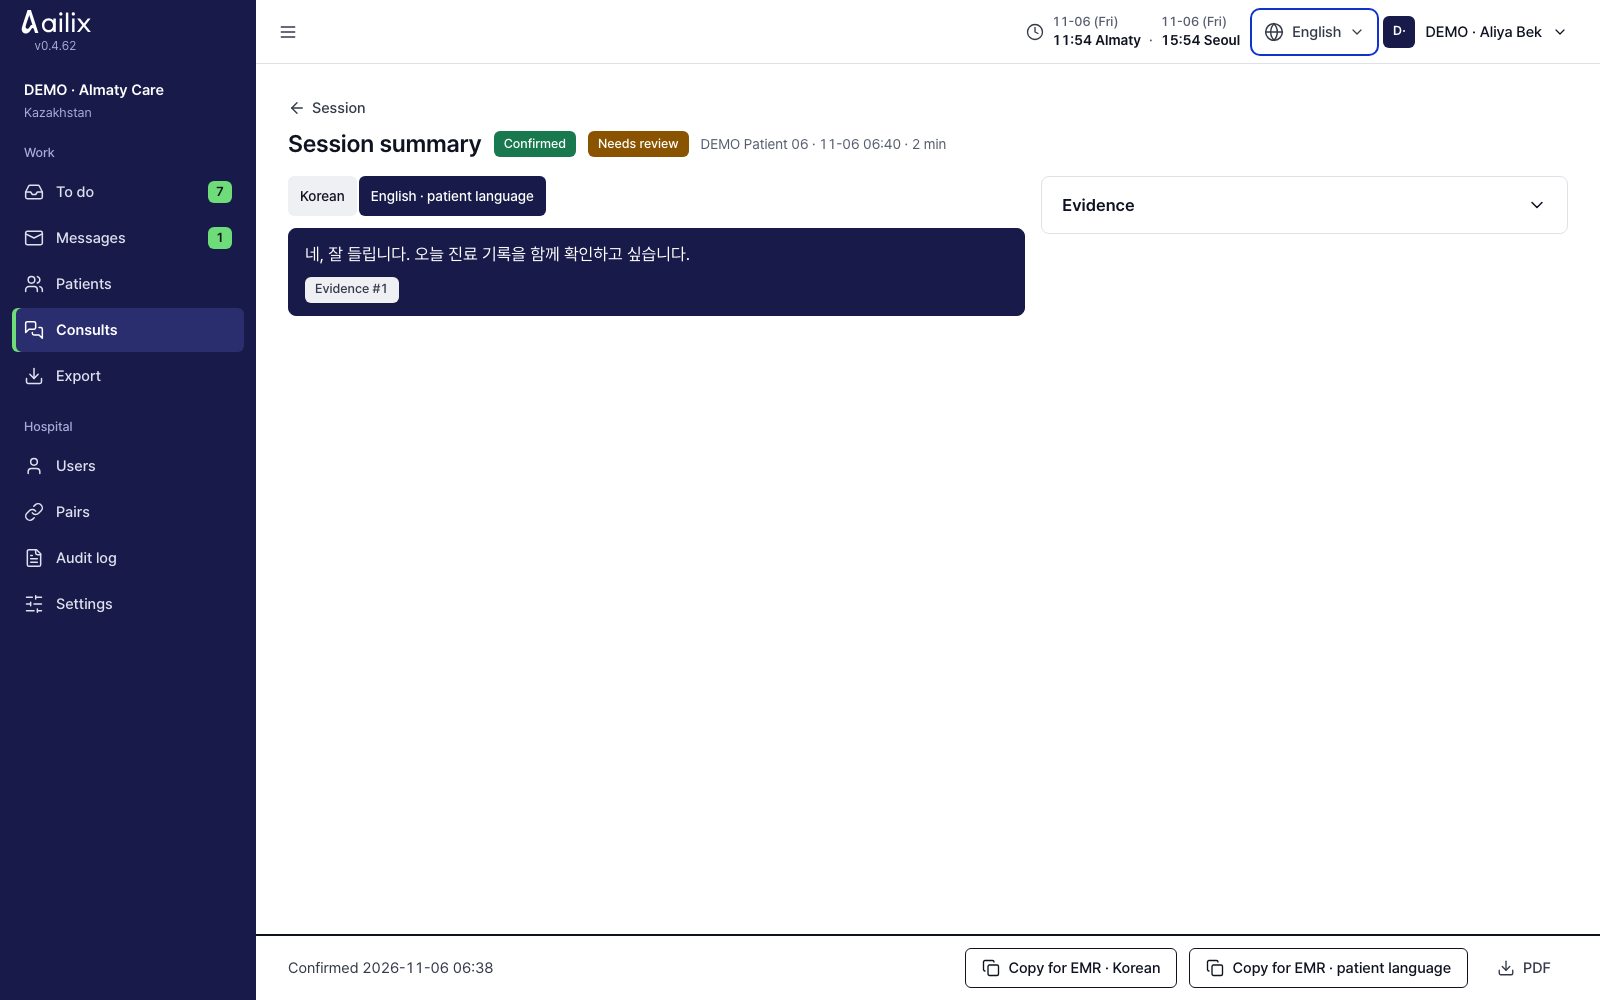
  3. Download medical images separately. After a summary is confirmed, move it with Copy for EMR · Korean.

Check before you finishIn your hospital EMR, check again that the patient and content match what you pasted.

Korean hospital administrator

Match the item order of your hospital's EMR

Export to EMR → Change order

Korean hospital administrator · Match the item order of your hospital's EMR
View larger
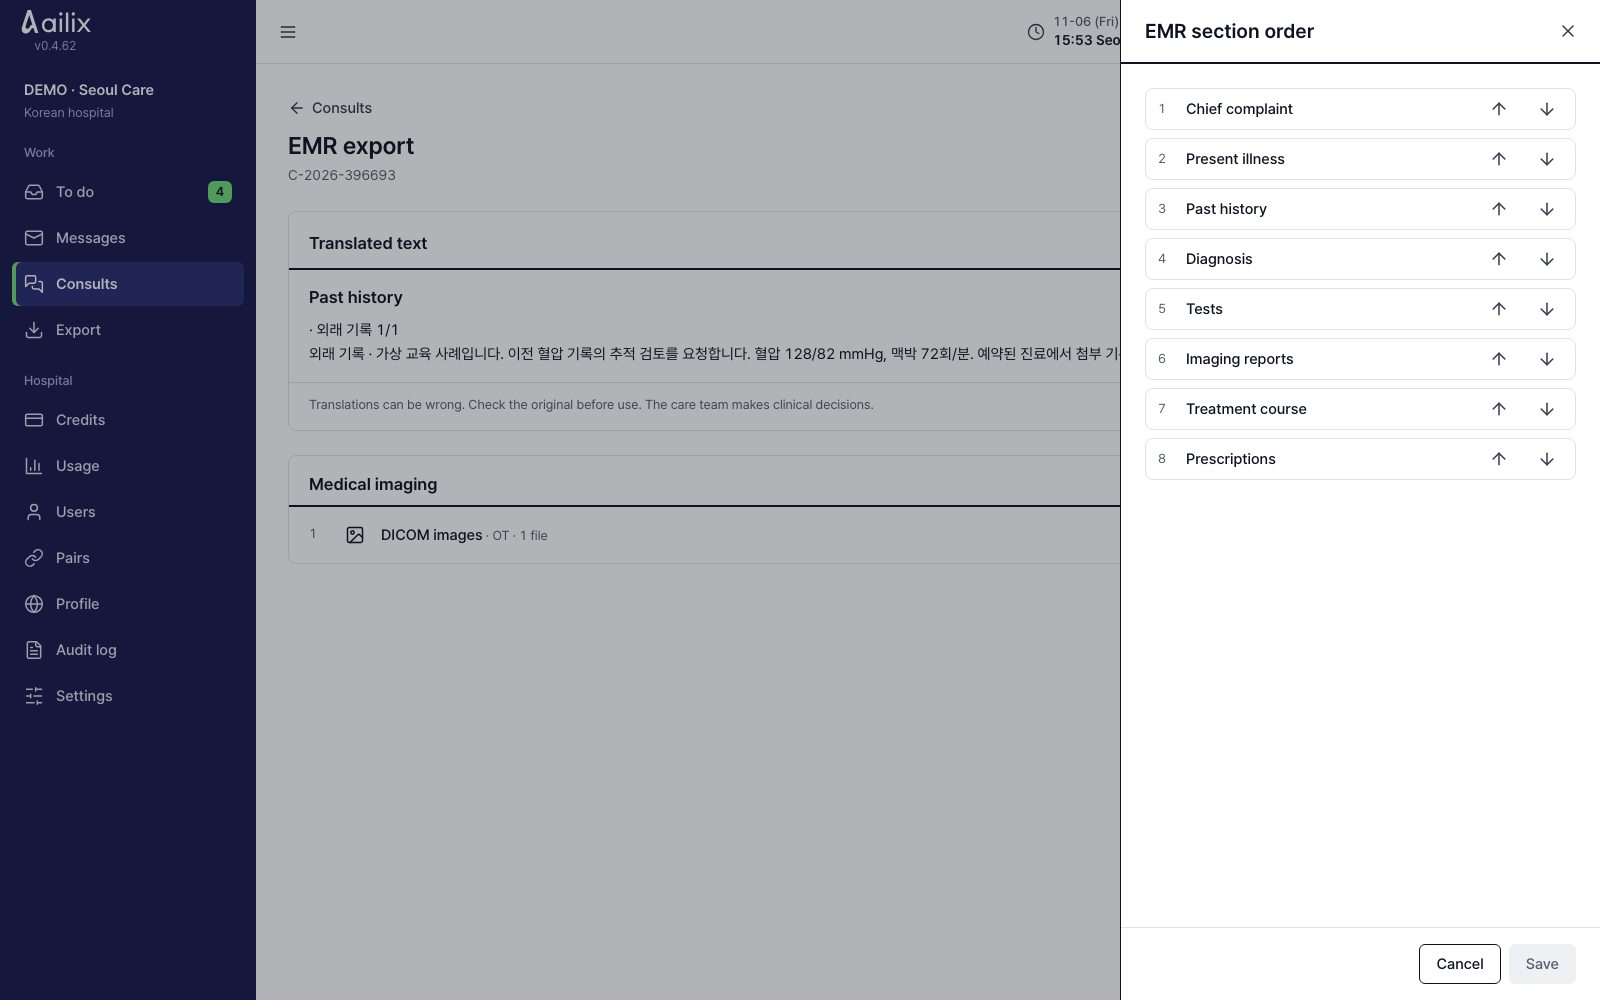
  1. Move the items with the up and down arrows. Match the order your hospital uses.
  2. Click Save, then check the text and the order it will be copied in.

Check before you finishSetting the item order does not turn on automatic sending to the hospital EMR.

Korean hospital administrator

Translate records for a patient who is going home

Consult details → Return translation

Korean hospital administrator · Translate records for a patient who is going home
View larger
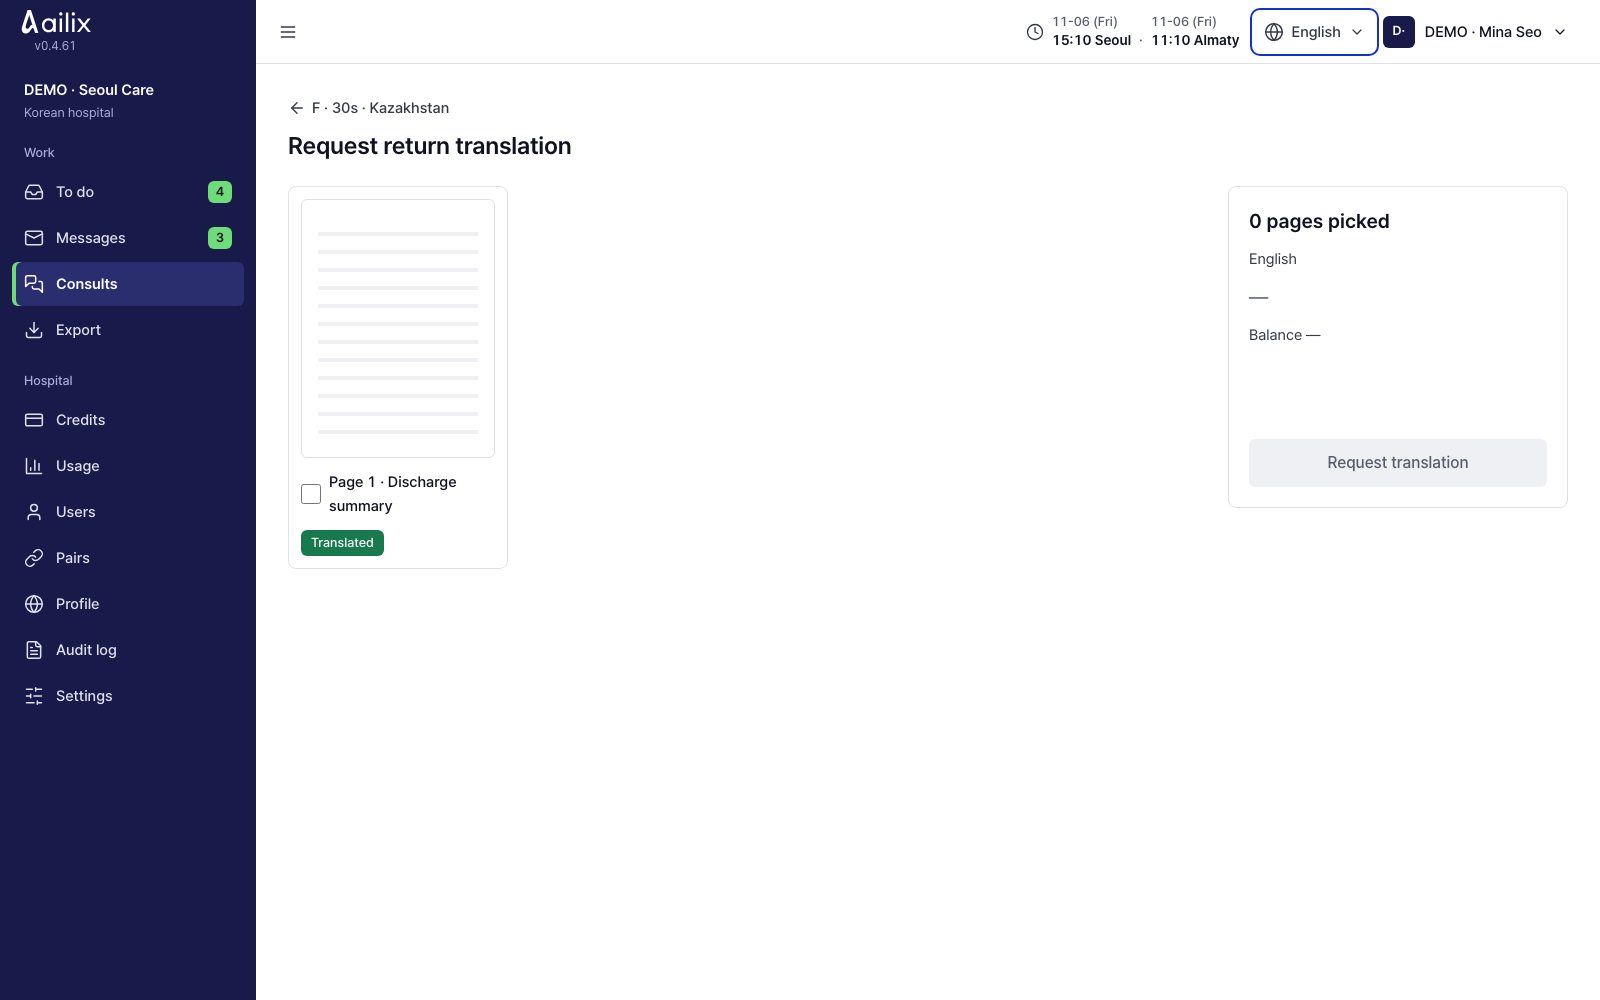
  1. Under Upload record, choose the Korean document type and the file. Do not include an ID.
  2. Check the pages to translate, the patient's language and English, and the cost, then ask for the translation.
  3. Open the finished pages and read the Korean original and each language translation. Check numbers, drug names and caution marks.

Check before you finishCheck the automatic translation · not a certified translation label and follow your hospital's process for giving results.

Korean hospital administrator · Service administrator

Prepare data to connect with an outside hospital system

Consult details → Export to EMR · Hospital IT staff

FHIR R4Move translated records into the hospital EMR
DICOMUpload CT, MRI and videos
OMOP CDMResearch data
OpenAPI integration guide ↗
  1. For daily work, move data into the hospital system with Copy text, Make PDF and image downloads.
  2. Open View OpenAPI integration document and pass it to your IT staff. Decide the target system, the data types and the rule for linking patient numbers.
  3. Clinical information uses FHIR, medical images use DICOM, and shared research data uses OMOP CDM. Agree with the IT staff on the consent scope, connection tests and receipt checks.

Check before you finishEMR copy, PDF and image files are ready to use right away. For automatic integration at each hospital, check with your IT staff whether it is available.

6. Scheduling and inviting patients

Referring hospital administrator

Choose the attending doctor and suggest times

Consult details → Ask for a session

Referring hospital administrator · Choose the attending doctor and suggest times
View larger
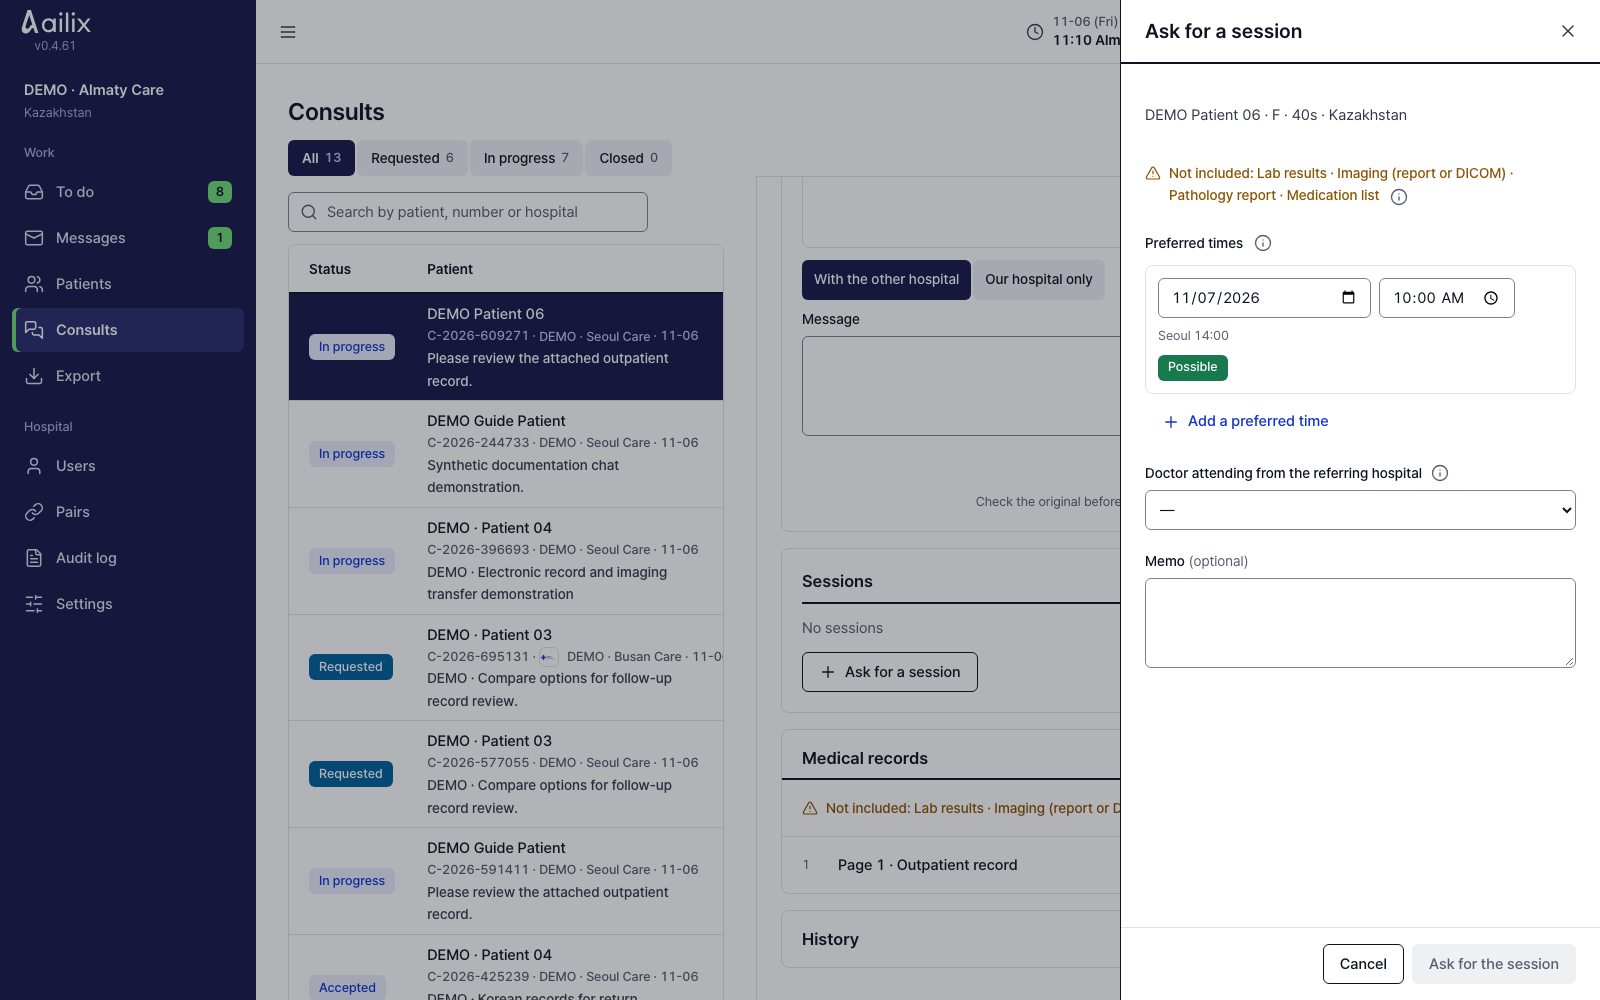
  1. Choose the referring hospital doctors who will attend and enter up to 3 preferred dates and times.
  2. Check your time zone and the Outside office hours label, then click Ask for the session.

Check before you finishAwaiting confirmation is not a confirmed booking. Wait for the Korean hospital's answer.

Korean hospital administrator

Confirm the session time and cost

Consult details → Open session

Korean hospital administrator · Confirm the session time and cost
View larger
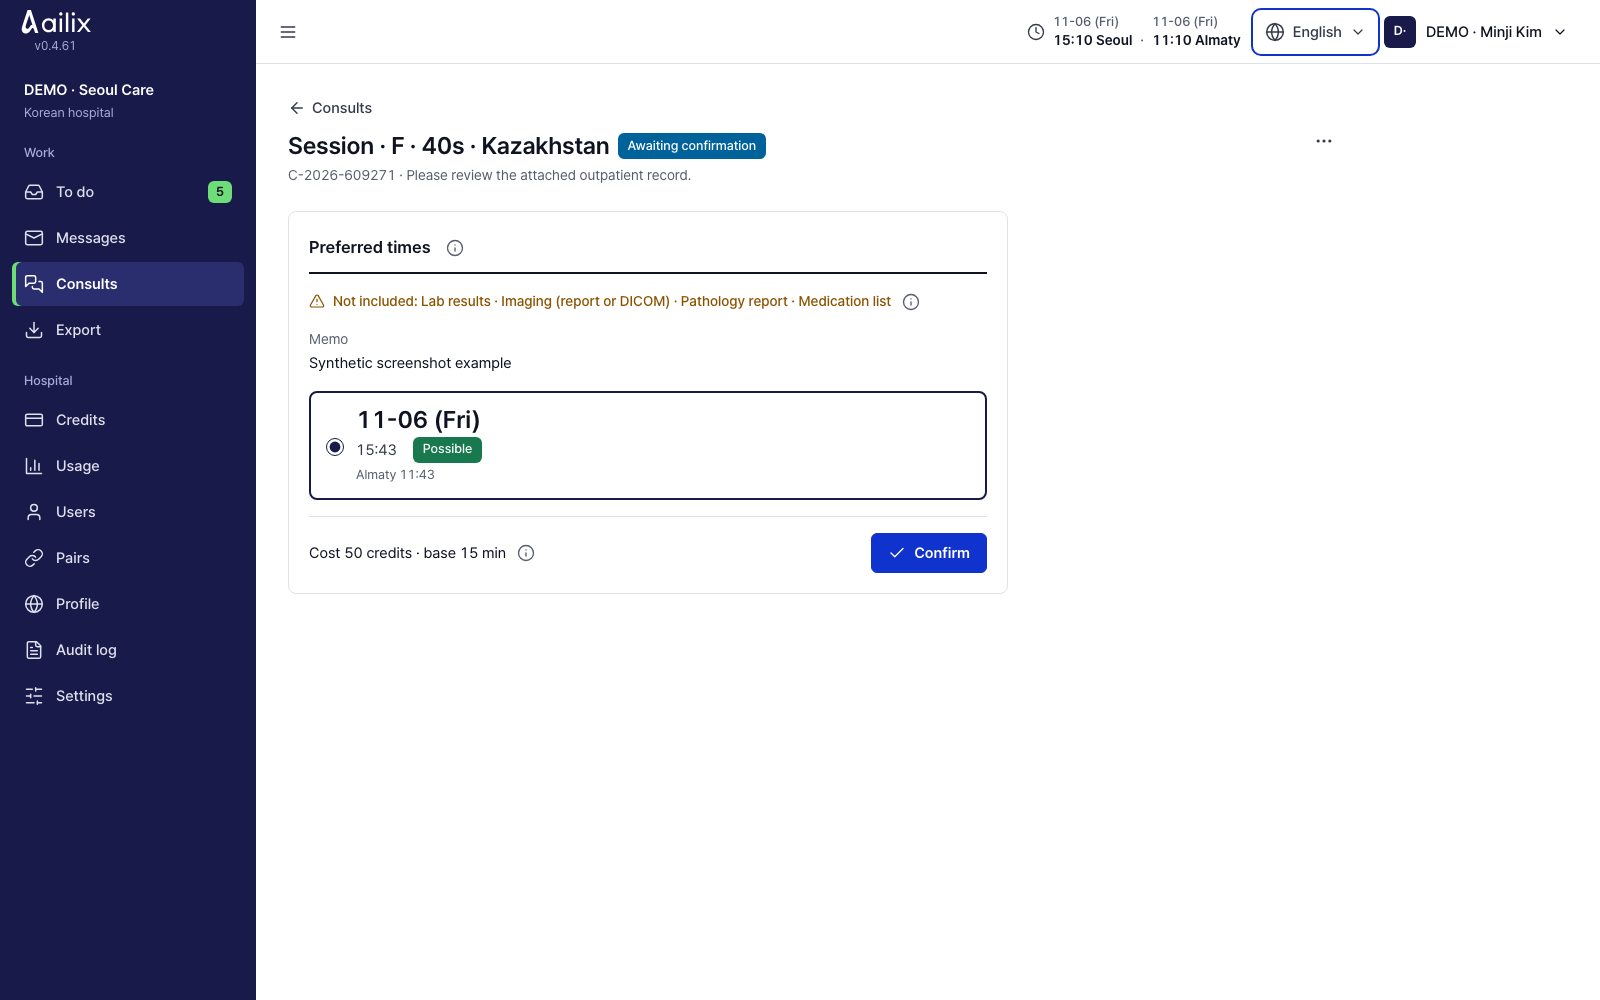
  1. Check the medical staff schedule and choose one of the preferred times.
  2. Read the base time, the credits to be deducted, the extra cost and the cancellation terms, then click Confirm.

Check before you finishWhen you confirm, the credits are deducted right away and a session room is created. Tell the other hospital the confirmed time.

Referring hospital administrator · Korean hospital administrator

Explain time changes and cancellations

Session details → Time change requests or ⋯

Referring hospital administrator · Explain time changes and cancellations
View larger
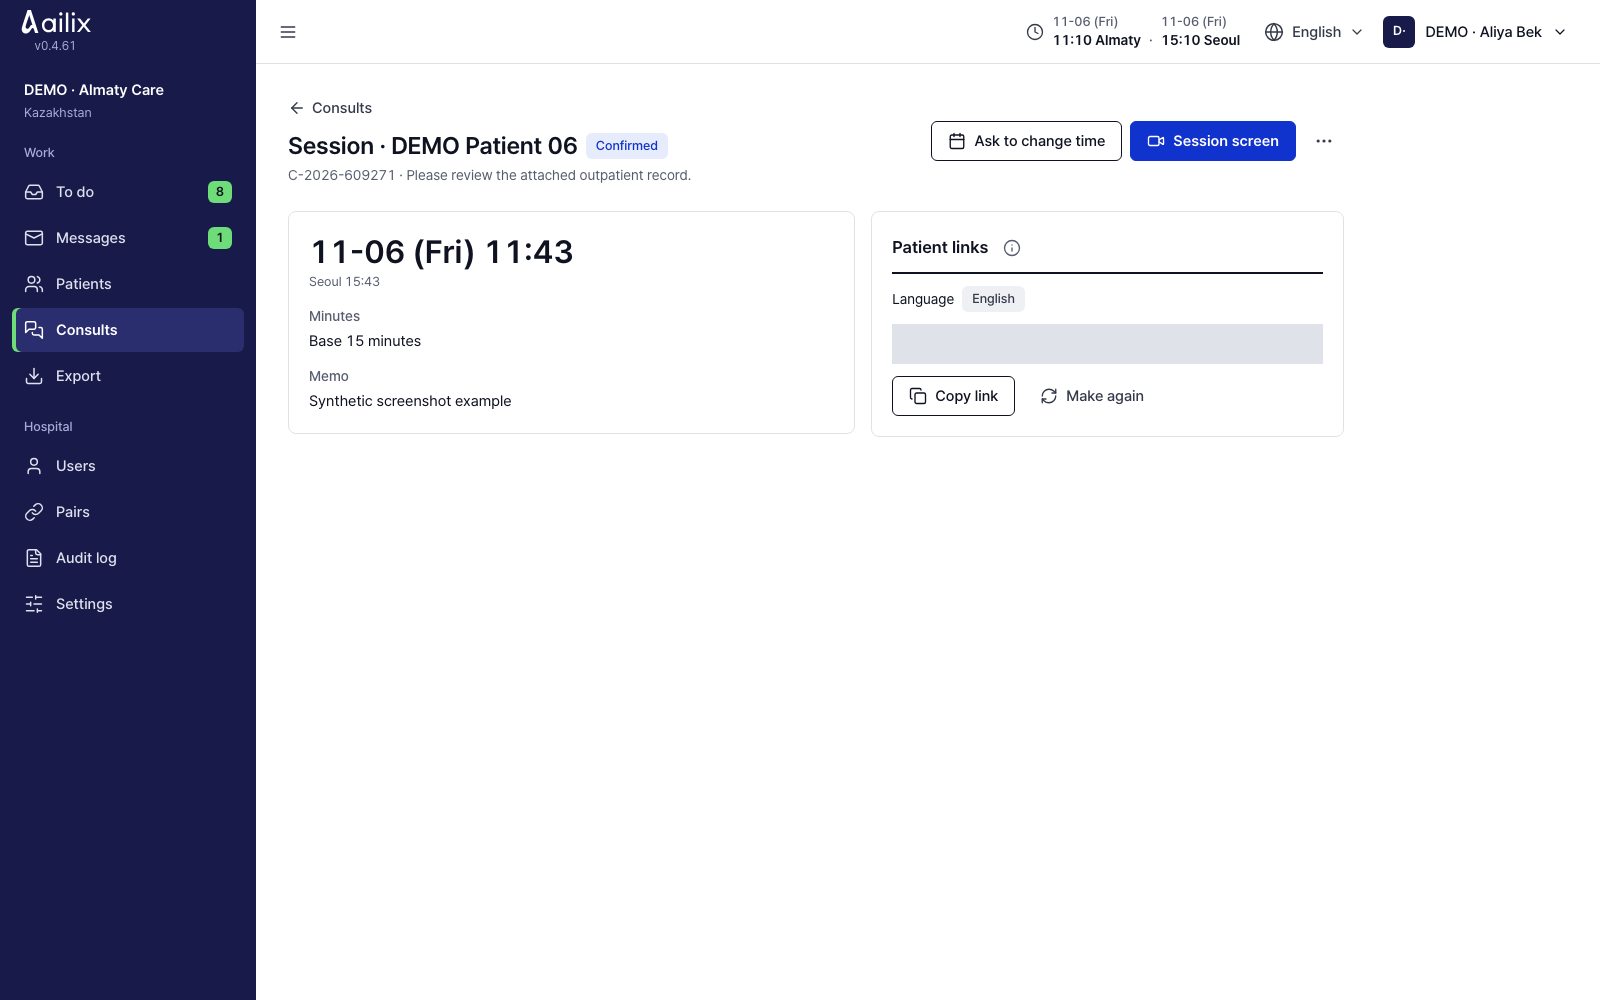
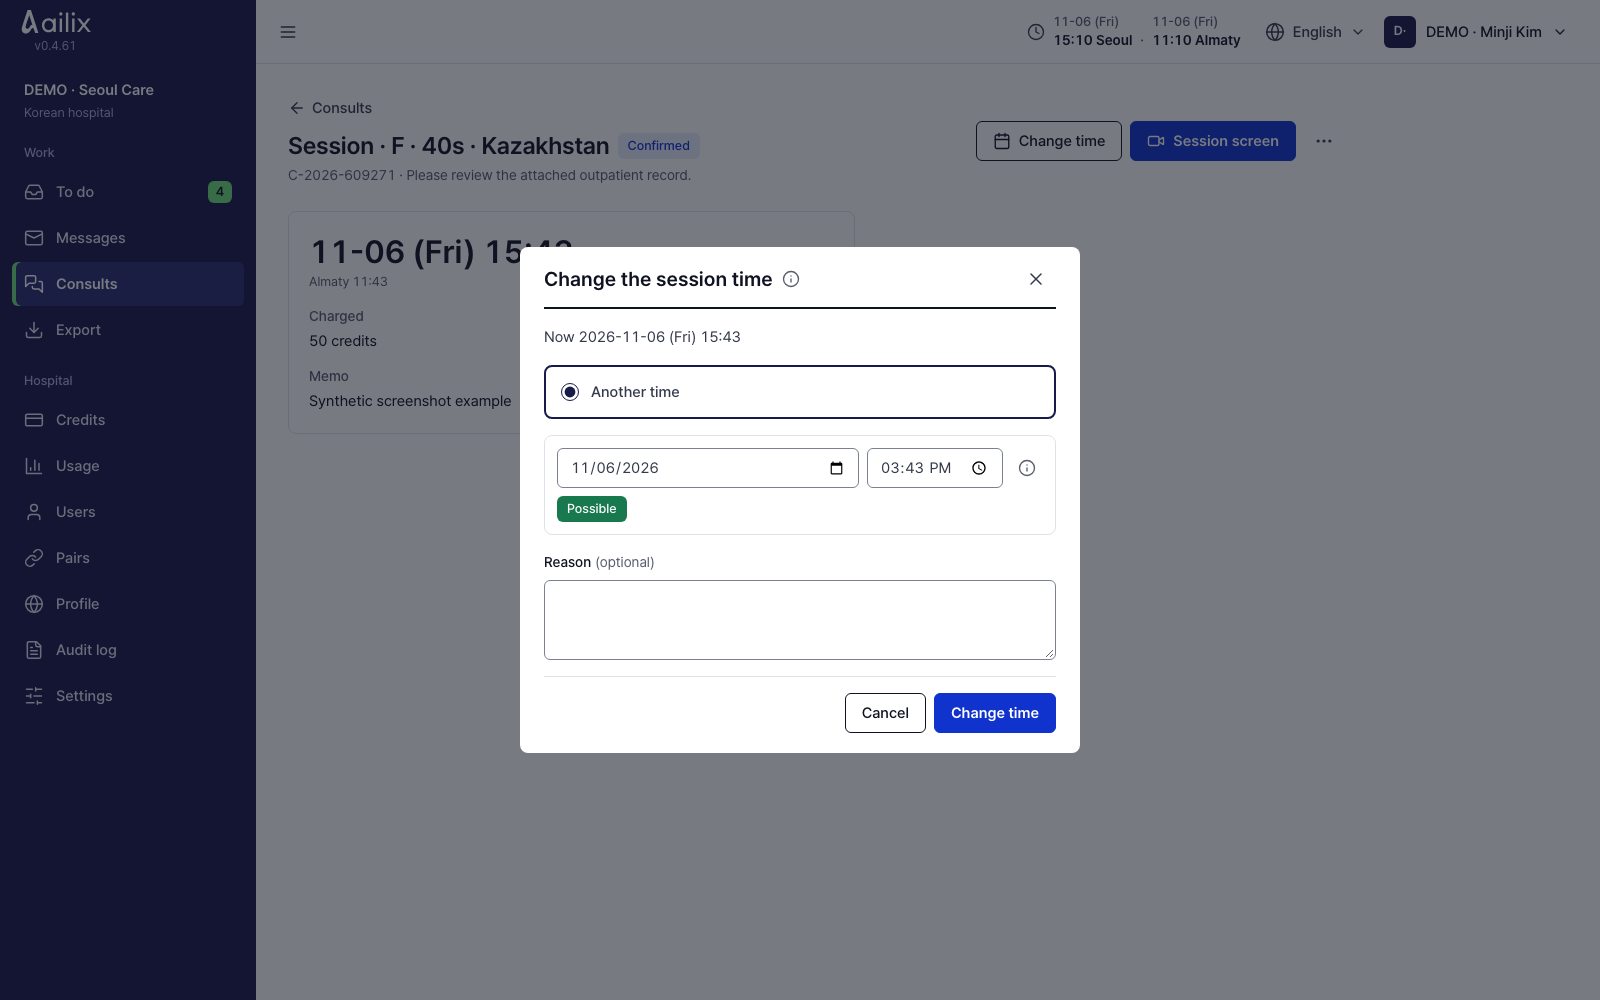
  1. Referring hospitals use Ask to change time. Korean hospitals use Change time. One session can be changed up to 3 times.
  2. Tell them again the new confirmed date and the patient's local time. The patient's existing link still works.
  3. To cancel, read the terms in ⋯ → Cancel session and confirm. You get a full refund up to 24 hours before the time first confirmed.

Check before you finishMoving the time does not reset the deduction and refund deadlines. You cannot undo a canceled session.

7. Video sessions and wrap-up

Patients and guardians who enter through a consultation link

Open the session link on your phone

The link you got from the hospital

Patients and guardians who enter through a consultation link · Open the session link on your phone
View larger
  1. Open the link you received in your phone's browser. You join without installing an app or signing up.
  2. Read the language and session instructions. If the link does not open, ask the hospital for a new link.

Check before you finishOnce you have opened the link, open it again in the same browser. On another device you may need a new link.

Referring hospital doctor · Korean doctor

Check who is in the session room

Session details → Session screen

Referring hospital doctor · Check who is in the session room
View larger
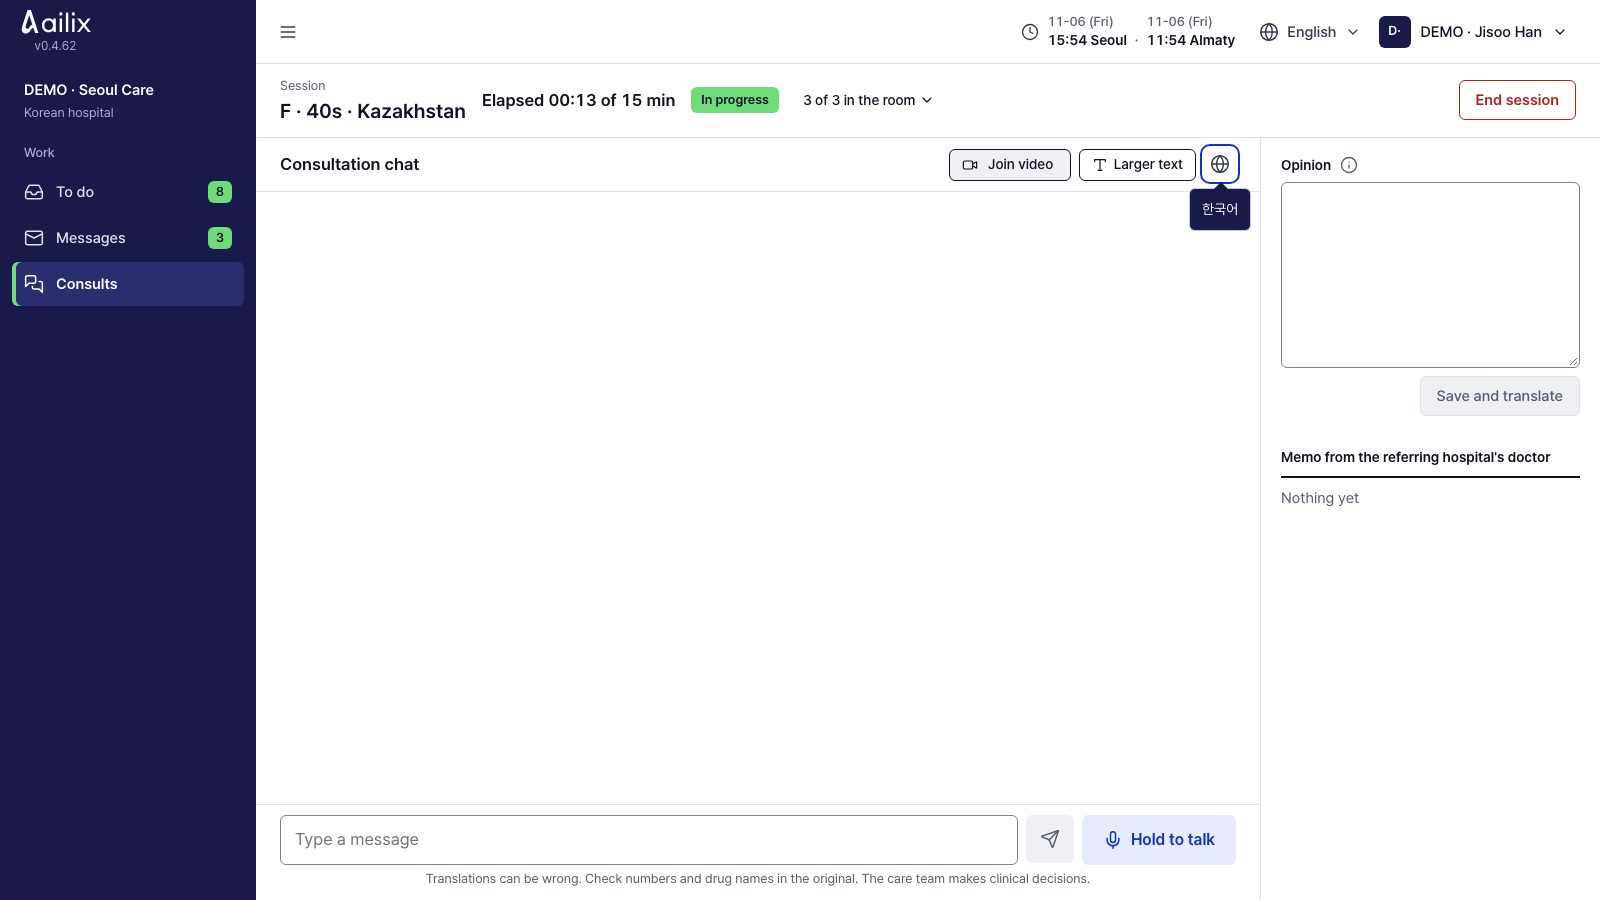
  1. The referring hospital doctor and the Korean doctor each join with their own account.
  2. Look at the attendance under the number in the room. When everyone is ready, the Korean doctor in charge clicks Start session.

Check before you finishYou can start from 15 minutes before the booking until 30 minutes after. If the session needs the referring hospital doctor, that doctor must be in the room.

Patients and guardians who enter through a consultation link

Allow your camera and microphone, then join

Session screen → Join video

Patients and guardians who enter through a consultation link · Allow your camera and microphone, then join
View larger
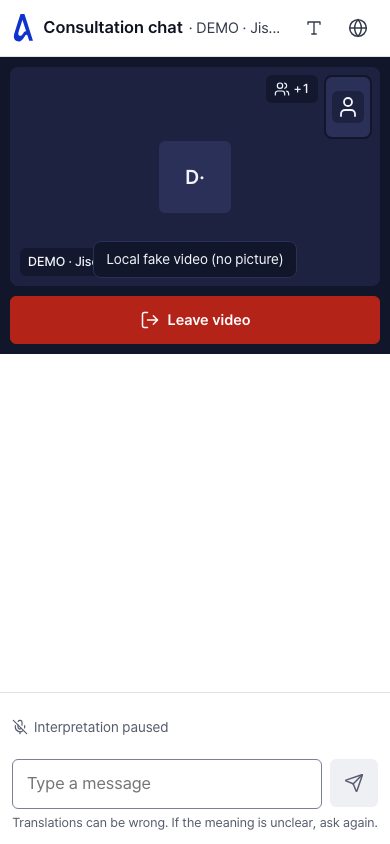
  1. When the session starts, click Join video. If your browser asks about the camera and microphone, allow them.
  2. Check your own screen, the doctor's screen and the volume. If you blocked them, allow them in your browser's site settings and click Reconnect.

Check before you finishThe camera and microphone prompts look different in each browser. If you cannot connect, tell the hospital.

Korean doctor · Referring hospital doctor

Check your devices and speak in short sentences

Session screen → Join video

Korean doctor · Check your devices and speak in short sentences
View larger
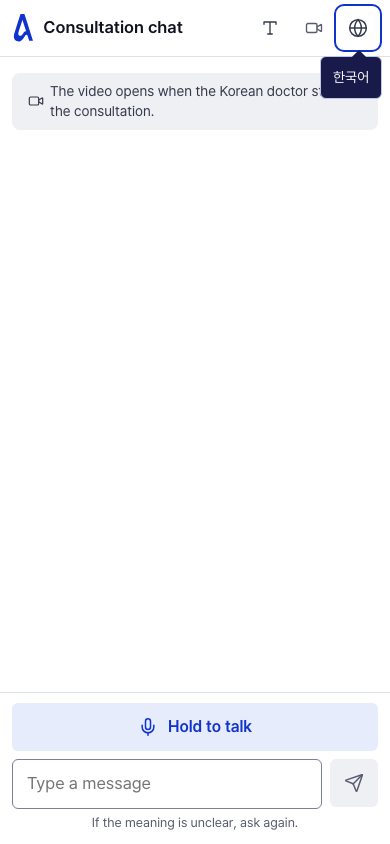
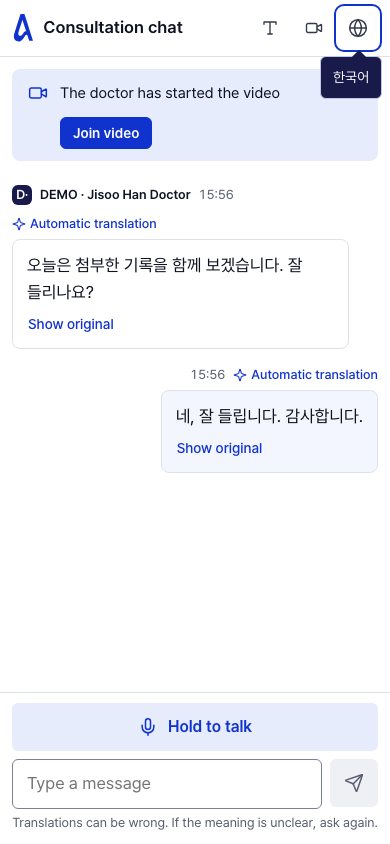
  1. Turn on your microphone and camera and check the connection with the patient and the referring hospital doctor. If you have several devices, choose one with ⌄ next to it.
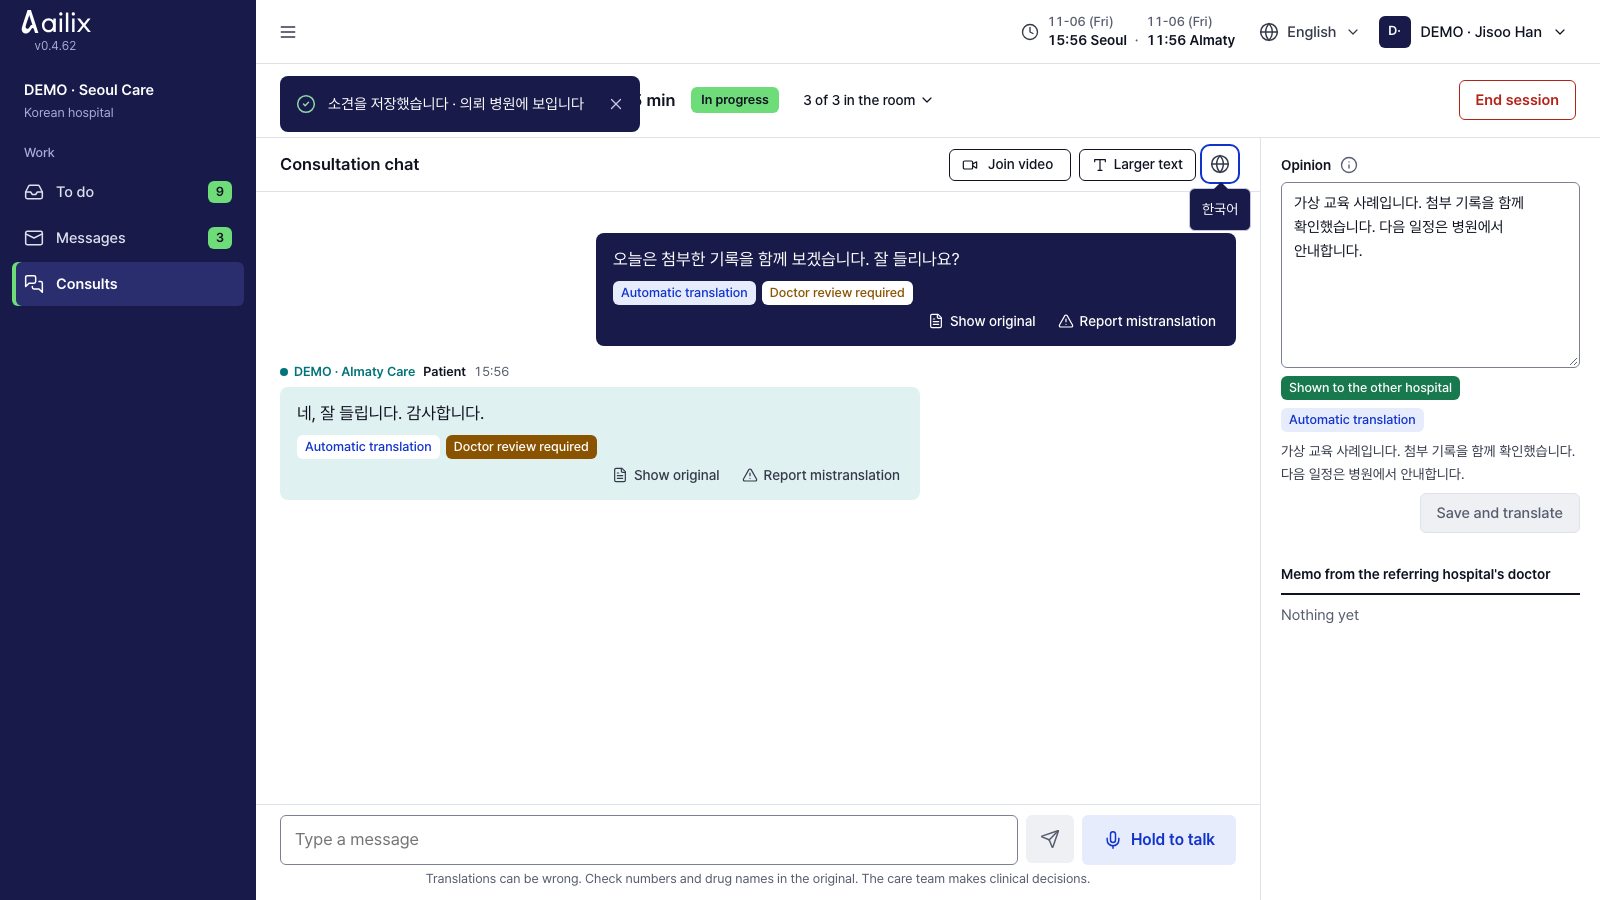
  2. Check Automatic interpretation on and speak briefly, one person at a time. If you turn off your microphone, your voice and the automatic interpretation both stop.
  3. When a request to check something appears under What we heard, read it. Click Send only if it is right. If it is wrong, cancel.
  4. If the interpretation is off, click Translate again or write it again in short words. Under Report mistranslation you can leave the problem and the correct wording.

Check before you finishCheck numbers and drug names against the original. We do not record video.

Patients and guardians who enter through a consultation link

Read the interpreted text and answer

The chat below the session screen

Patients and guardians who enter through a consultation link · Read the interpreted text and answer
View larger
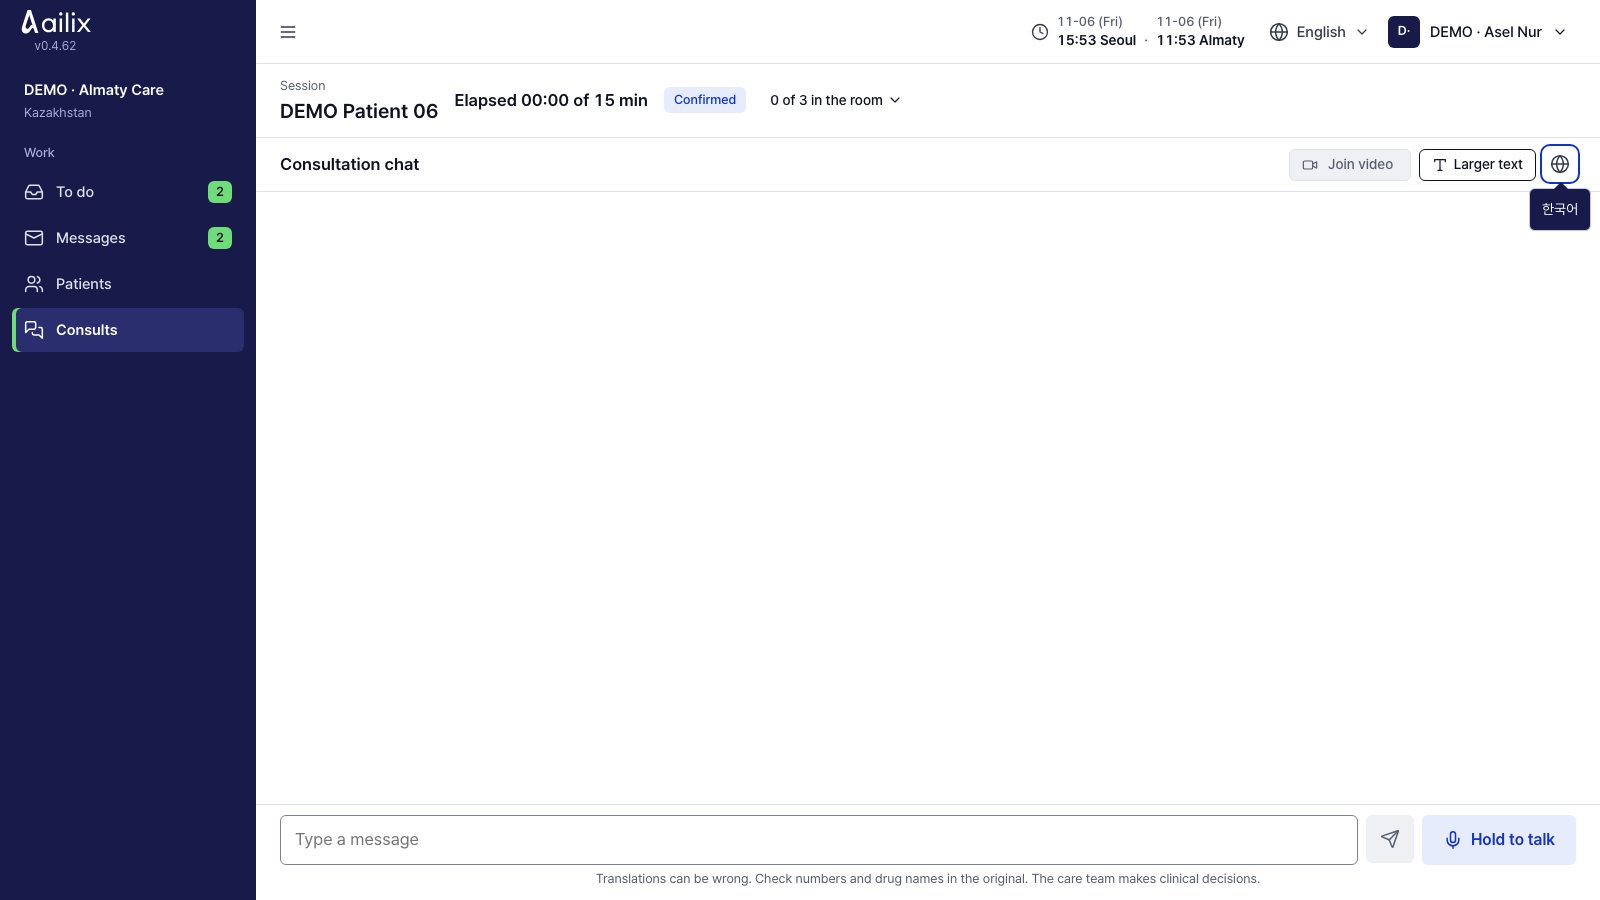
  1. Check that the doctor's words show in your language. If the meaning seems strange, ask again.
  2. If the sound cuts out, type a short message and send it. If you need to, click Show original or Larger text.
  3. When your words stay in What we heard, read them. Words marked Check, then send go out only when you click Send because they are right.

Check before you finishLeave video only takes your own video out. It does not end the whole session.

Korean doctor · Referring hospital doctor

Write the opinion and check the translation status

Session screen → Opinion

Korean doctor · Write the opinion and check the translation status
View larger
  1. The Korean doctor writes the opinion and clicks Save and translate. The referring hospital doctor leaves their own Memo.
  2. If Risk · held or Translation failed appears, check the original and fix it or translate again.

Check before you finishCheck that it is in a state the other hospital can see. Click Send as is only after you check the content.

Korean doctor

End the session after you finish explaining

Session screen → End session

Korean doctor · End the session after you finish explaining
View larger
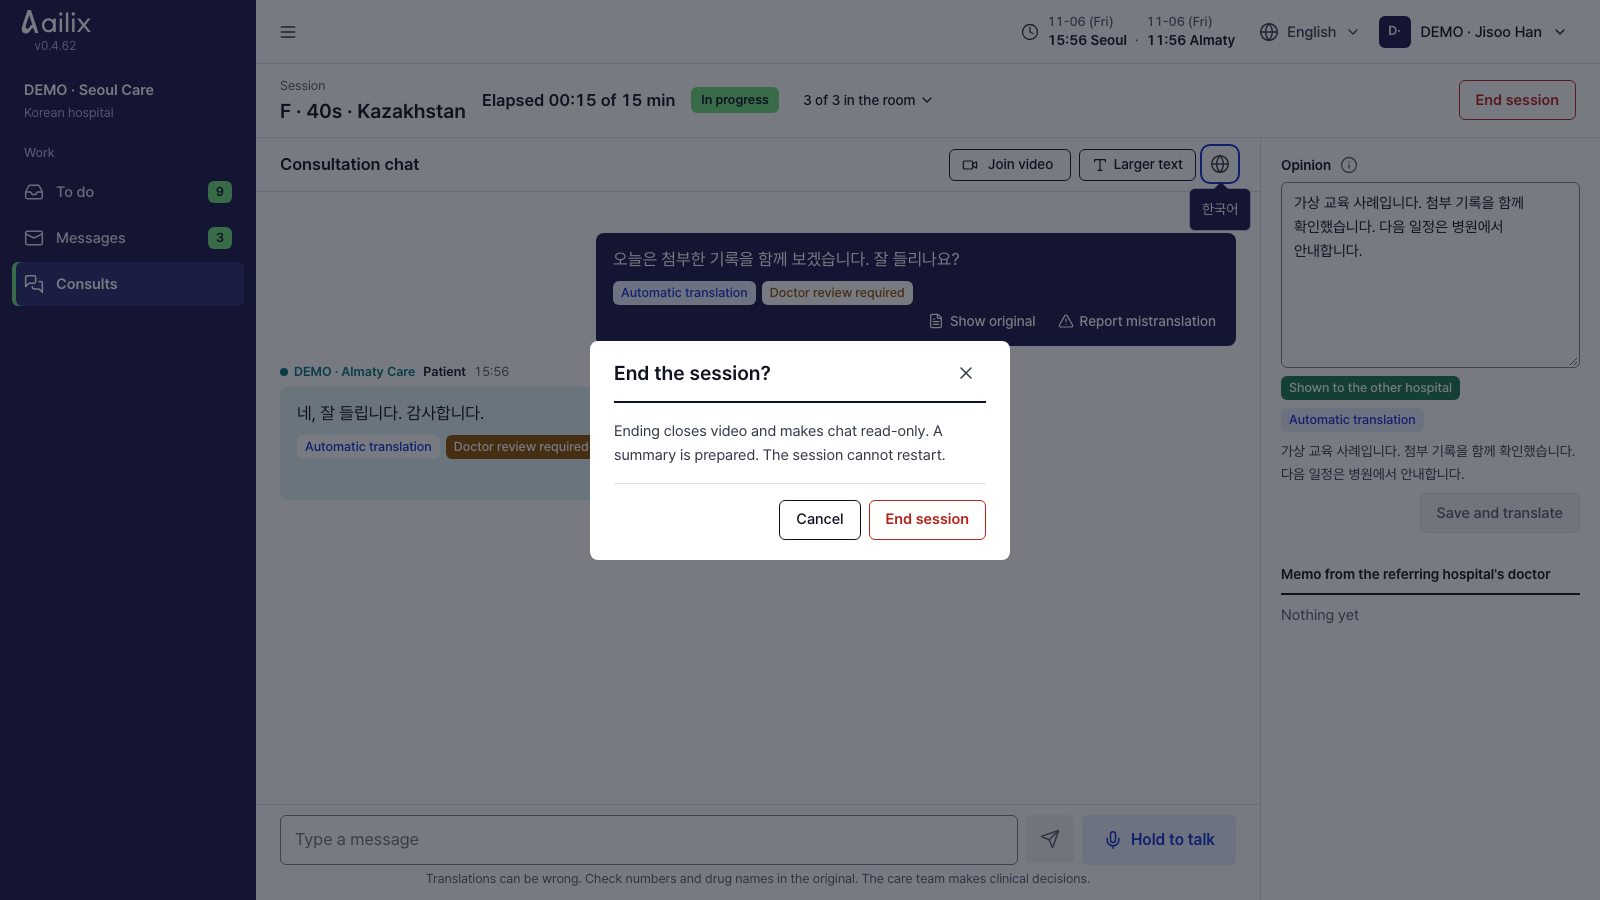
  1. Check the patient's questions and what happens next.
  2. The Korean doctor in charge clicks End session and confirms.

Check before you finishEveryone's video closes and the chat becomes read only. You cannot restart a session that has ended.

Korean doctor

Check the evidence in the summary and confirm it

Finished session → Open summary

Korean doctor · Check the evidence in the summary and confirm it
View larger
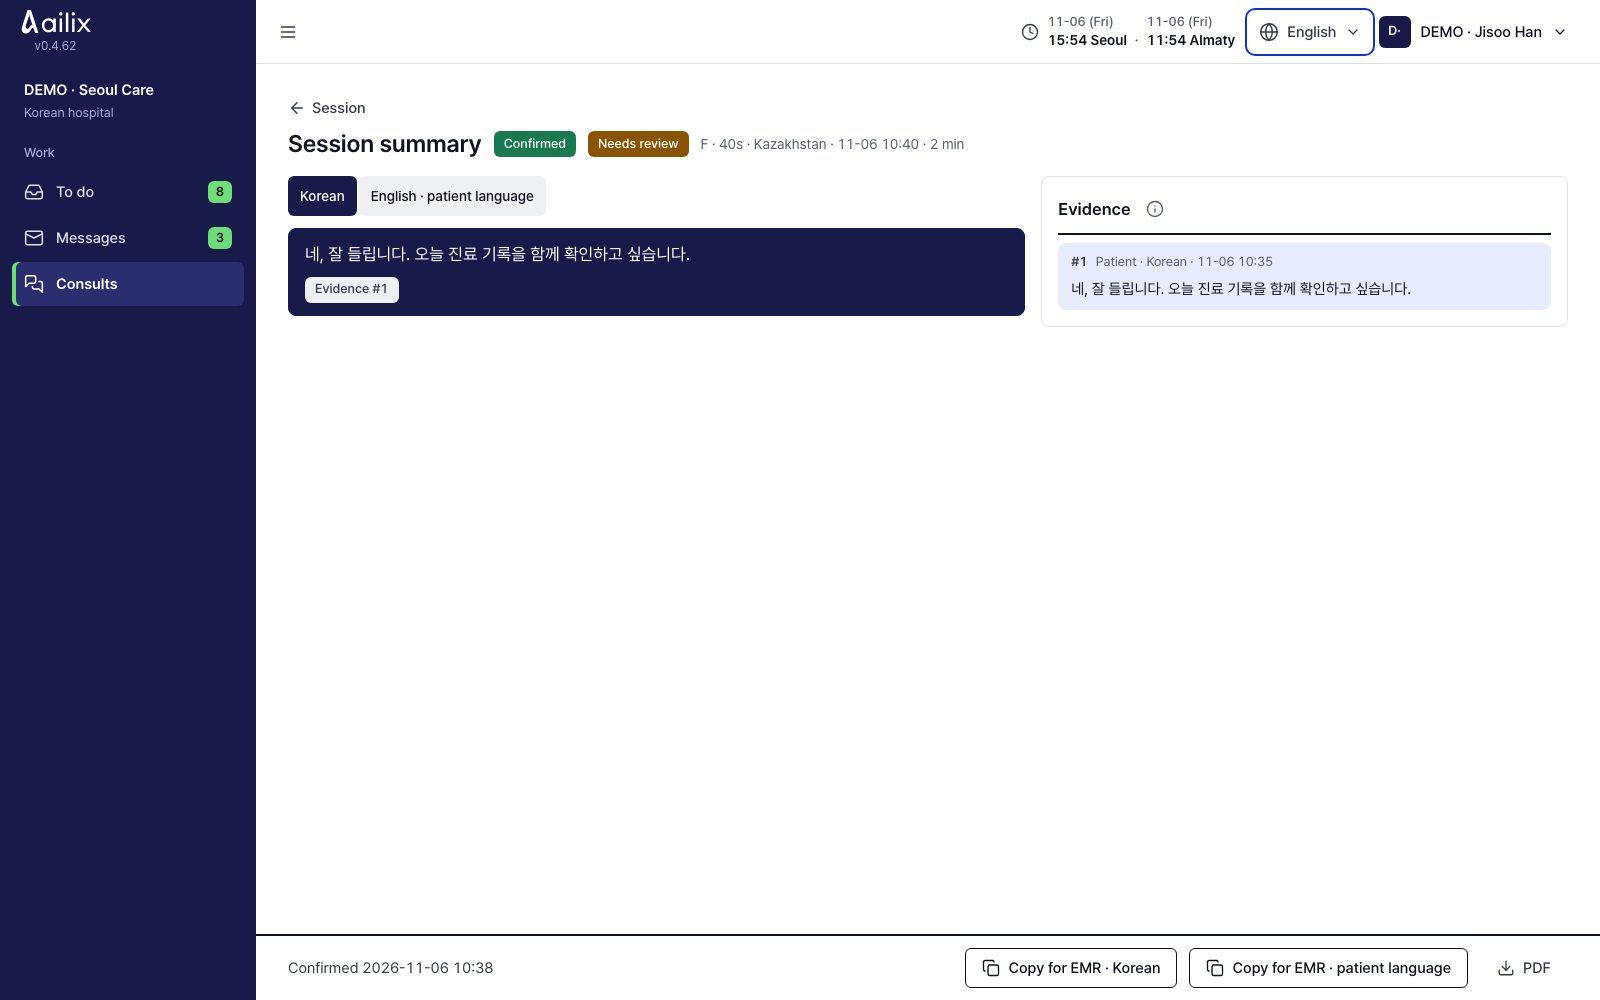
  1. Click a sentence in the summary to see the messages it is based on. Compare numbers, drug names and the next plan.
  2. Fix wrong sentences with Correct. Fix or delete anything marked No evidence, and translate again or check any risky sentence.
  3. If nothing is blocking confirmation, click Confirm. If making the summary failed, use Make again.

Check before you finishThe other hospital cannot see a draft before it is confirmed. Confirm only content you have read and checked.

Referring hospital administrator

Check the result and explain it to the patient

Finished session → Summary

Referring hospital administrator · Check the result and explain it to the patient
View larger
  1. Open the confirmed summary and opinion and explain them to the patient. If it is not confirmed yet, wait for the Korean doctor in charge to confirm it.
  2. Tell the patient about the next visit or tests and how results will be shared.

Check before you finishA patient who only has a session link does not get result files through that link. A patient who signed up on their own uses the Result screen.

8. Contacts and messages

Korean hospital administrator · Referring hospital administrator · Korean doctor · Referring hospital doctor

Send a message to the person in charge of the consult

Work → Messages

Korean hospital administrator · Send a message to the person in charge of the consult
View larger
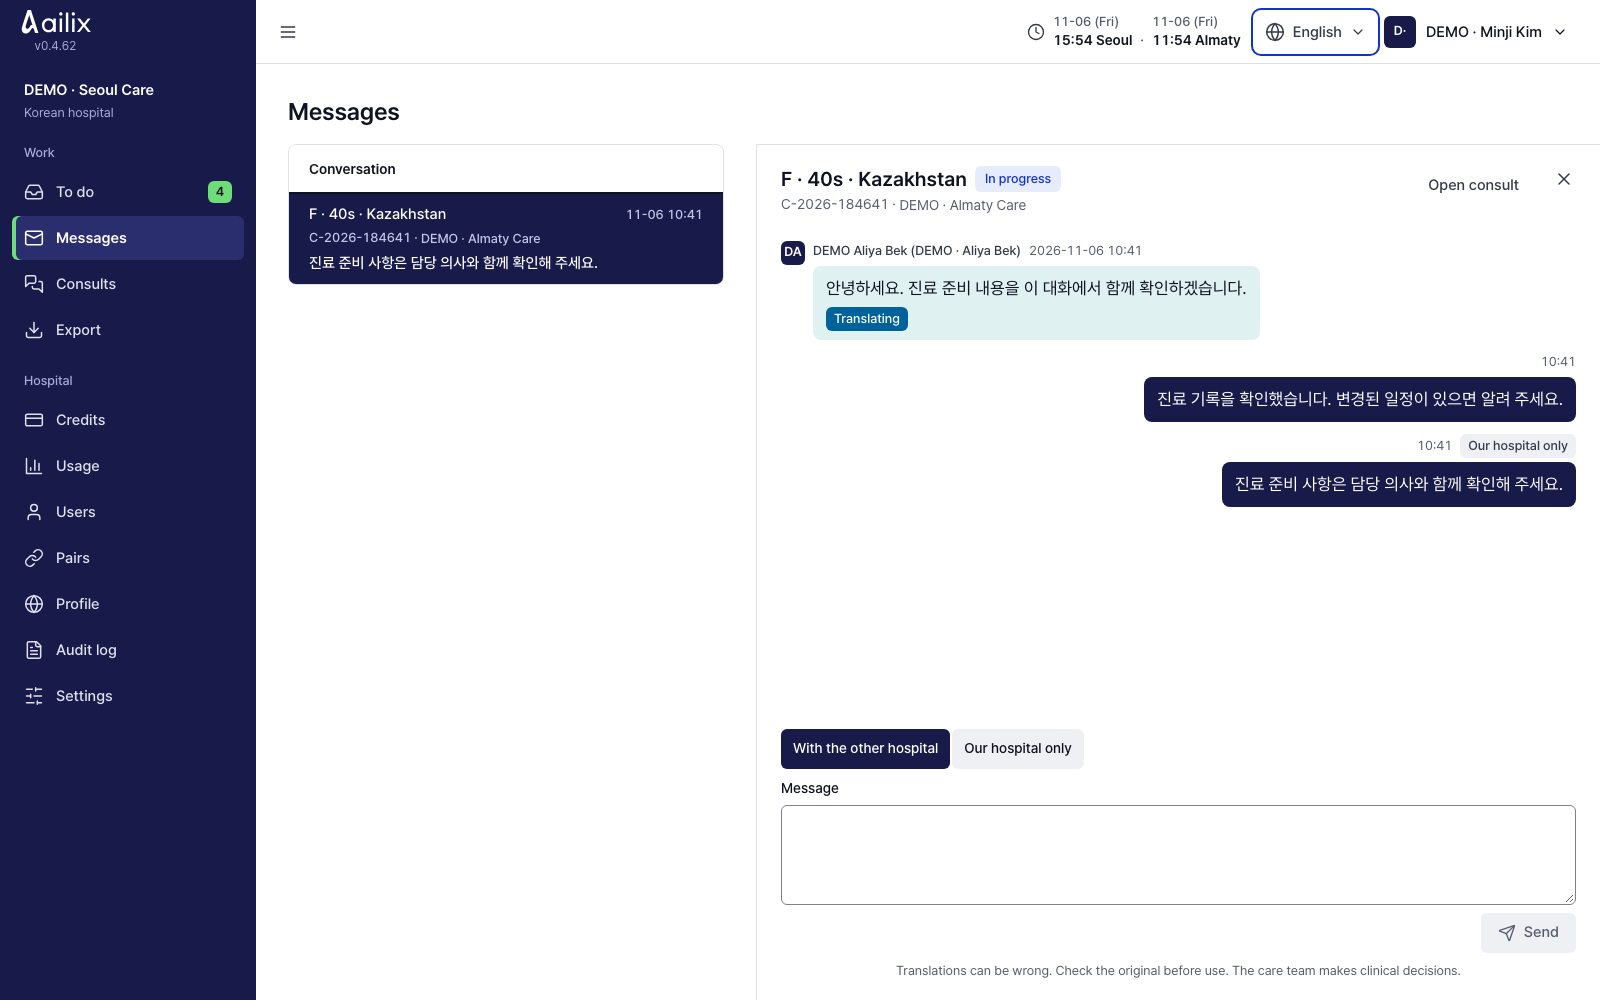
  1. In the conversation list, check the patient, the consult number and the other hospital, then open it. You can also write from Messages in the consult details.
  2. Choose Recipients as With the other hospital or With the patient and write your message. Click Send or press Ctrl/⌘+Enter.
  3. Check translated text with Show original. If a new message arrives while you read older ones, click New messages to scroll down.

Check before you finishThere is one conversation for each consult. Check the patient, the consult number and the recipients before you send.

Korean hospital administrator · Referring hospital administrator · Korean doctor · Referring hospital doctor

Share opinions only inside your own hospital

Messages → Conversation → Recipients

Korean hospital administrator · Share opinions only inside your own hospital
View larger
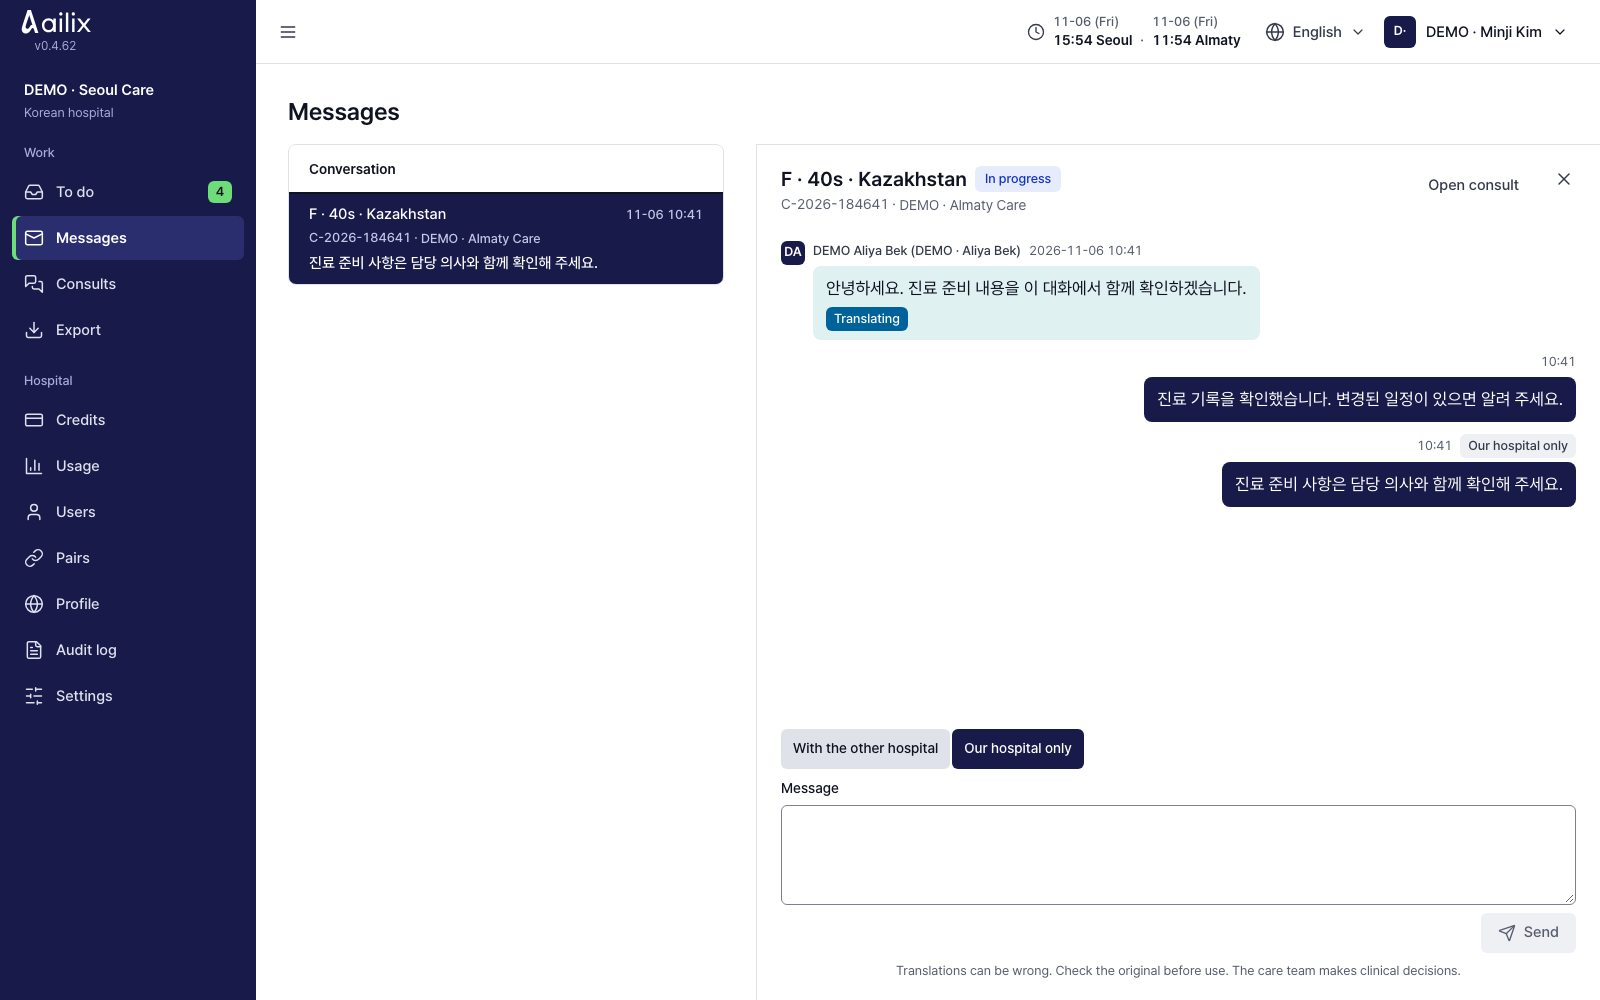
  1. Choose Our hospital only and send your message.
  2. Check that your message has the Our hospital only mark. To send something outside, change the recipients and write a new message.

Check before you finishThis message is not visible to the other hospital or the patient. Check the recipients again before you send.

Patients who sign up on their own

Message the hospital handling your referral

Messages at the top → Choose a hospital

Patients who sign up on their own · Message the hospital handling your referral
View larger
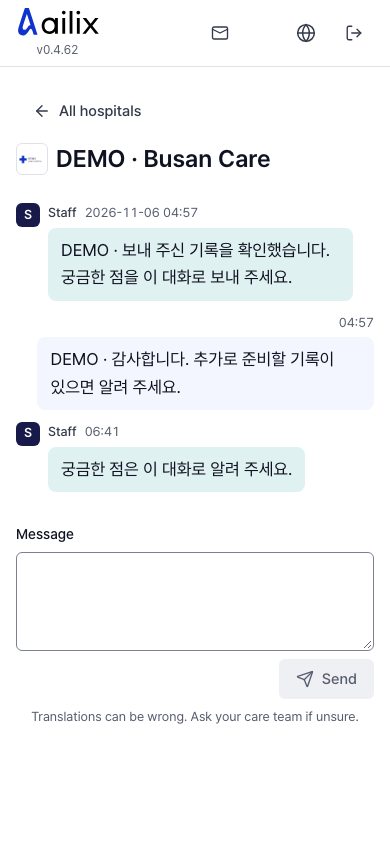
  1. Choose a hospital, write your question and click Send. Check the hospital name and the answer.
  2. Go back to All hospitals and open another conversation. If you also want email, turn on Also get new messages by email.

Check before you finishYou can chat only if you have asked a hospital. The number of unread messages shows at the top.

9. Patients who sign up on their own

Patients who sign up on their own

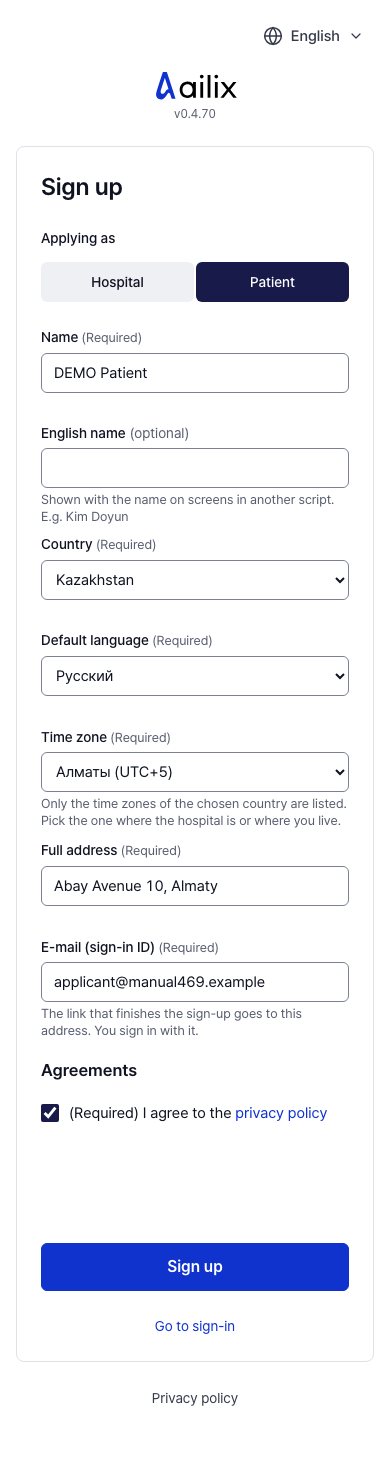
Create a patient account

Home page → Sign up → Patient

Patients who sign up on their own · Create a patient account
View larger
  1. Enter your name, country, address, default language and time zone, and your email. Read the documents, agree, and sign up.
  2. Open the link in the email and click Finish signing up. Sign in with the new temporary password and set up your password and authenticator app.

Check before you finishIf there is no Patient choice, direct sign-up is not open right now. Contact the hospital staff.

Patients who sign up on their own

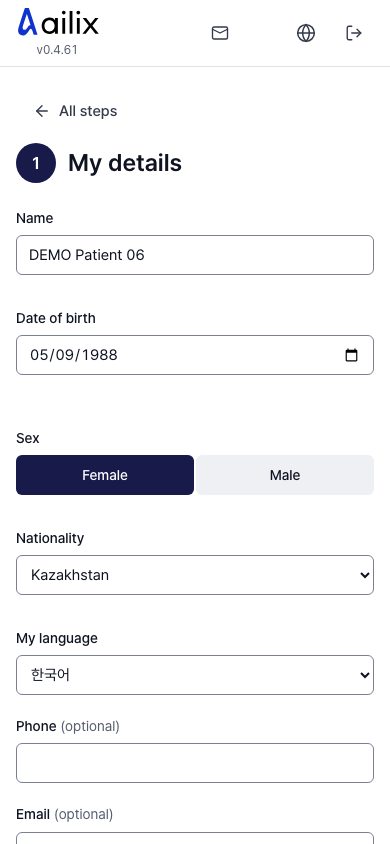
Enter your details

My referral → My details

Patients who sign up on their own · Enter your details
View larger
  1. Check your name, date of birth, sex and nationality, and choose your language. Add a phone number and email as much as you need.
  2. Click Save, then go back to All steps and open your next to do.

Check before you finishYour sign-up information and your details for care are different. Check your name and date of birth carefully.

Patients who sign up on their own

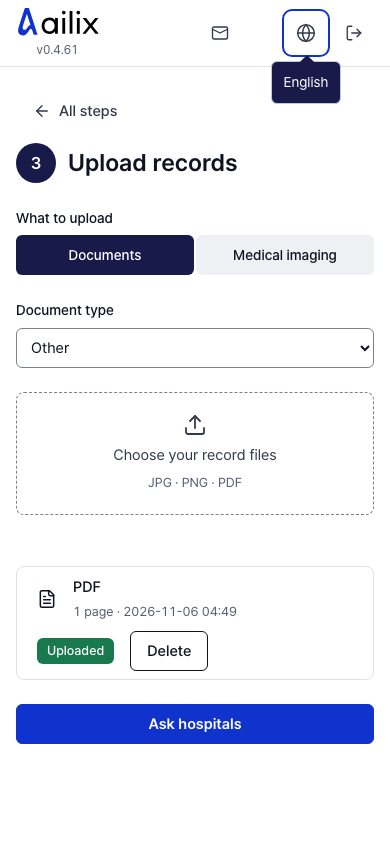
Upload your medical records

My referral → Upload record

Patients who sign up on their own · Upload your medical records
View larger
  1. Choose the document type and upload a PDF, JPG or PNG. For CT, MRI and videos, choose Medical imaging.
  2. Check the type, page count and time of the records you uploaded. You can delete records you have not sent with a referral yet.

Check before you finishDo not upload an ID such as a passport. If it says Checking, wait until processing is done.

Patients who sign up on their own

Find hospitals and send a referral

My referral → Ask hospitals

Patients who sign up on their own · Find hospitals and send a referral
View larger
  1. Find hospitals by department and available language, and choose up to 5.
  2. Write where it hurts, any diagnosis you received and what you want. Check Records sent with it and click Send request.

Check before you finishWait for the answers. Sending a referral does not by itself book a session.

Patients who sign up on their own

Compare the answers and choose one hospital

My referral → Compare answers and choose

Patients who sign up on their own · Compare the answers and choose one hospital
View larger
  1. Read each hospital's test and treatment plan, expected cost and doctor. If a translation seems strange, check Show original and ask the hospital.
  2. Within the deadline, click Choose this hospital and confirm.
  3. If a request comes to pass your case to another hospital, look at the target and the reason, then choose Pass it on or Don't pass it on.

Check before you finishYou cannot undo your choice of hospital. The expected cost can change after care.

Patients who sign up on their own

See the session time and the records that came back

My referral → Results

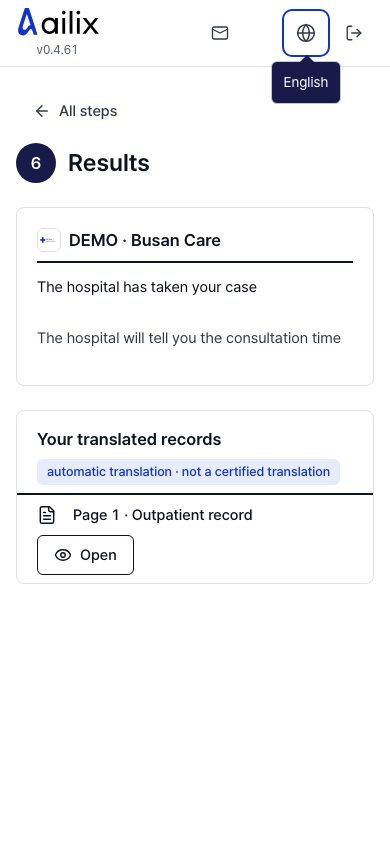
Patients who sign up on their own · See the session time and the records that came back
View larger
  1. See the date and time the hospital set. When it is open, join the session with Join the chat.
  2. Under Your translated records, click Open to see the Korean original and the translation. Ask the doctor about anything you do not know.

Check before you finishIf there is no schedule or translation yet, wait for the hospital's message. Send questions with Messages.

Patients who sign up on their own

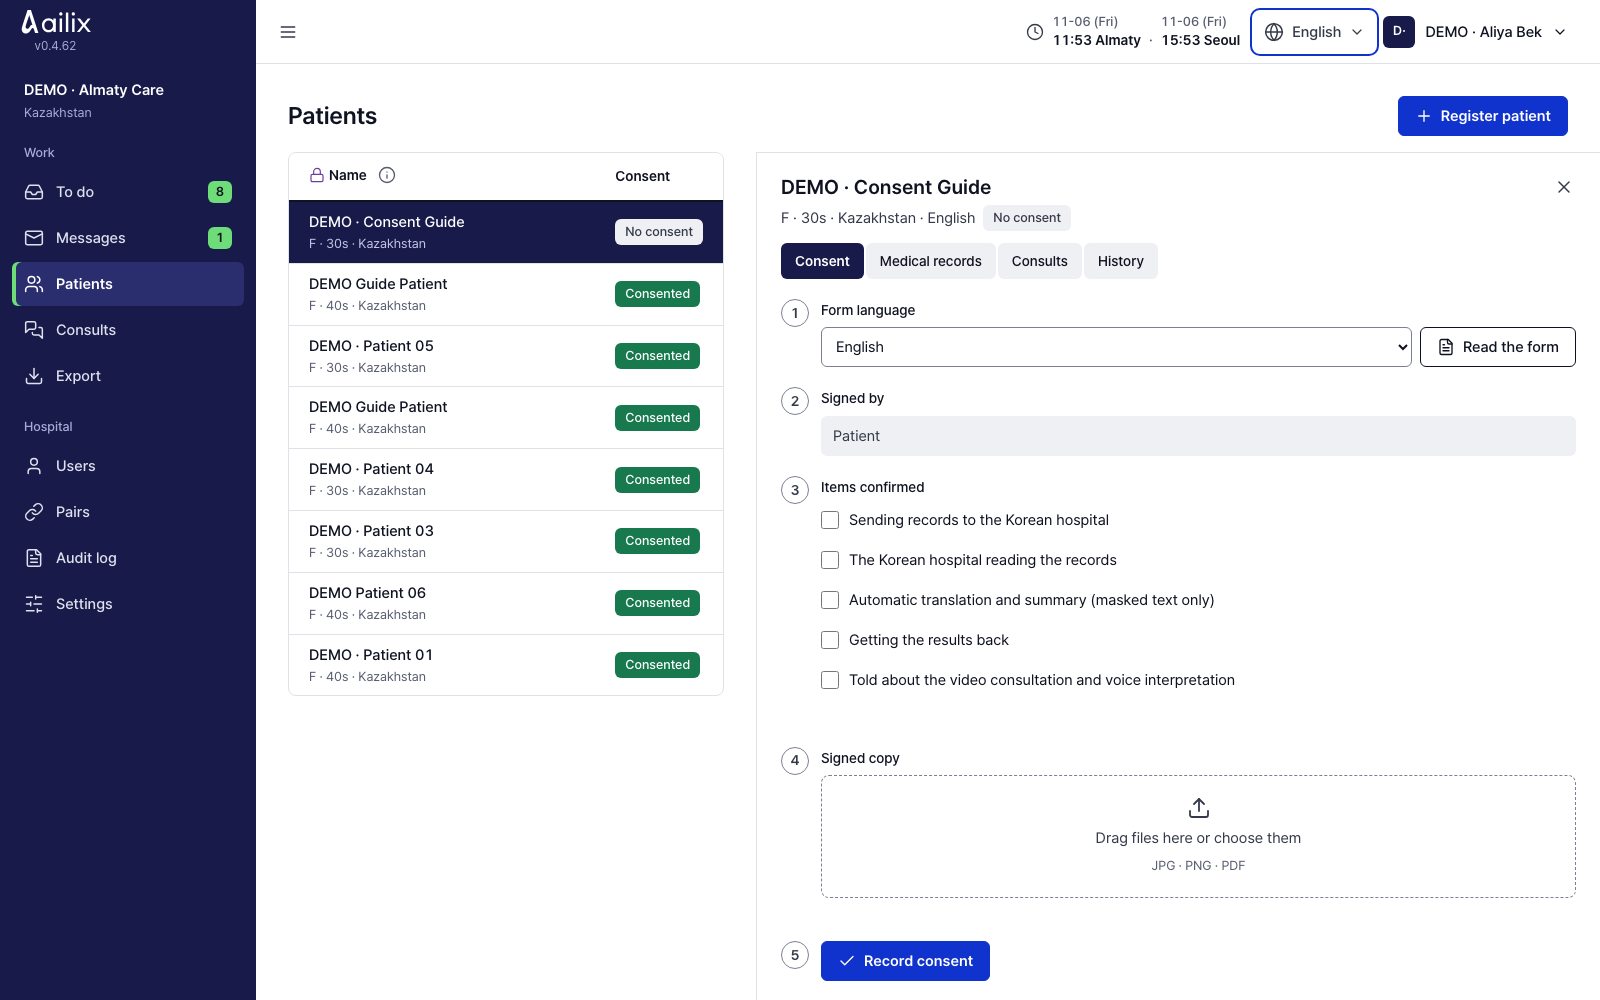
Check before you withdraw a referral or consent

Compare answers and choose, or Consent

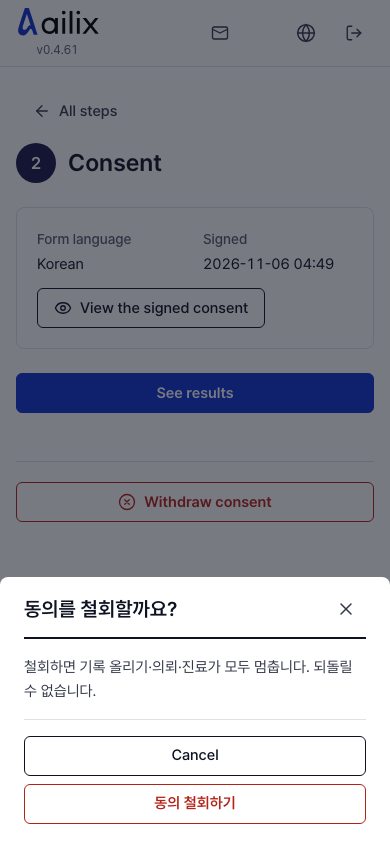
Patients who sign up on their own · Check before you withdraw a referral or consent
View larger
  1. To take back a referral before you choose a hospital, click Withdraw the request. This referral closes for all hospitals.
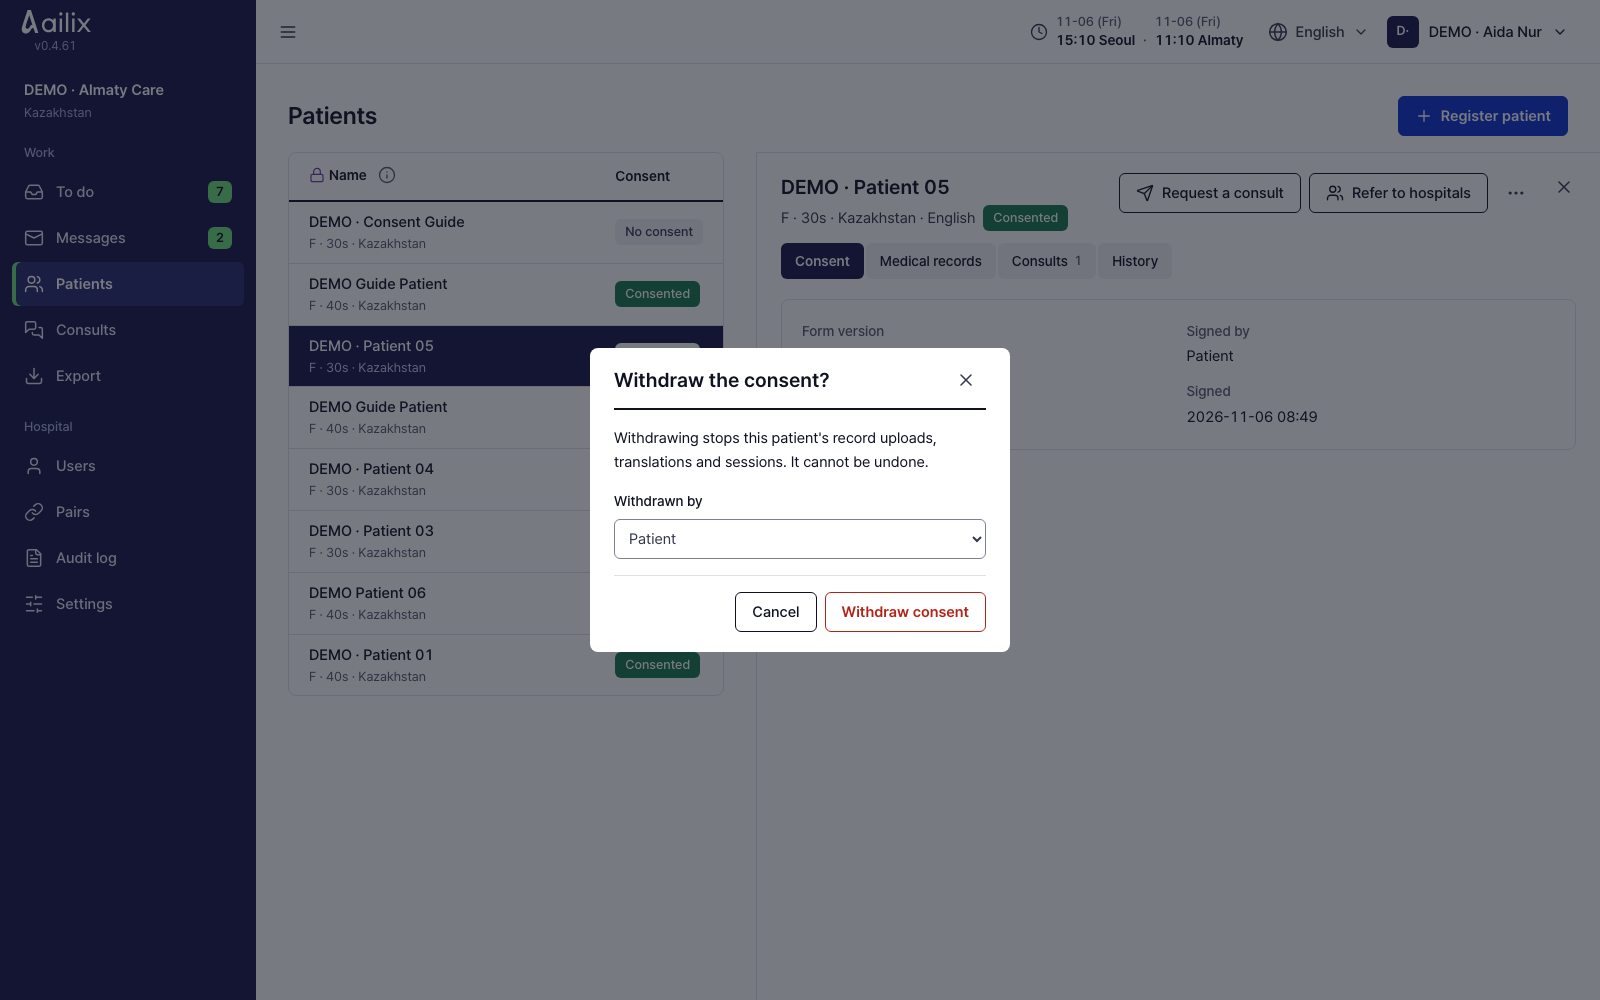
  2. To stop the service from processing your data, click Withdraw consent under Consent. Read the notice and confirm.

Check before you finishYou cannot undo either one. Withdrawing consent stops record uploads, referrals and sessions.

10. Service administrator

Service administrator

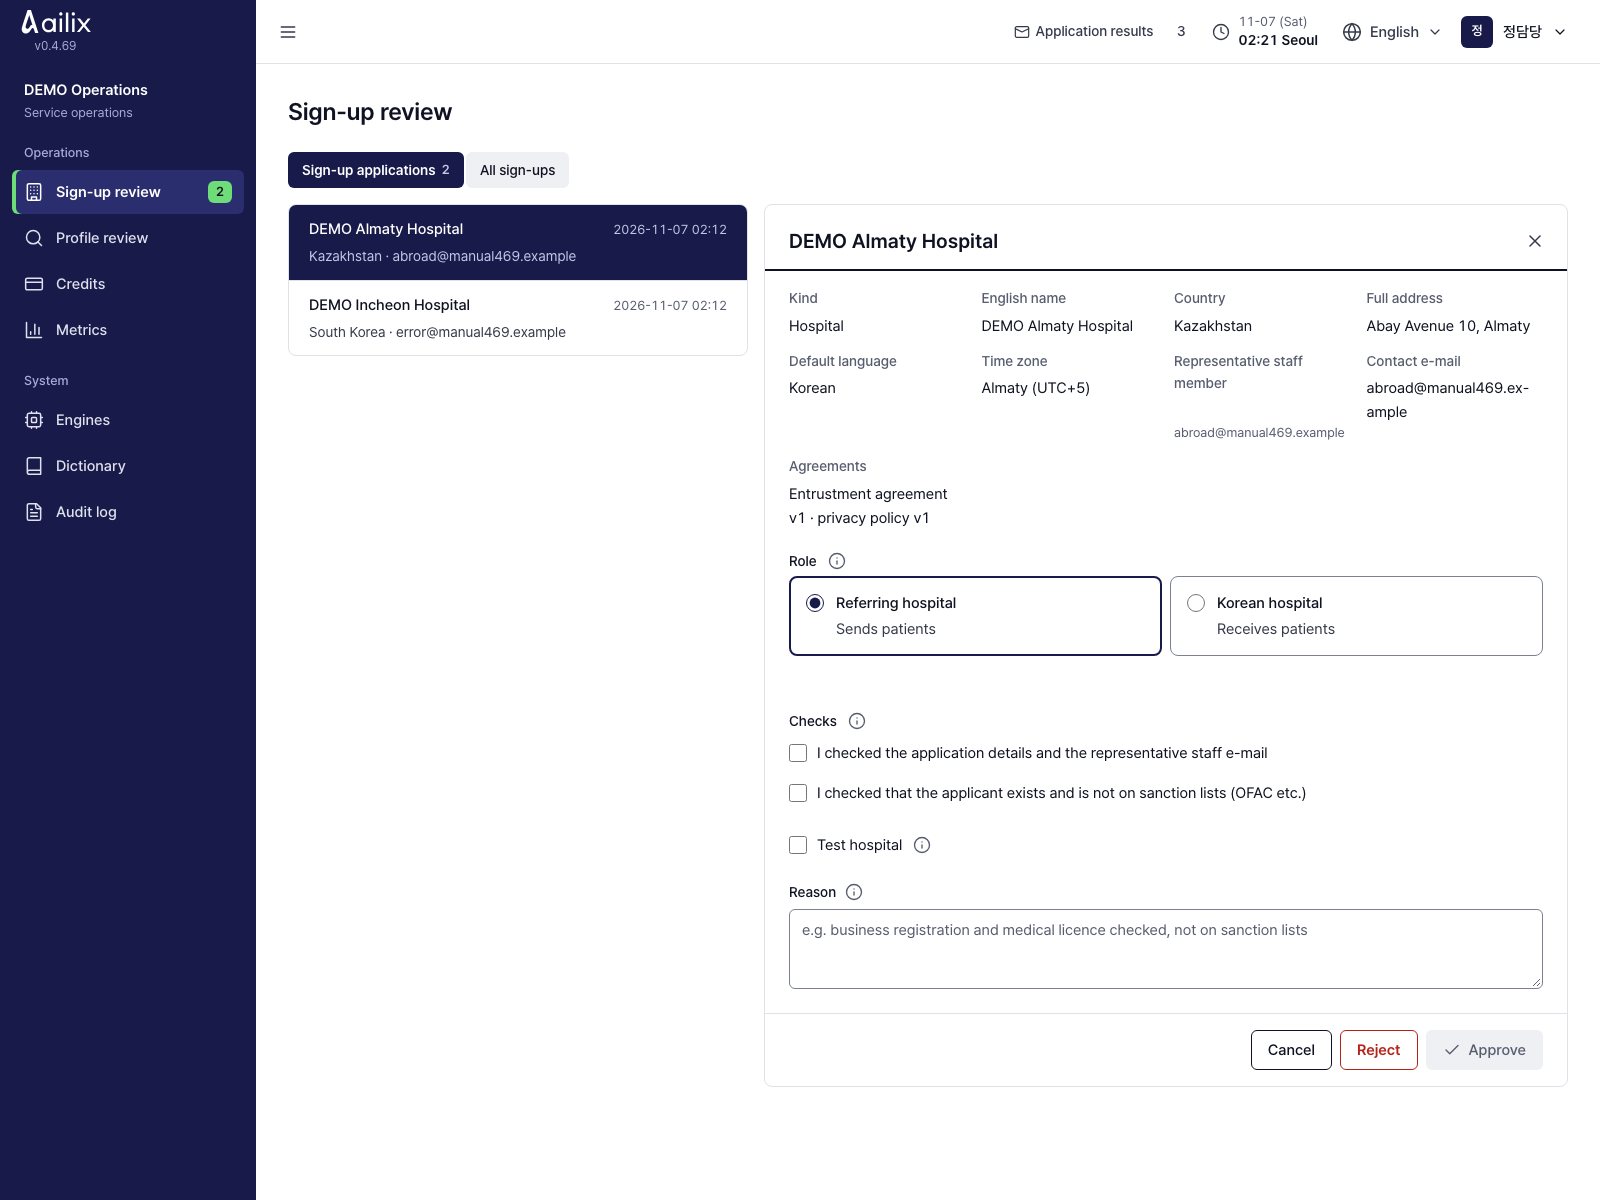
Review a referring hospital’s application

Operations → Sign-up review → Sign-up applications

Service administrator · Review a referring hospital’s application
View larger
  1. Open the referring hospital’s application. Check the hospital details, representative staff email and accepted documents.
  2. Select the referring-hospital side, complete the checks and enter a reason to approve or reject.

Check before you finishApproval sends an invitation email to the representative staff member. Korean hospital evidence is checked automatically. Administrators handle verification errors; normal applications need no manual approval.

Service administrator

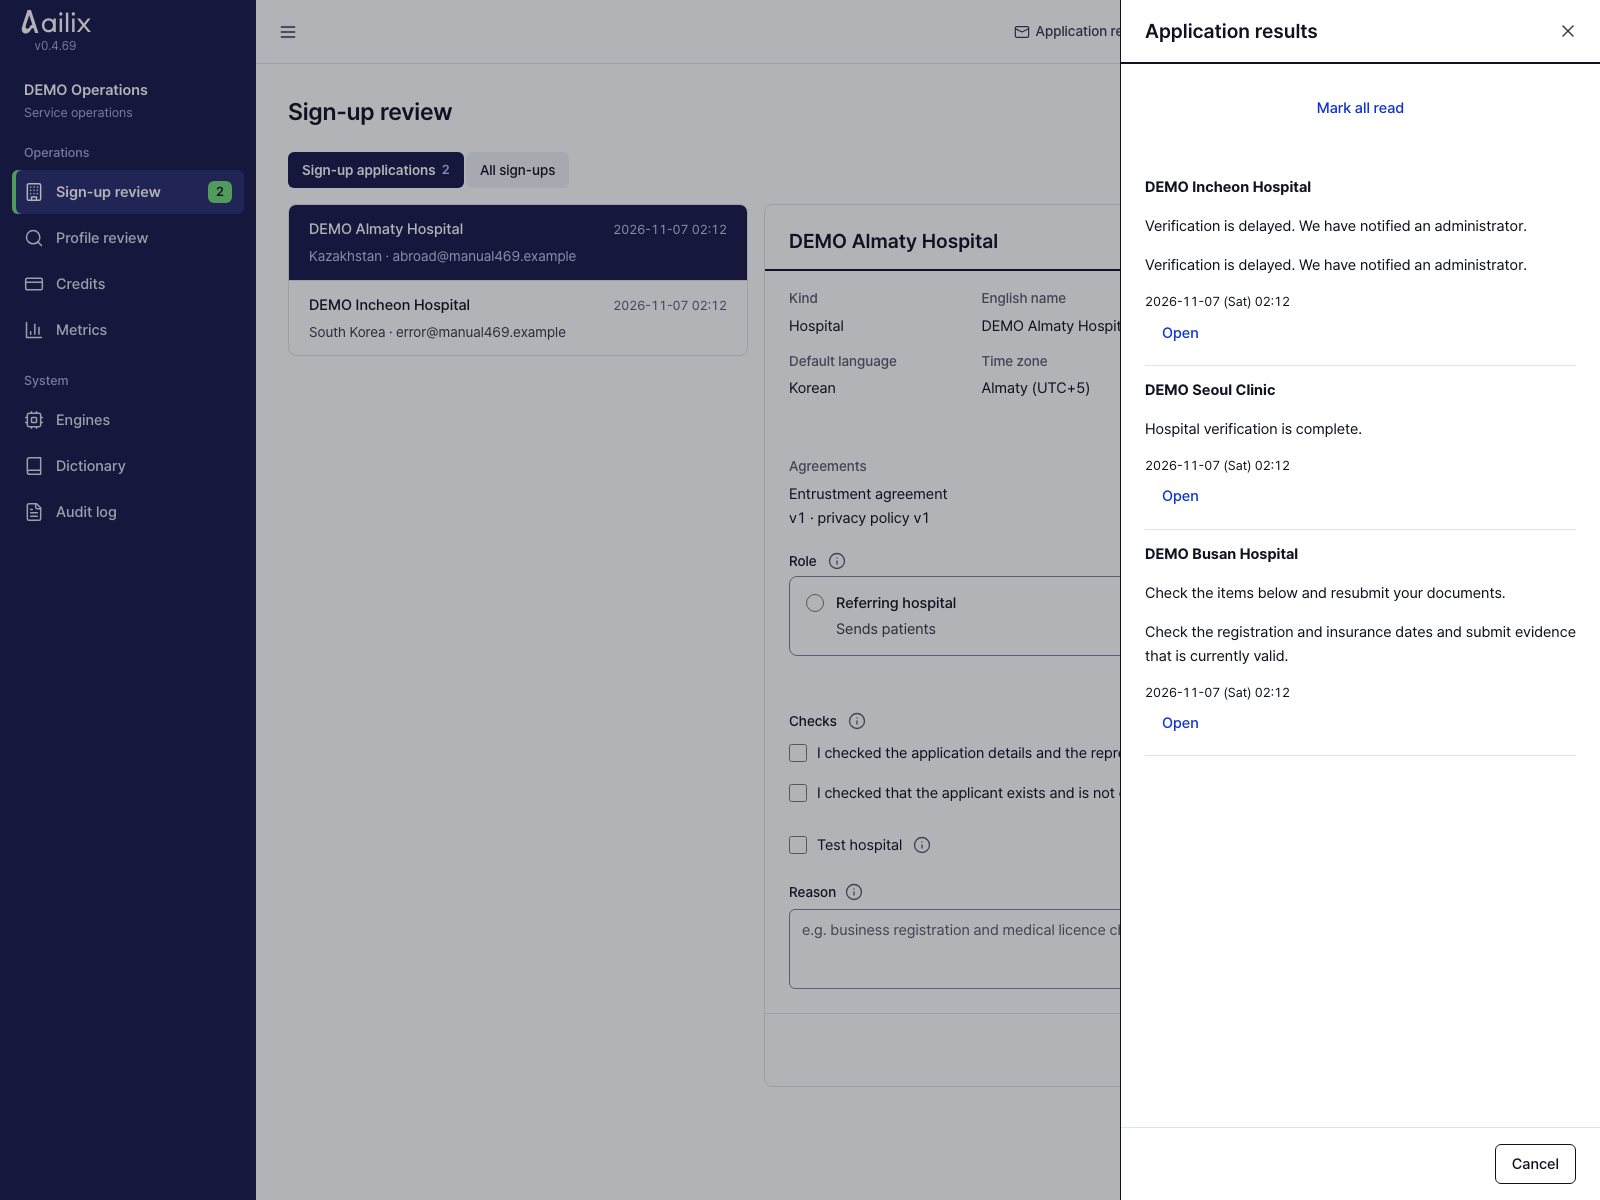
Read application result notifications

Application results → Open

Service administrator · Read application result notifications
View larger
  1. Open “Application results” in the header. New results update the notification count.
  2. Check the hospital, result, reasons and time. Select “Open” to view the hospital.
  3. Use “Mark all read” to clear unread indicators. Approval and rejection results also arrive by administrator email.

Check before you finishCorrections, verification errors and later intake restrictions or restoration have distinct notices. Reading a notice does not change the decision.

Service administrator

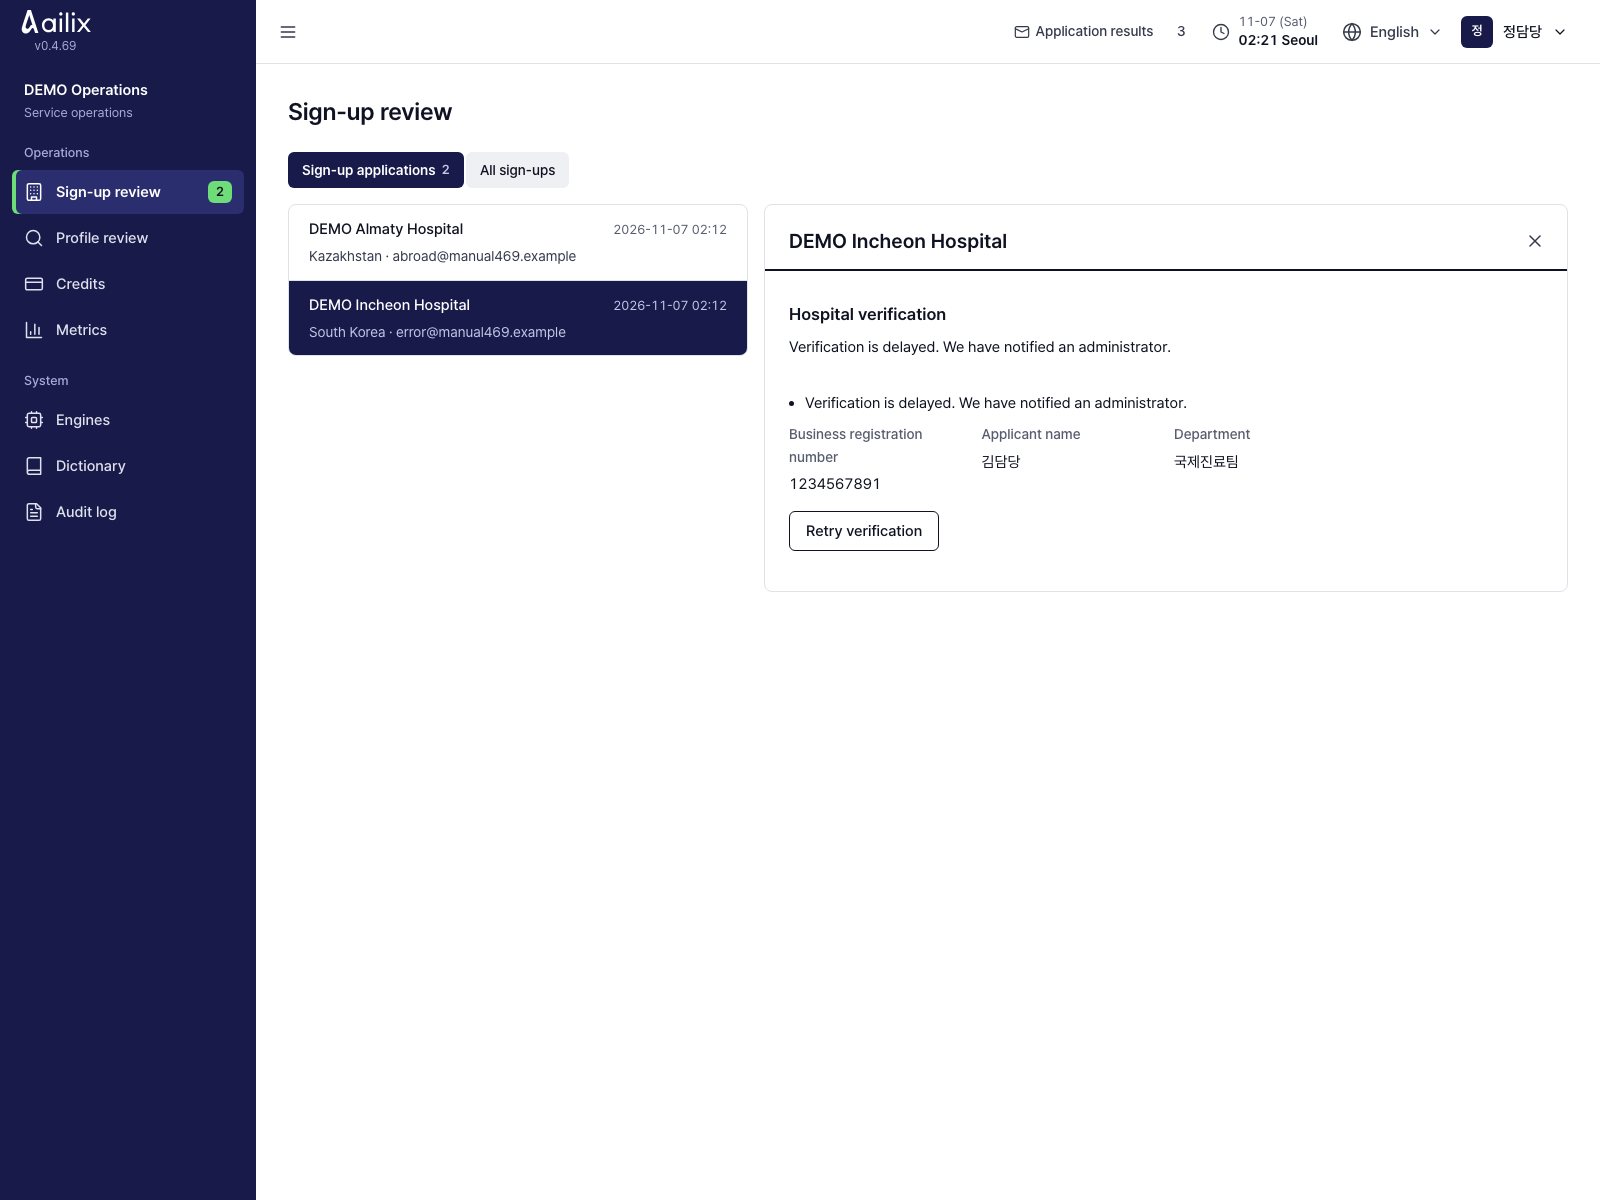
Resolve an automatic verification error

Operations → Sign-up review → Sign-up applications → Retry verification

Service administrator · Resolve an automatic verification error
View larger
  1. Open the Korean hospital with a verification error in the application-review list.
  2. Check the error, dates and attachments. The applicant corrects documents on their own status page.
  3. Once the verification problem is resolved, select “Retry verification”. Read the new result in application notifications.

Check before you finishNormal verification and outage retries run automatically. Staff handle recurring errors. Retrying runs the eligibility checks again; it does not bypass them with manual approval.

Service administrator

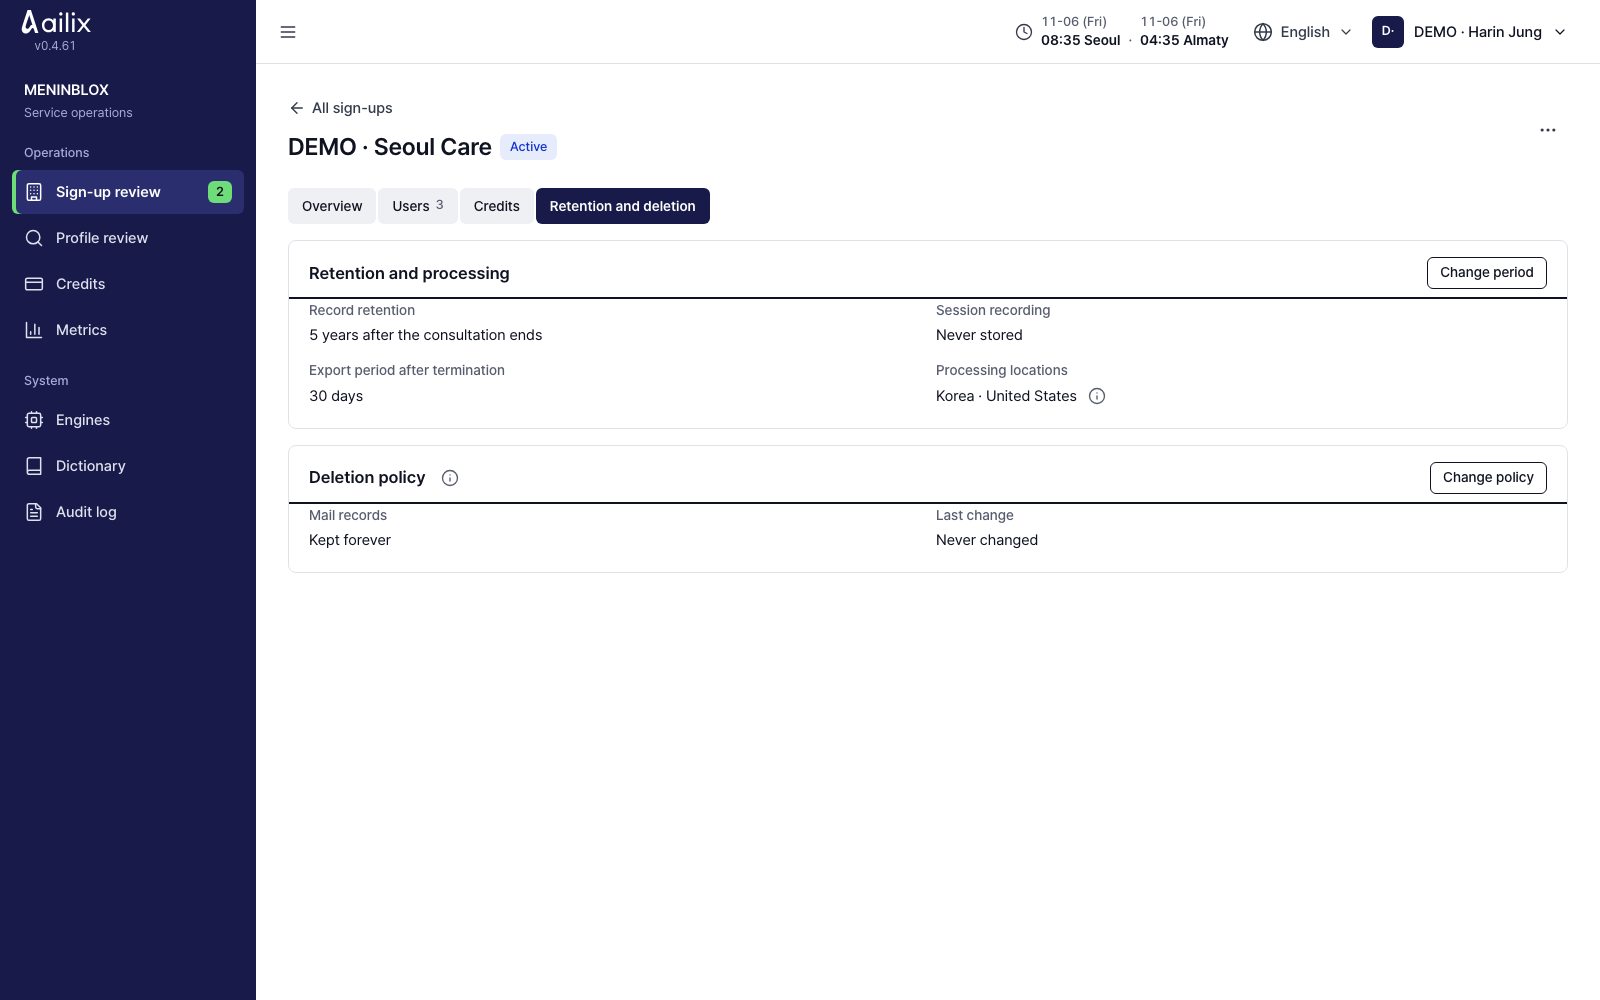
Check hospital information and retention policy

Sign-up review → All sign-ups → Hospital

Service administrator · Check hospital information and retention policy
View larger
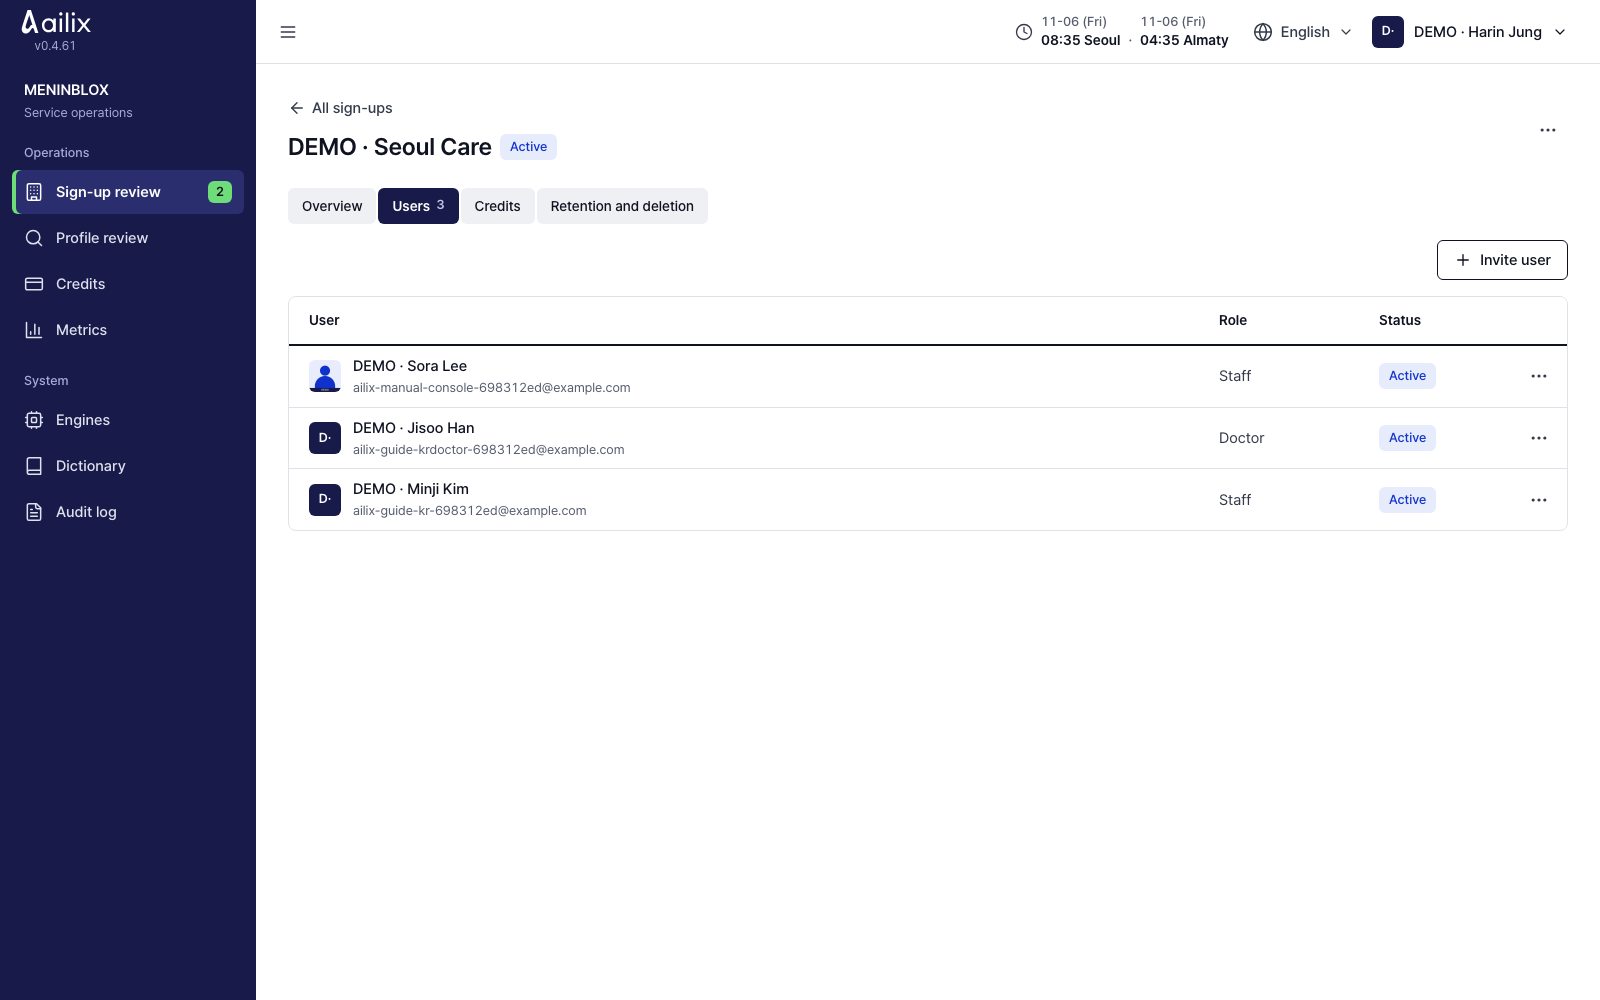
  1. Check the name, country, pairs, users and status. Under Retention and deletion, see the record retention period.
  2. To match a written request, leave the number of years and the reason under Change period. Set email retention under Change policy in Deletion policy.
  3. Remove an inappropriate logo with ⋯ at the top → Remove logo.

Check before you finishThe retention period and the email deletion policy are different settings. Check the basis for each hospital's request.

Service administrator

Help with hospital account problems

Sign-up review → All sign-ups → Hospital → Users

Service administrator · Help with hospital account problems
View larger
  1. Check the hospital and the user. Use Invite user, or Send invitation again and Cancel invitation in ⋯.
  2. For a user who lost their authenticator app, leave a reason and reset it. Disable users who left, and enable them again if they come back.
  3. Remove an inappropriate photo with Remove photo.

Check before you finishBefore you cut off the last administrator, get a new contact ready. Do not reset an authenticator app without confirming who the person is.

Service administrator

Review international care profiles

Operations → Profile review

Service administrator · Review international care profiles
View larger
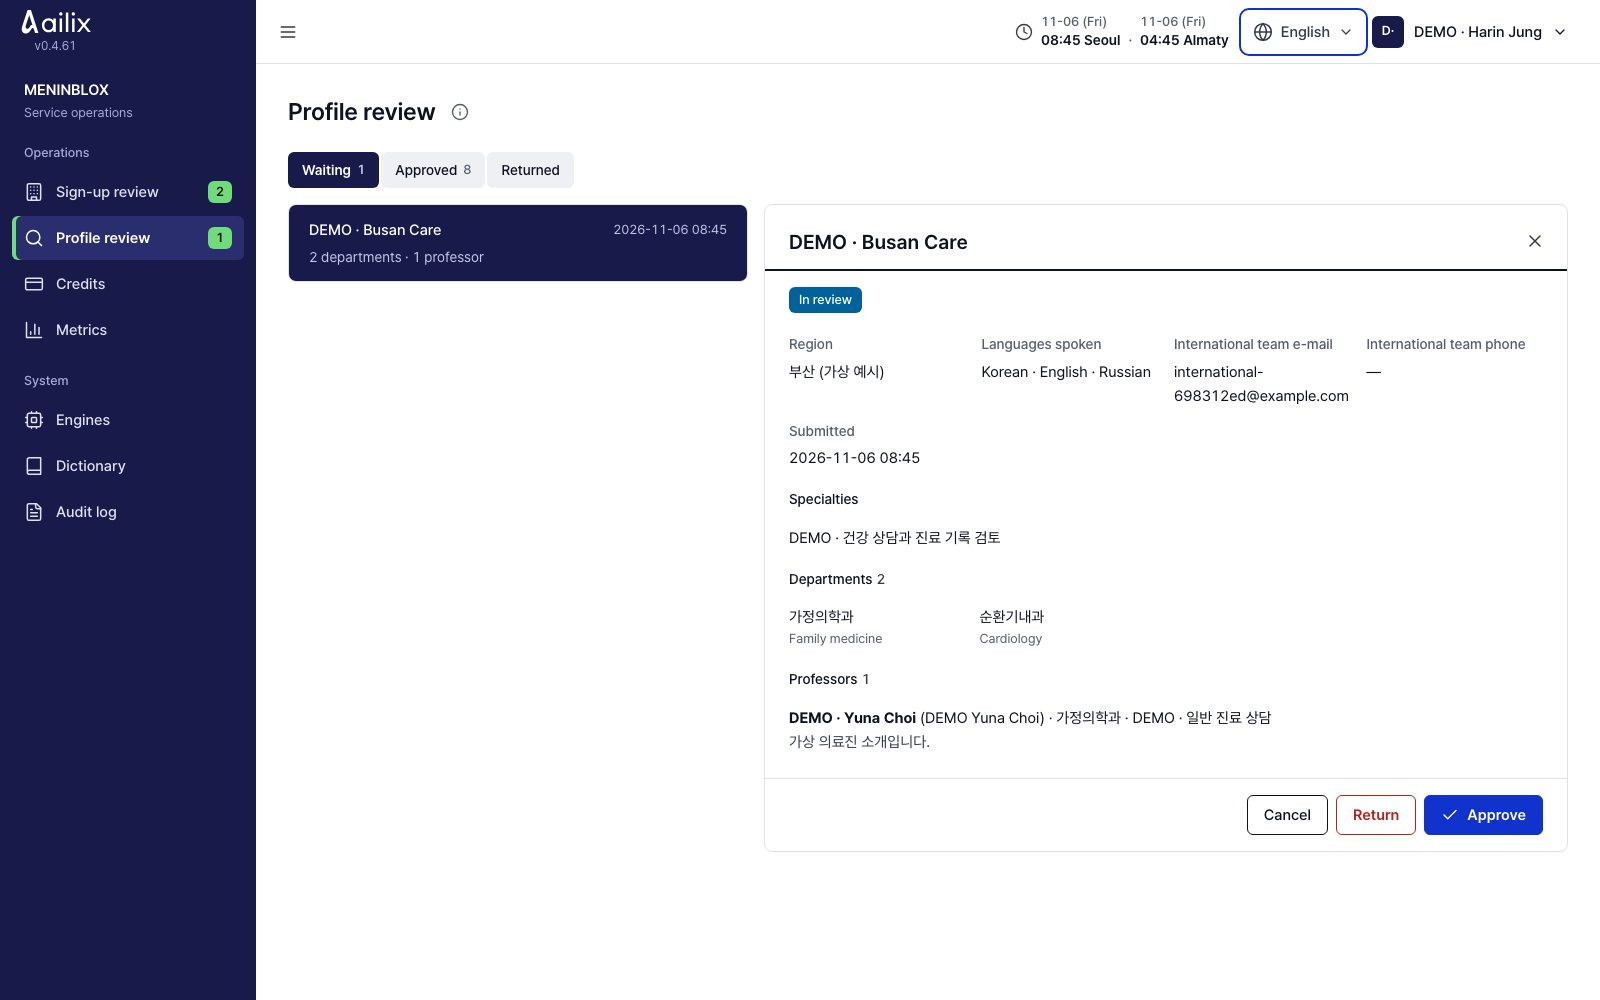
  1. Under Waiting, open the hospital and look at the contact, languages, departments, professor introductions and what changed.
  2. If it is right, click Approve. If it needs fixing, click Return with a reason. To stop showing a profile, use Remove from the list.

Check before you finishAn approved profile shows in the hospital finder. If the hospital finder itself is closed, an approval does not make it visible.

Service administrator

Confirm the payment and top up credits

Operations → Credits → Hospital → Adjust balance

Service administrator · Confirm the payment and top up credits
View larger
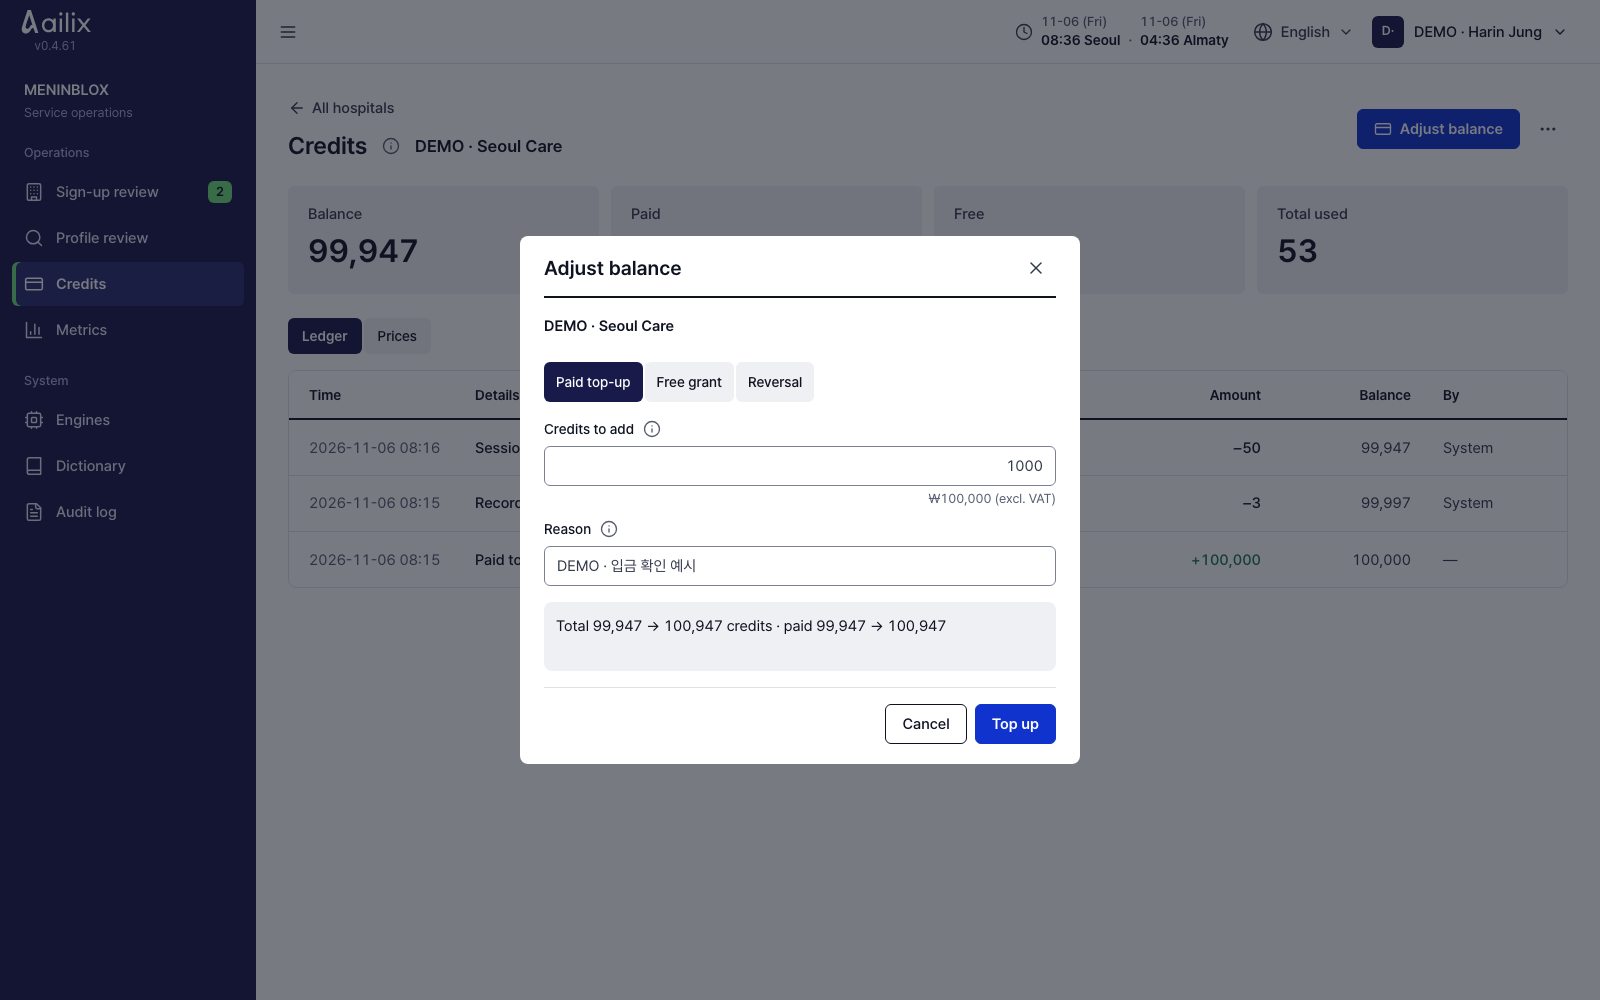
  1. Check the hospital name and choose Paid top-up. After you confirm the payment, enter the credits to add and the reason.
  2. Read the balance before and after the adjustment and click Top up. For support credits, choose Free grant in the same window.
  3. For a charge deducted by mistake, use Reversal to choose the deduction line, the amount and the reason, and reverse it.

Check before you finishCheck that the ledger shows the new line and the right balance. The balance must also be right when you go back to the hospital list.

Service administrator

Set a start and end date and add a price

Credits → Default Prices or Hospital → Prices

Service administrator · Set a start and end date and add a price
View larger
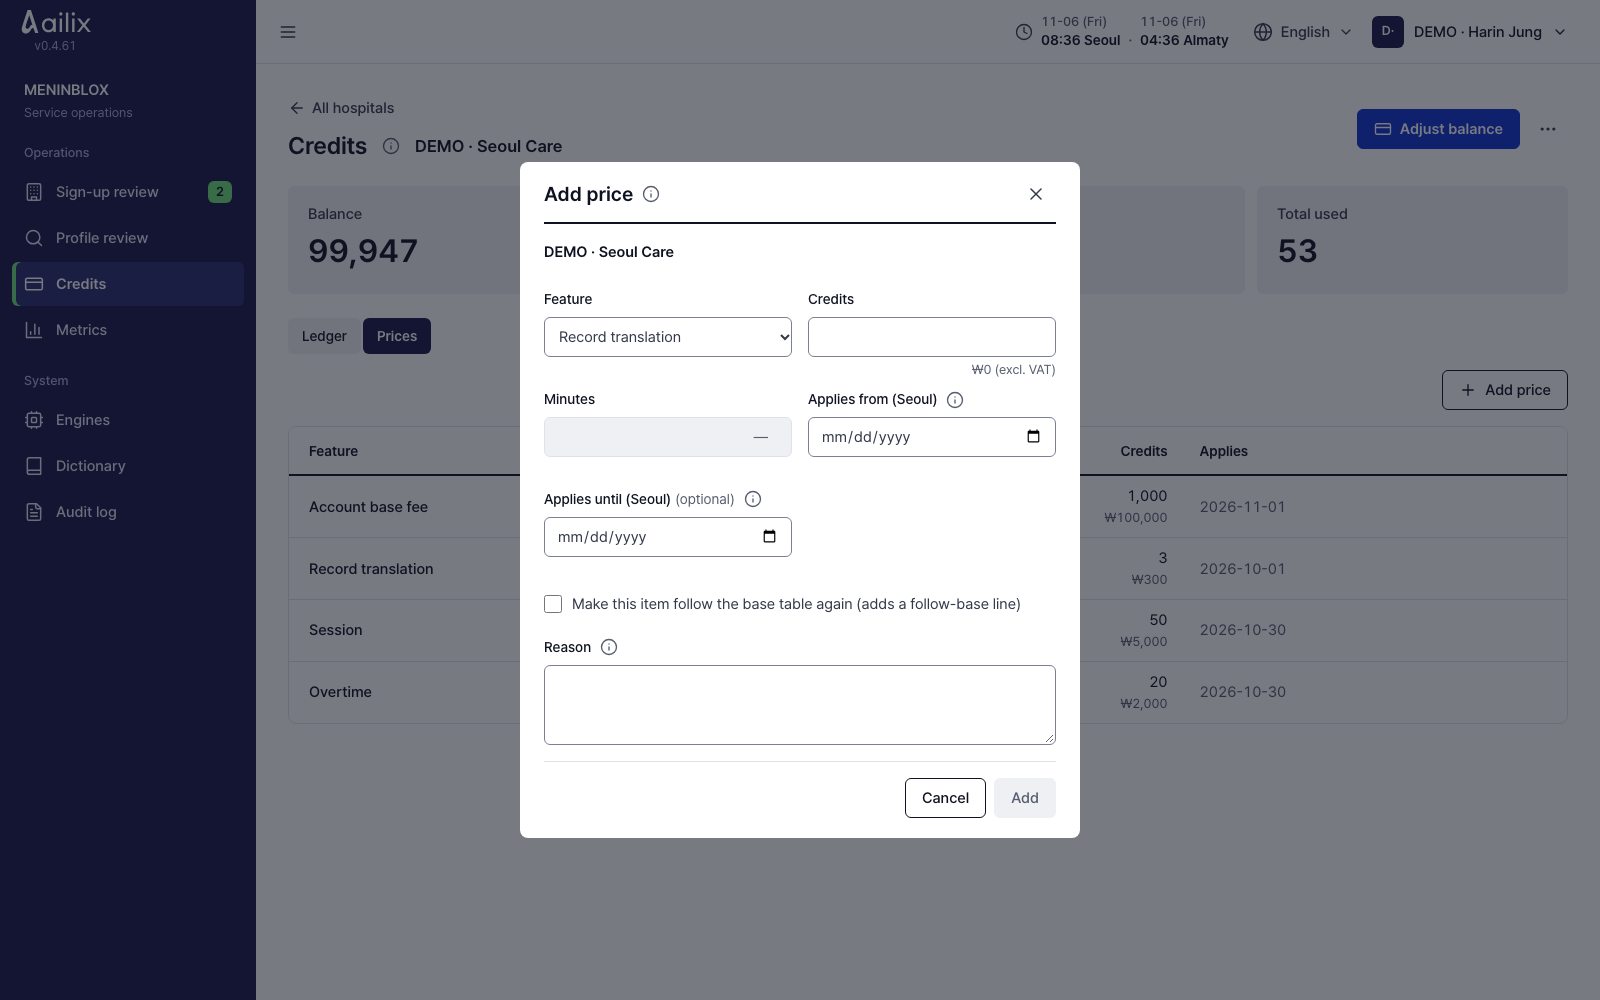
  1. Check whether it is the default price for all hospitals or a price for one hospital, then click Add price.
  2. Enter the item, credits, time, the date it starts, and the end date and reason if needed, then click Add.
  3. The base account fee uses the price on day 1 of that month. For a price added in the middle of a month, check whether it applies next month.

Check before you finishA price changes from the start date of the line you added. When a hospital's own price ends, the default price applies.

Service administrator

Set the low balance alert and unlimited

Credits → Hospital → ⋯

Service administrator · Set the low balance alert and unlimited
View larger
  1. Under Change, set the number of credits at which a low balance alert goes out.
  2. If a trial or contract needs it, use Turn unlimited on. When it ends, use Turn unlimited off to bring back balance checks.

Check before you finishBilling records are still kept under unlimited. For hospitals that are ending or finished, you can only view the balance.

Service administrator

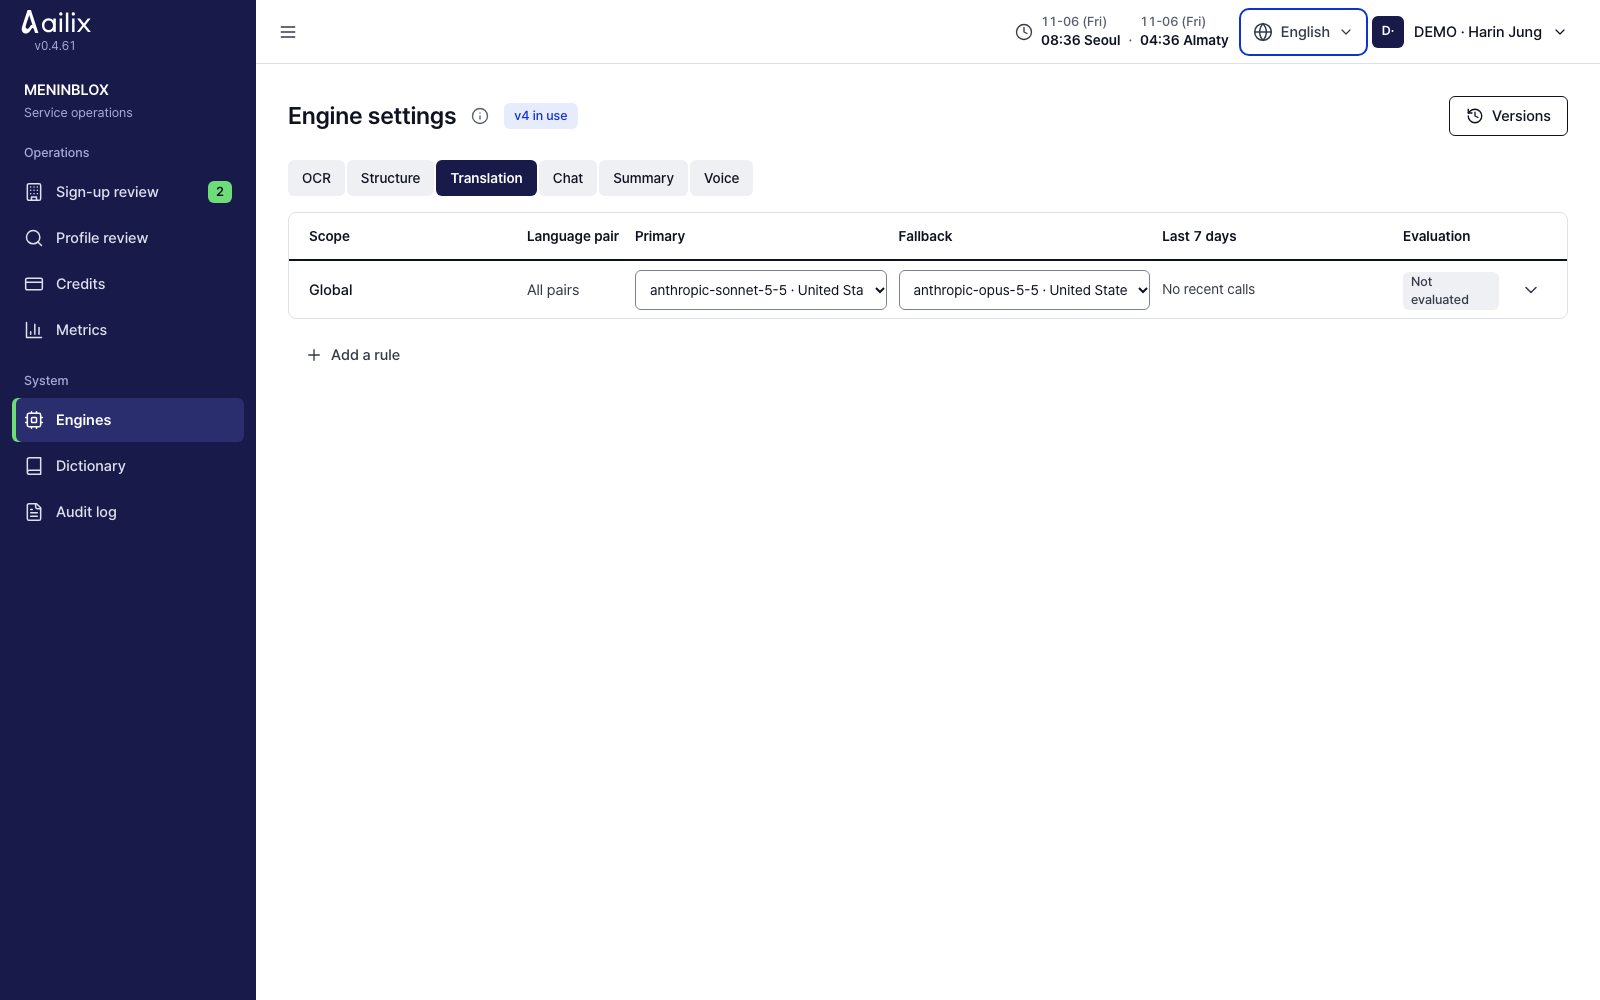
Change processing engines and their scope

System → Engine

Service administrator · Change processing engines and their scope
View larger
  1. Choose a feature such as translation, chat or voice. Check the hospital and language pair scope, the default and backup engines, the processing location and consent.
  2. Check the change and click Save as a new version. If someone changed it at the same time, load the latest version again.
  3. If a problem comes up, use Roll back to this in Versions.

Check before you finishBoth saving and rolling back make a new version. Also check the actual call records of the feature that changed.

Service administrator

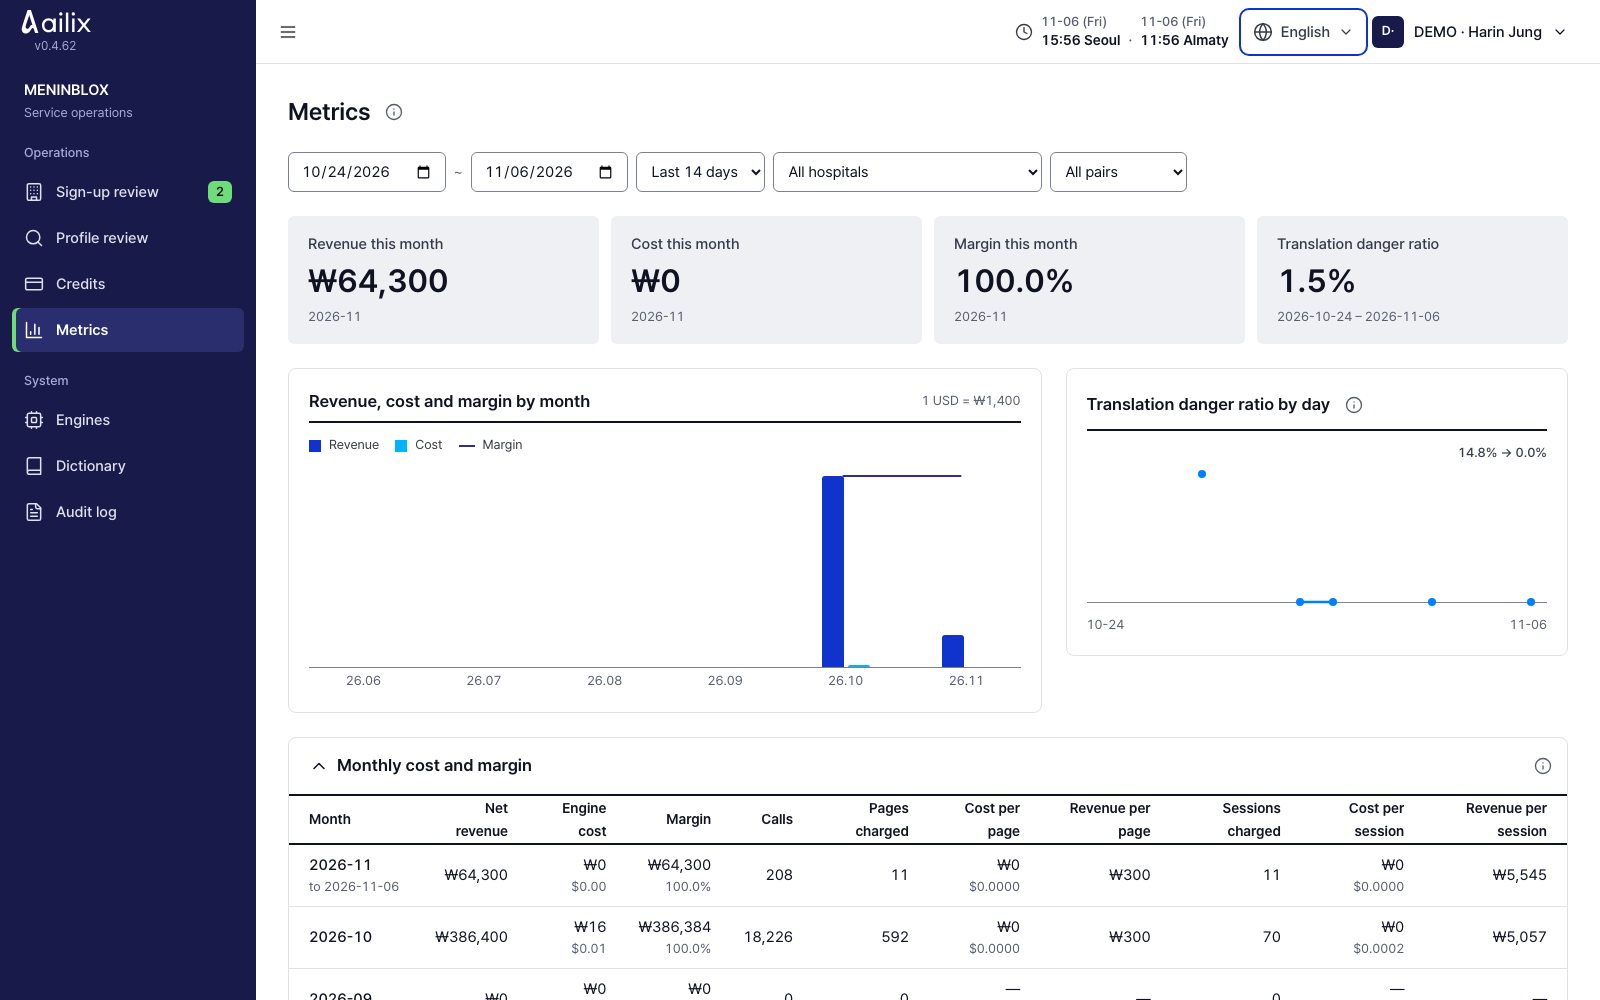
Look at revenue, cost and risk rates

Operations → Metrics

Service administrator · Look at revenue, cost and risk rates
View larger
  1. Choose the period, hospital and language pair. Look at monthly revenue, cost, margin and the translation risk rate.
  2. Expand the table to compare the ledger with the numbers. For more detail on engines and translation, go to Audit log.

Check before you finishThe revenue, cost and margin at the top are this month's values, whatever period you choose.

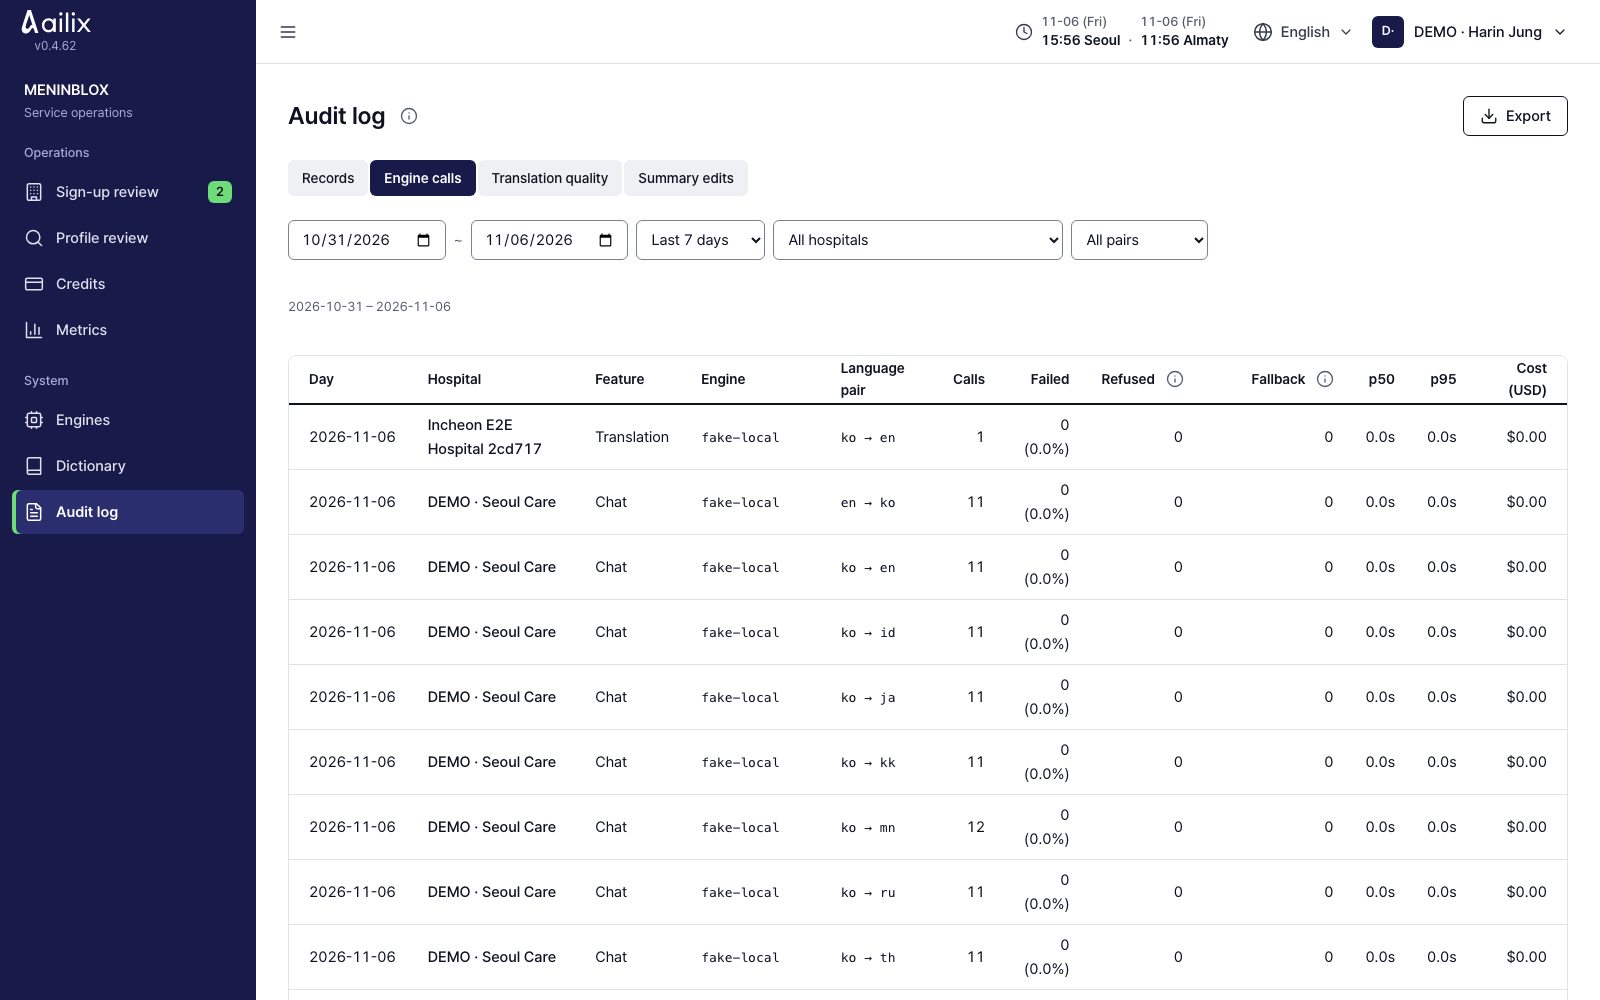
Service administrator

Find errors and changes in the records

System → Audit log

Service administrator · Find errors and changes in the records
View larger
  1. Choose the period and hospital, and see who did what under Lines. Open a row to check the request number and the result.
  2. Use the Engine calls, Translation quality and summary edits tabs to see each feature. Narrow the range by language pair.
  3. Export only the range you need to CSV. Compare the real records on the screen with the time the setting changed.

Check before you finishTranslation quality numbers do not replace a doctor's clinical judgment or a native speaker's review.

Service administrator

Test and approve term changes

System → Dictionary

Service administrator · Test and approve term changes
View larger
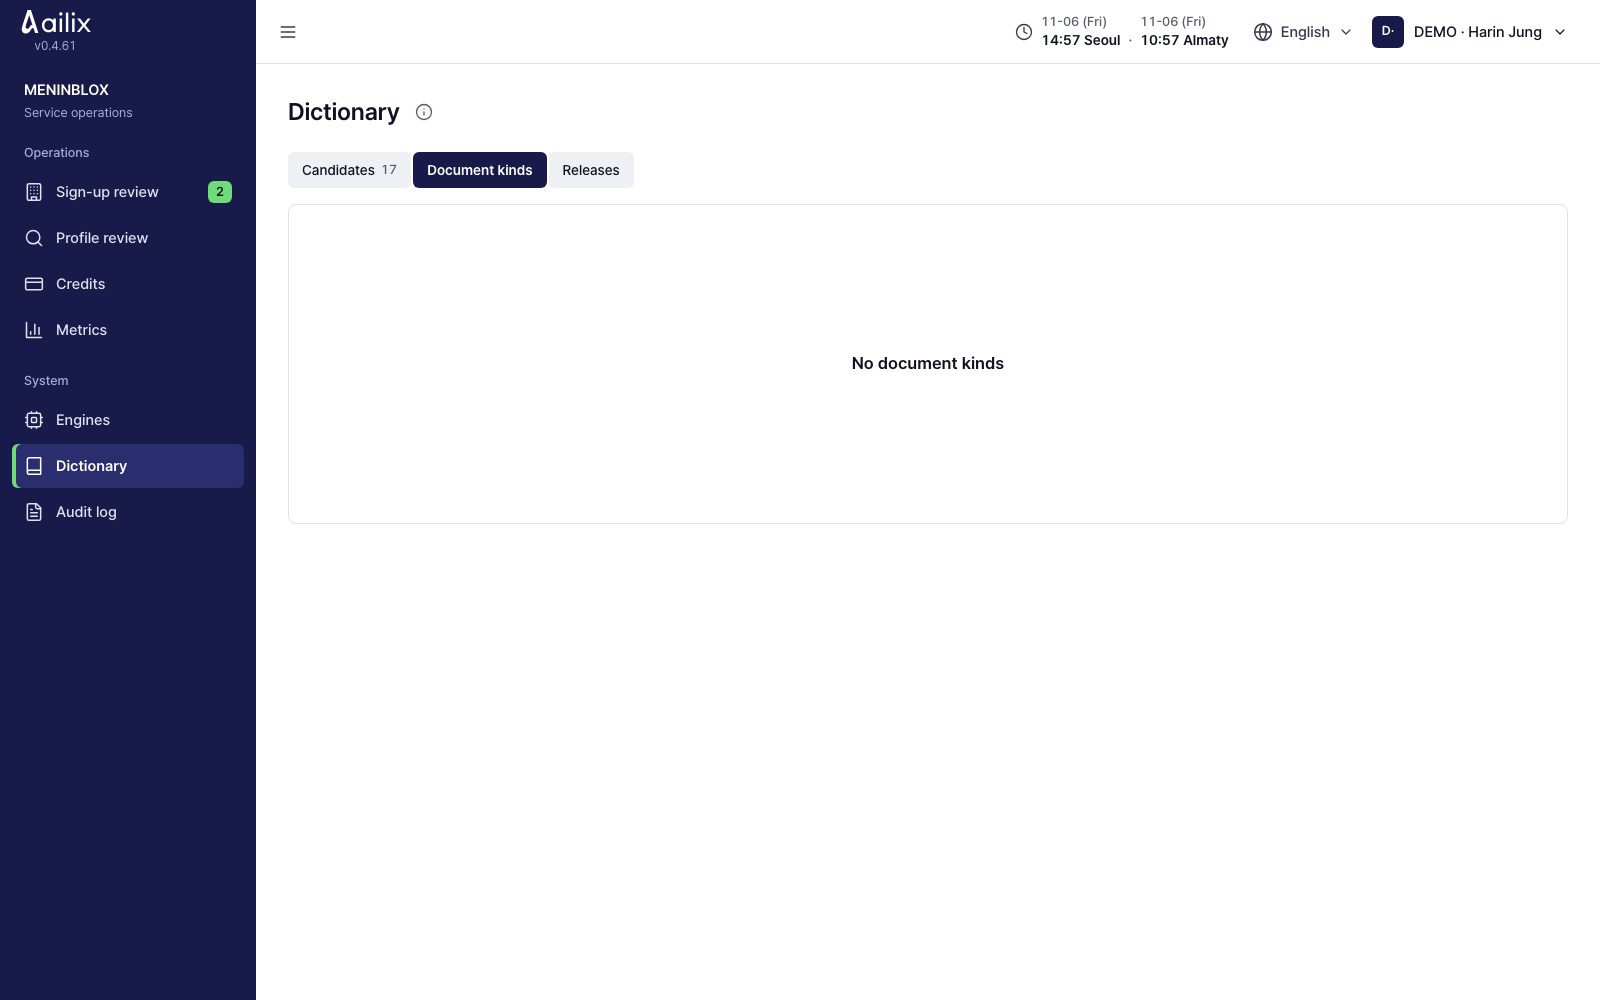
  1. Under Candidates, compare the original, the engine translation and the doctor's edit. Decide the concept, the language and the name to add or fix.
  2. Run Run the test. Turn on only changes that pass with Approve · new release, and click Reject for candidates that do not fit.
  3. Fix names and synonyms in Document kinds. If a problem comes up, go back to an earlier version under Releases.

Check before you finishText a doctor fixed does not go straight into the dictionary. It goes through a test and a person's approval.

Service administrator

Carry out termination and data cleanup

Sign-up review → All sign-ups → Hospital → ⋯

Service administrator · Carry out termination and data cleanup
View larger
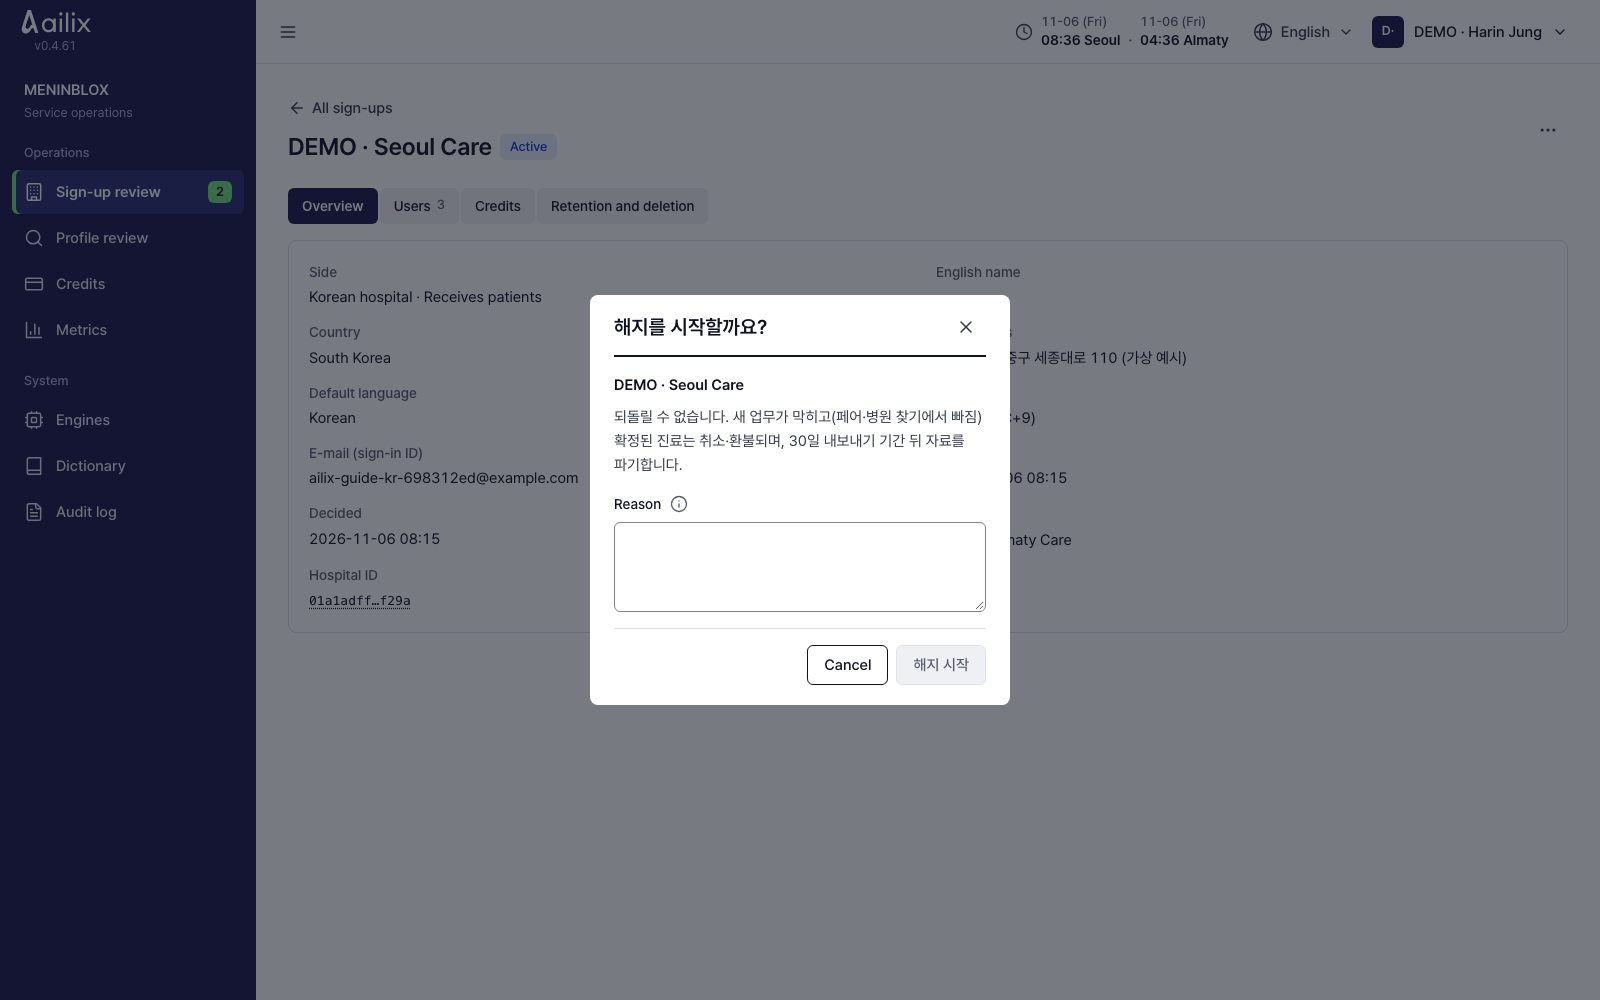
  1. Check the hospital's request and that the export is ready, then click Start termination and leave a reason.
  2. Under Termination, check session cancellations and refunds, the export deadline and each service's destruction report.
  3. Use Destroy now only when the hospital has made a written request for early destruction. Enter the hospital name and the basis for the request.
Check before you finishTermination cannot be undone. The hospital must get its data with Export within 30 days.

When you are stuck

I cannot find a menu or button

Check your role, your hospital and the step you are on. Administrators, staff, doctors and patients each see different screens.
My photo or logo will not save

Choose a JPEG, PNG or WebP file smaller than 20 MB. If only the preview changed, click Save.

I cannot send a message

Check that it is the right consult. You cannot send more to a conversation that closed because the referral was withdrawn, another hospital was chosen, or it was passed on.
I do not have enough credits

A Korean hospital administrator should check the balance and ask the service administrator for a top-up. See the cost on the request screen.
The patient link was already used

Open it again in the browser you first used. To switch devices, ask the hospital for a new link.

My camera or microphone does not work

Allow them in your browser's site settings and click Reconnect. Also check your devices and your phone volume.

I cannot start the session

Check that you are the Korean doctor in charge, that it is a time when the session can start, and that the needed doctor is in the room.

The interpretation seems wrong

Check with Show original, then say it again in short words or write it. If something remains under What we heard, read it and send it.

I cannot see the data in the hospital system

Check that you finished the copy, PDF or image download. For automatic integration, ask your hospital IT staff about the receipt status.

Why is a new referral or acceptance blocked?

Korean hospital staff should check registration, insurance and verification status, then renew evidence as needed. Referring hospitals and patients can check the reason and choose a hospital accepting referrals. Ongoing consultations remain available.

If it is still not fixed, tell your hospital contact the error message and the request number. Patients who signed up on their own can use the ailix contact (dev@meninblox.com). Do not post records or links on a public board.

When you demo the work

  1. Show administrators the patient and record preparation first, doctors the translation review first, and patients how they sign up first.
  2. For translation and video sessions, play the video, then go back to that screen's guide and follow along yourself.
  3. At the end, check messages, settings and signing out.